Free crochet cat pattern: ginger tabby amigurumi kitty
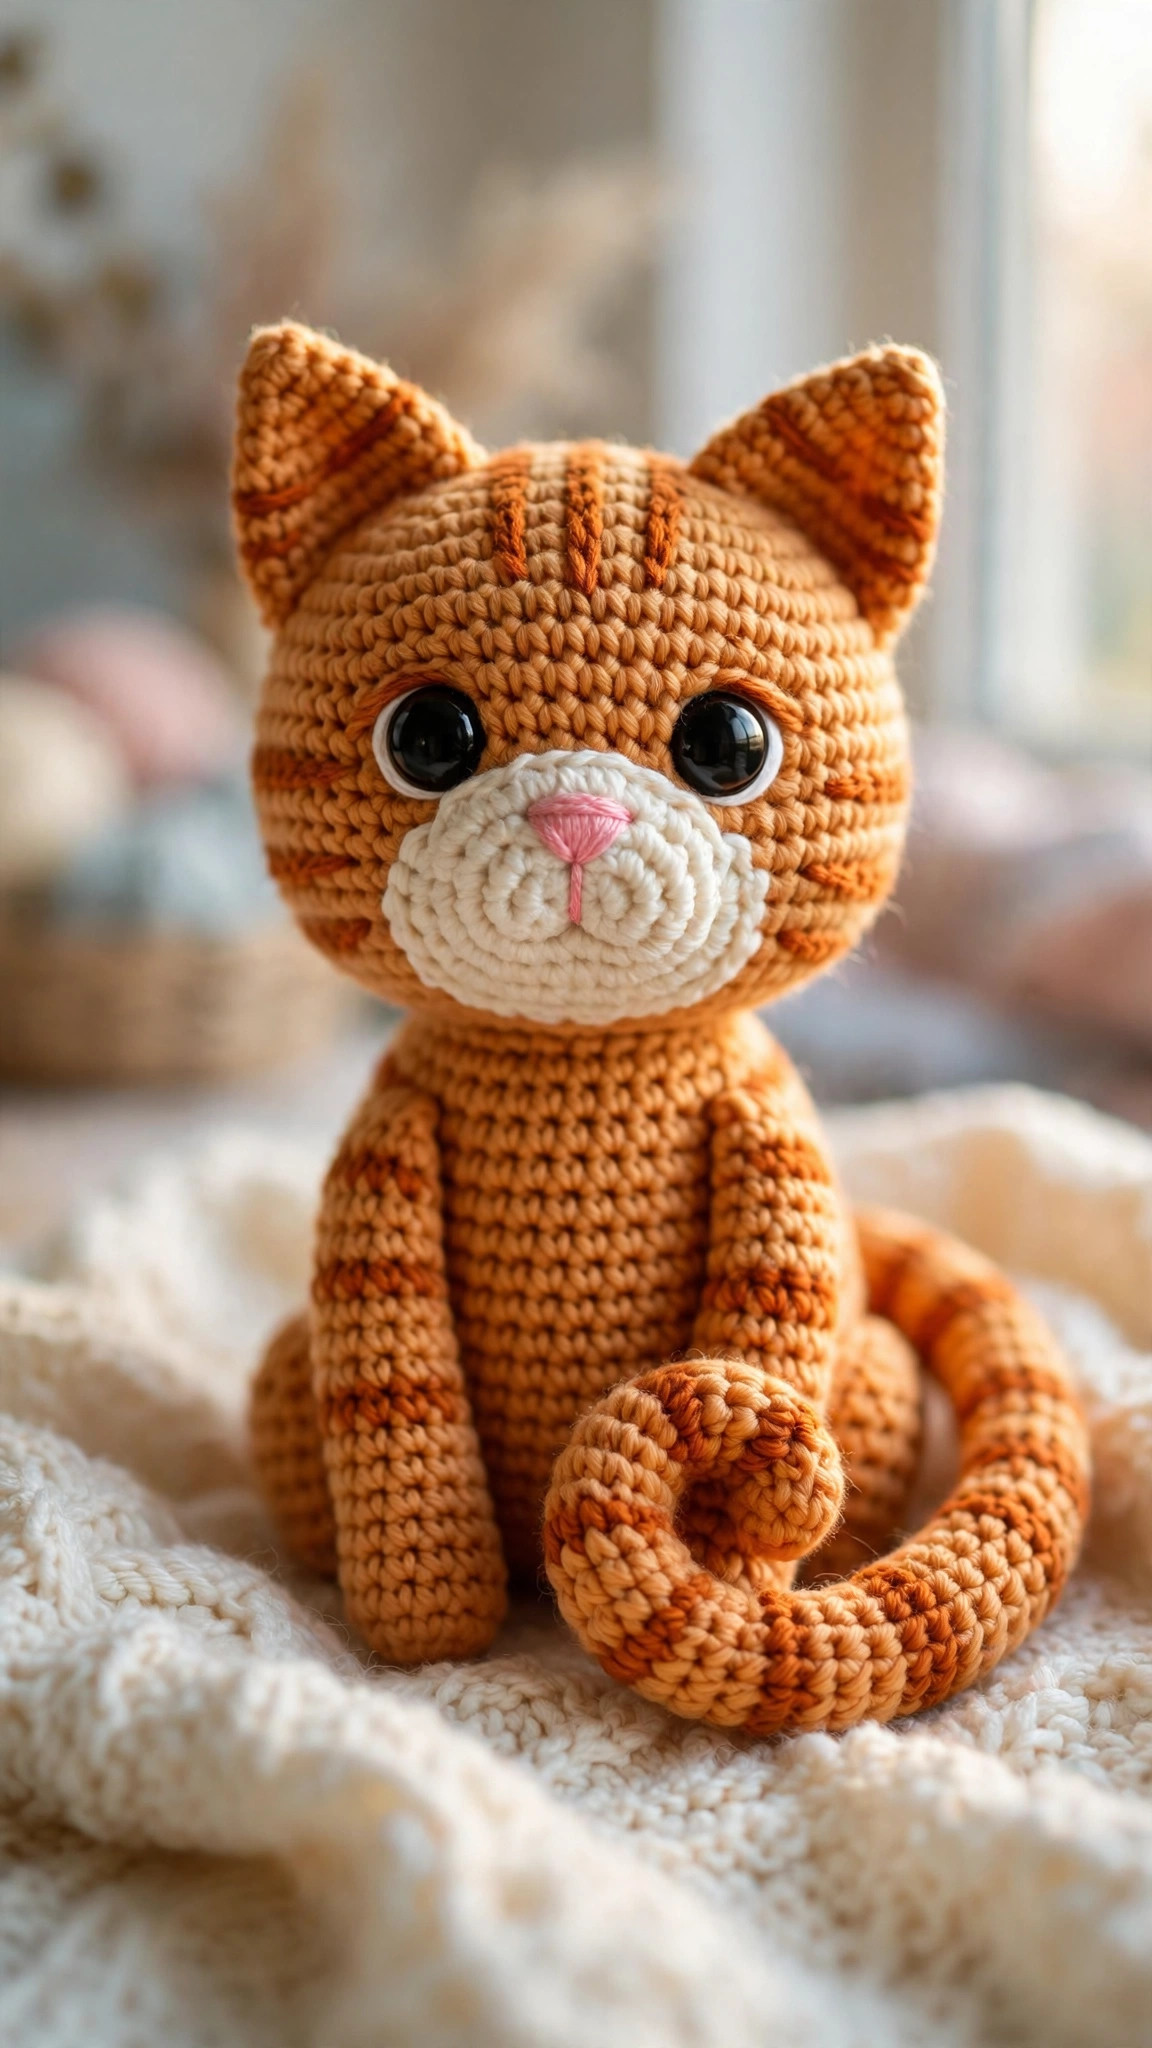
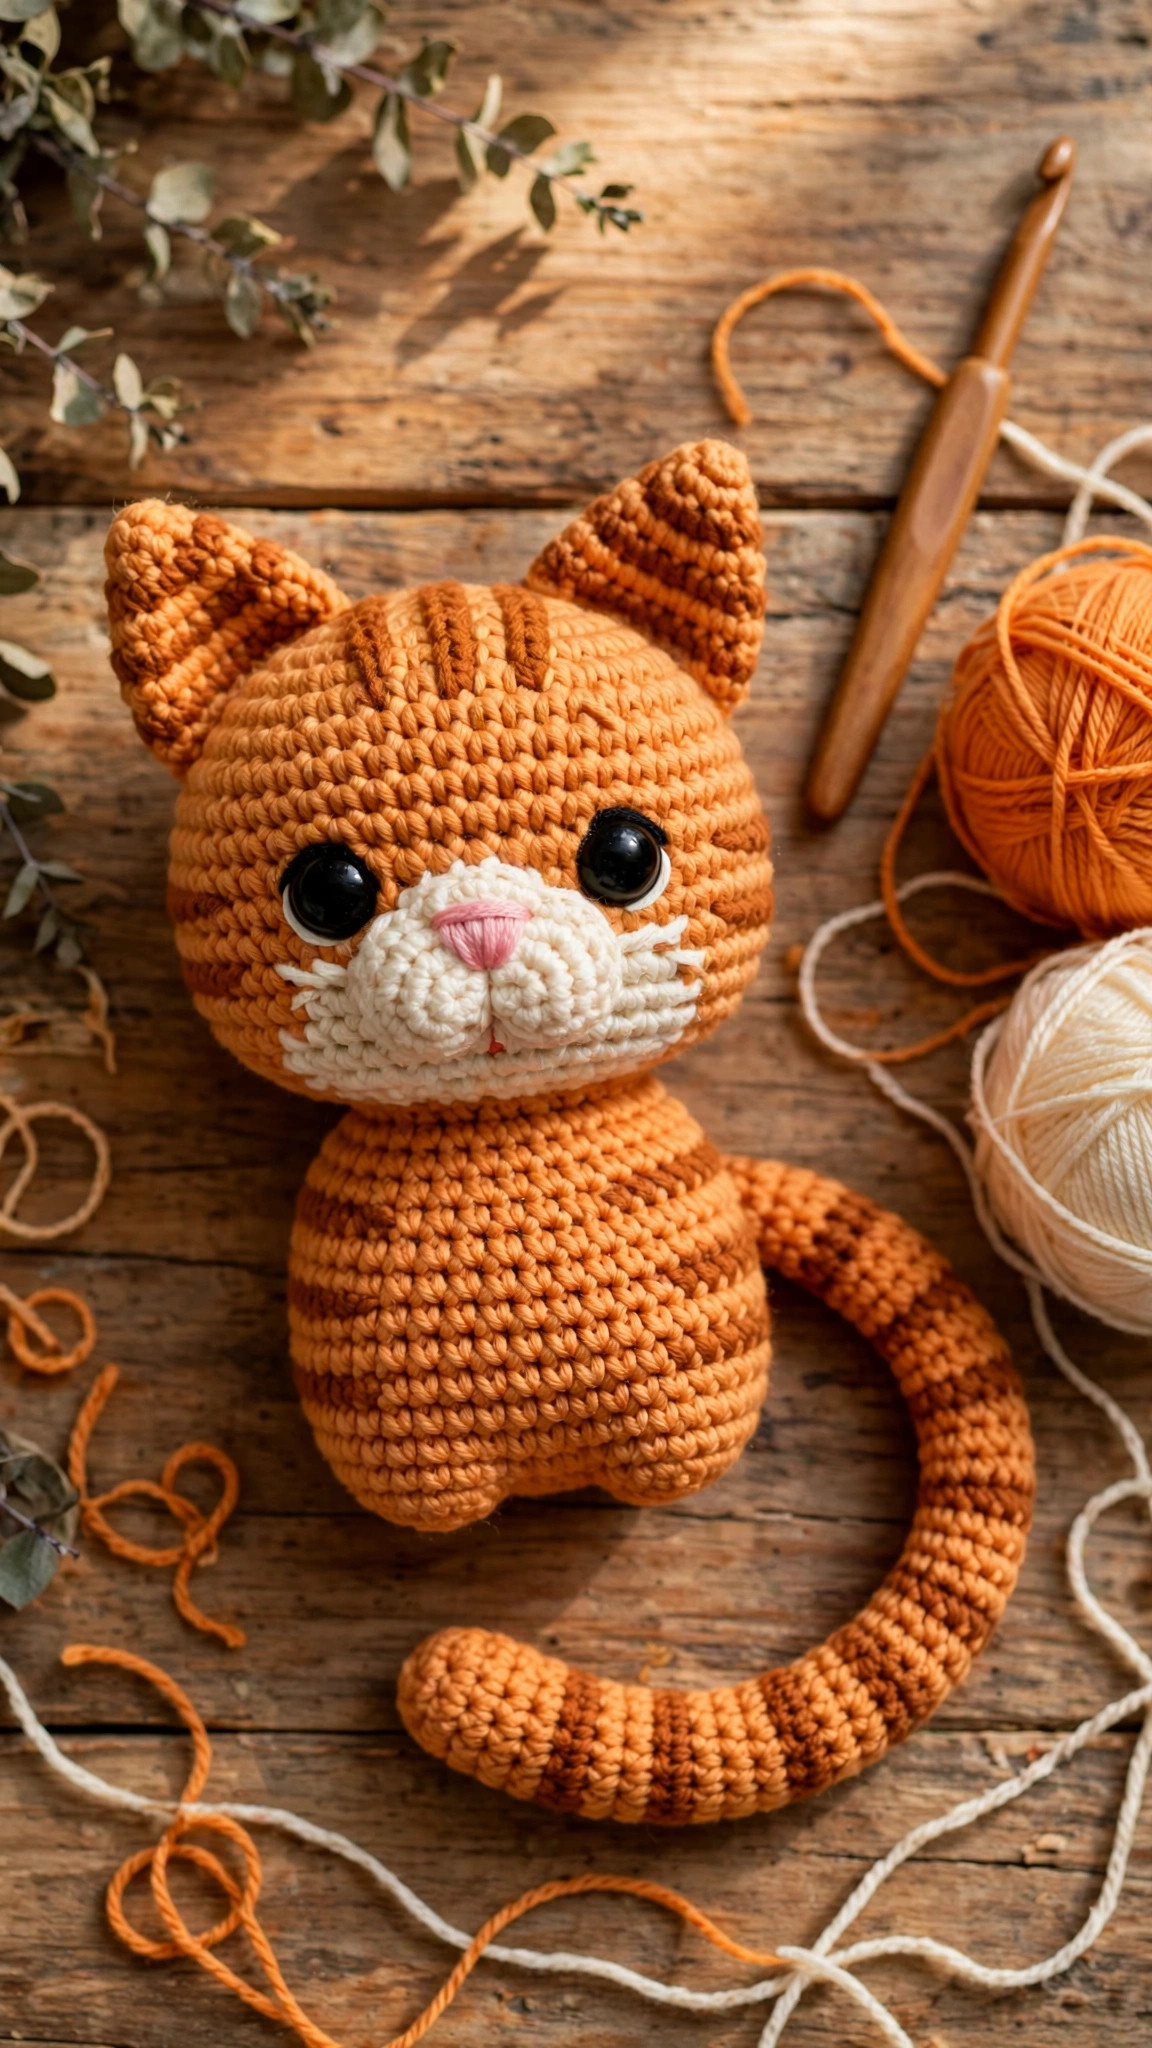
A sweet ginger tabby kitty with big glossy safety eyes, a cream muzzle with an embroidered pink nose, perky striped ears and a curled tail — worked in simple single-crochet spirals from 10 small pieces you sew together in one relaxed afternoon.

Amigurumi · Crochet
- Finished size
- About 10 cm / 4 in tall
- Making time
- About 3–4 hours
- Hook
- 3.5 mm, worsted-weight yarn
- Pieces
- 10 pieces to assemble
- Skill
- Beginner
In this post
If you've been searching for a crochet cat pattern that's actually free, actually cute, and actually works up without a fight — this ginger tabby kitty is the one. She sits upright on her own, her striped tail curls around her side, and those big glossy eyes make her look like she's waiting for chin scratches. Best of all, the whole thing is worked in simple single crochet spirals, so if you can make a magic ring, you can make this cat.
Why you'll love this free crochet cat pattern
Most free cat patterns fall into two traps: they're either so simplified the cat looks like a potato with ears, or so fiddly you need an engineering degree to assemble them. This pattern was designed to land in the sweet spot. The head and body are classic amigurumi spheres with clean, standard increase math, so the shaping is smooth and predictable. The muzzle is a separate little piece, which is the secret behind that irresistible sweet-faced look — a flat embroidered nose never photographs as well as a dimensional muzzle does.
It's also a genuinely stash-friendly project. You need less than half a skein of orange worsted-weight yarn, a scrap of cream, and a few basic notions you probably already own. And because every piece is small, it's the perfect evening project: start after dinner, wake up to a cat.
Materials you'll need
| Supply | What to get |
|---|---|
| Main yarn | Worsted-weight (#4) acrylic or cotton in orange/ginger, about 60 g |
| Contrast yarn | Worsted-weight cream or white, about 15 g |
| Embroidery floss | Pink, for the nose and mouth |
| Crochet hook | 3.5 mm (E-4) |
| Safety eyes | 12 mm black, one pair |
| Stuffing | Polyester fiberfill, a small handful |
| Notions | Tapestry needle, stitch markers, scissors |
A quick note on yarn choice: acrylic is the forgiving beginner pick — it holds its shape and the stitches look crisp. Cotton gives you beautiful stitch definition for photos but shows every wobble, so save it for your second cat. If you only have a 4.0 mm hook, that's fine too; your kitty will just come out a touch bigger and softer.
Size, gauge and skill level
- Finished size: about 10 cm (4 in) tall sitting, 8 cm (3 in) wide.
- Gauge: not critical for amigurumi — what matters is that your fabric is tight enough that stuffing doesn't peek through. If you can see daylight between your stitches, drop down a hook size. As a rough guide, 4 single crochets should measure about 2.5 cm (1 in).
- Skill level: confident beginner. You should know the magic ring, single crochet, increase, decrease, and how to fasten off. Everything else is explained below.
If this is your very first amigurumi, don't panic — the celestial leaf dragon is our most-loved amigurumi and its comment section is full of first-timers who started with a simpler project like this cat. The skills transfer directly.
Abbreviations — US terms
| Abbreviation | Meaning |
|---|---|
| MR | magic ring |
| sc | single crochet |
| inc | increase (2 sc in the same stitch) |
| dec | decrease (sc 2 together — invisible decrease recommended) |
| st(s) | stitch(es) |
| R | round |
| FO | fasten off |
A note on decreases: the invisible decrease (insert hook in front loop only of the next two stitches, yarn over, pull through both loops, yarn over, pull through two loops) keeps your fabric smooth with no little bumps. Use it everywhere this pattern says "dec" and your kitty's head will look professionally finished.
The pattern (US terms)
Work in continuous spirals unless noted. Mark the first stitch of each round with a stitch marker and move it up as you go. The stitch count at the end of every round is in parentheses — count your stitches, especially on the head. Ten seconds of counting now saves ten minutes of frogging later.
Head — main color (orange)
- R1: MR, 6 sc (6)
- R2: inc in each st (12)
- R3: [sc, inc] × 6 (18)
- R4: [2 sc, inc] × 6 (24)
- R5: [3 sc, inc] × 6 (30)
- R6–R11: sc in each st around (30) — 6 rounds even
- R12: [3 sc, dec] × 6 (24)
- R13: [2 sc, dec] × 6 (18)
- Insert the safety eyes between R9 and R10, 7 stitches apart. Push the washers on firmly — they should click. Start stuffing the head now, while the opening is wide.
- R14: [sc, dec] × 6 (12)
- R15: dec × 6 (6). FO, thread the tail through the front loops of the remaining stitches, pull tight, and weave in.
Tip: stuff the head firmly but not drum-tight. Over-stuffing stretches the stitches and shows the fiberfill; under-stuffing gives you a sad, lumpy head. Aim for the firmness of a tennis ball.
Body — main color (orange)
- R1: MR, 6 sc (6)
- R2: inc in each st (12)
- R3: [sc, inc] × 6 (18)
- R4: [2 sc, inc] × 6 (24)
- R5–R9: sc in each st around (24) — 5 rounds even
- R10: [2 sc, dec] × 6 (18)
- R11: [sc, dec] × 6 (12)
- Stuff firmly. FO, leaving a long tail (about 30 cm / 12 in) for sewing the head on.
Ears — main color (orange), make 2
- R1: MR, 4 sc (4)
- R2: [sc, inc] × 2 (6)
- R3: [2 sc, inc] × 2 (8)
- R4: [3 sc, inc] × 2 (10)
- R5: sc in each st around (10)
- FO, leaving a long tail. Do not stuff. Flatten each ear gently — you'll pinch the base slightly when you sew it on, which gives that perky upright-ear look.
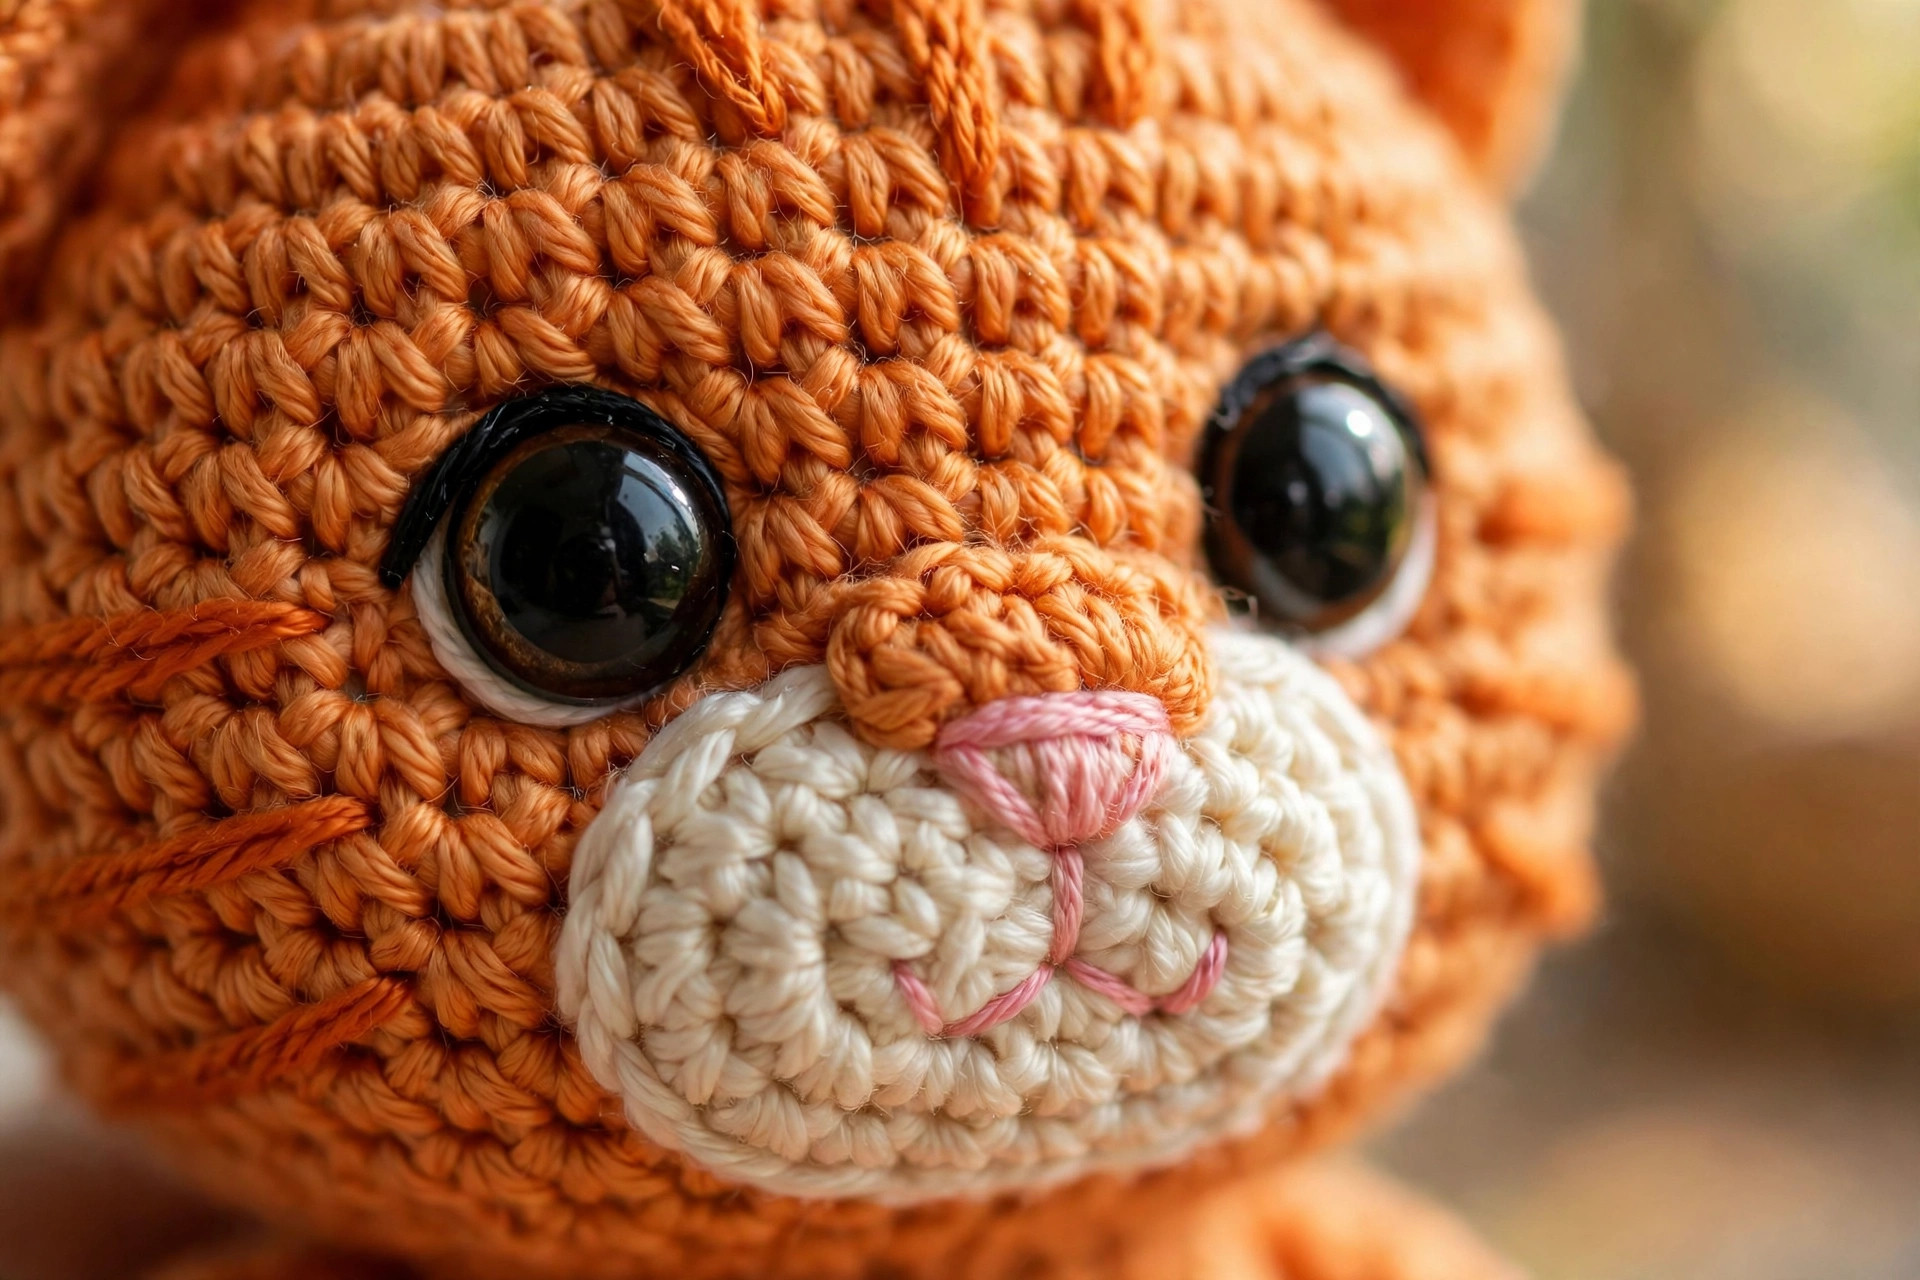
Muzzle — cream
- R1: MR, 6 sc (6)
- R2: [sc, inc] × 6 (12)
- R3: sc in each st around (12)
- FO, leaving a long tail for sewing.
Tail — main color (orange)
- R1: MR, 6 sc (6)
- R2–R10: sc in each st around (6) — 9 rounds even
- Lightly stuff just the last two rounds, or leave unstuffed for a floppier tail. FO, leaving a long tail.
Stripe option: for the tabby look in the photos, change to cream for R4–R5 and R8–R9, carrying the orange loosely up the inside. Two cream bands are all you need — the embroidery in the Finishing section adds the rest.
Front paws — main color (orange), make 2
- R1: MR, 6 sc (6)
- R2–R4: sc in each st around (6) — 3 rounds even
- FO, leaving a long tail. Do not stuff.
Back feet — main color (orange), make 2
- R1: MR, 6 sc (6)
- R2: [sc, inc] × 6 (12)
- R3–R4: sc in each st around (12) — 2 rounds even
- FO, leaving a long tail. Stuff very lightly or leave unstuffed.
Assembly — the order that actually matters
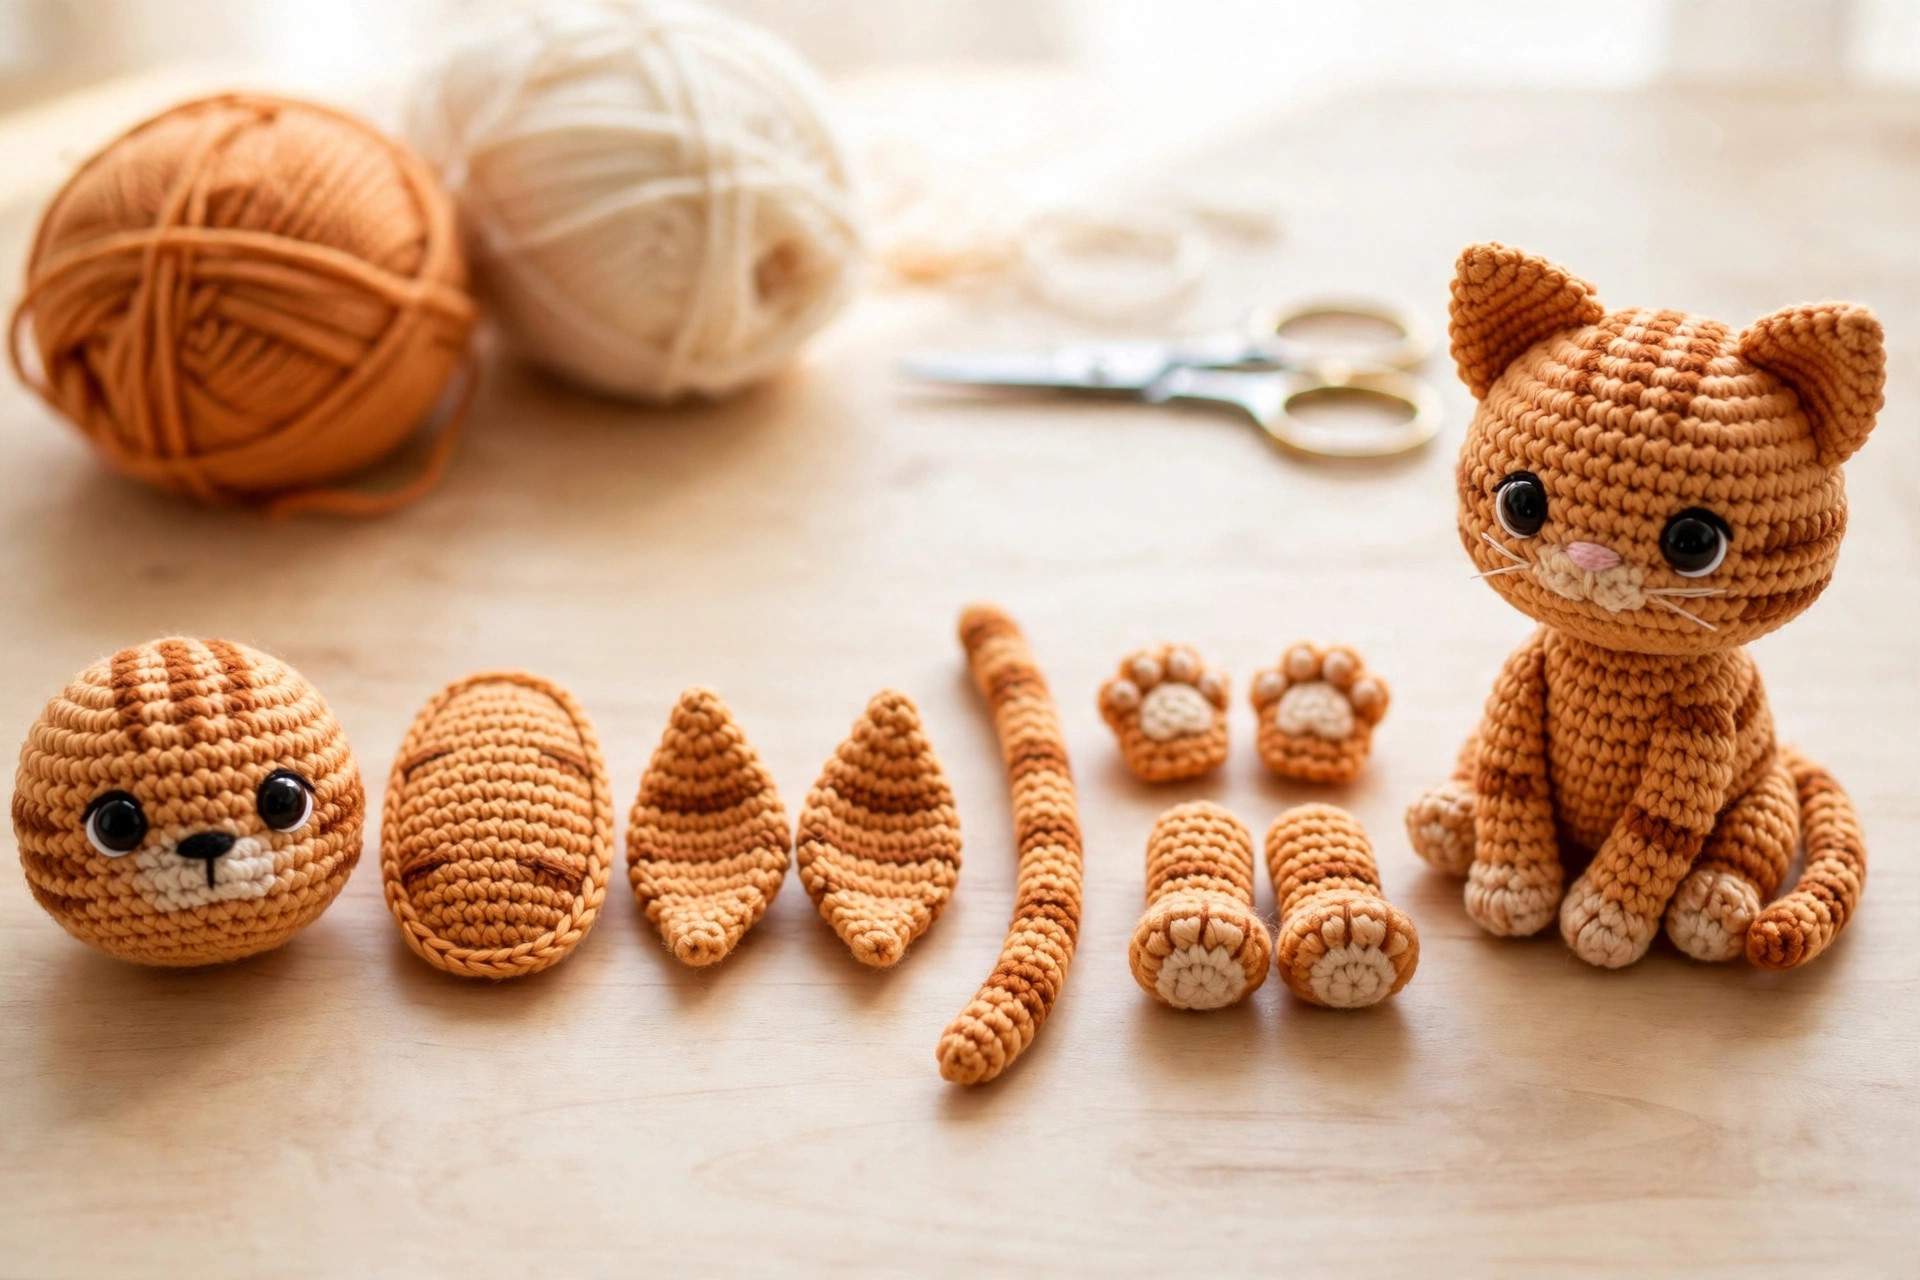
- Muzzle first. Pin the cream muzzle to the lower front of the head, centered between the eyes, with its bottom edge sitting around R11. Sew with small whipstitches, stuffing a tiny pinch of fiberfill behind it as you close so it stays softly rounded.
- Face. With pink floss, embroider a small triangle nose over the center of the muzzle (about 3 stitches wide, 2 tall), then bring the needle down and stitch a short vertical line with two little curves for the mouth. Full how-to is in Finishing touches below.
- Ears. Pinch the base of each ear flat, then pin them to the top of the head around R3–R5, roughly 8 stitches apart. Sew around the base twice — ears take abuse, so make this join strong.
- Head to body. Center the head on top of the body (the body's R11 opening faces up into the head). Using the long tail, sew around the join, then go around a second time for security. Add a little extra stuffing into the neck area before you close the last few stitches so the head doesn't wobble.
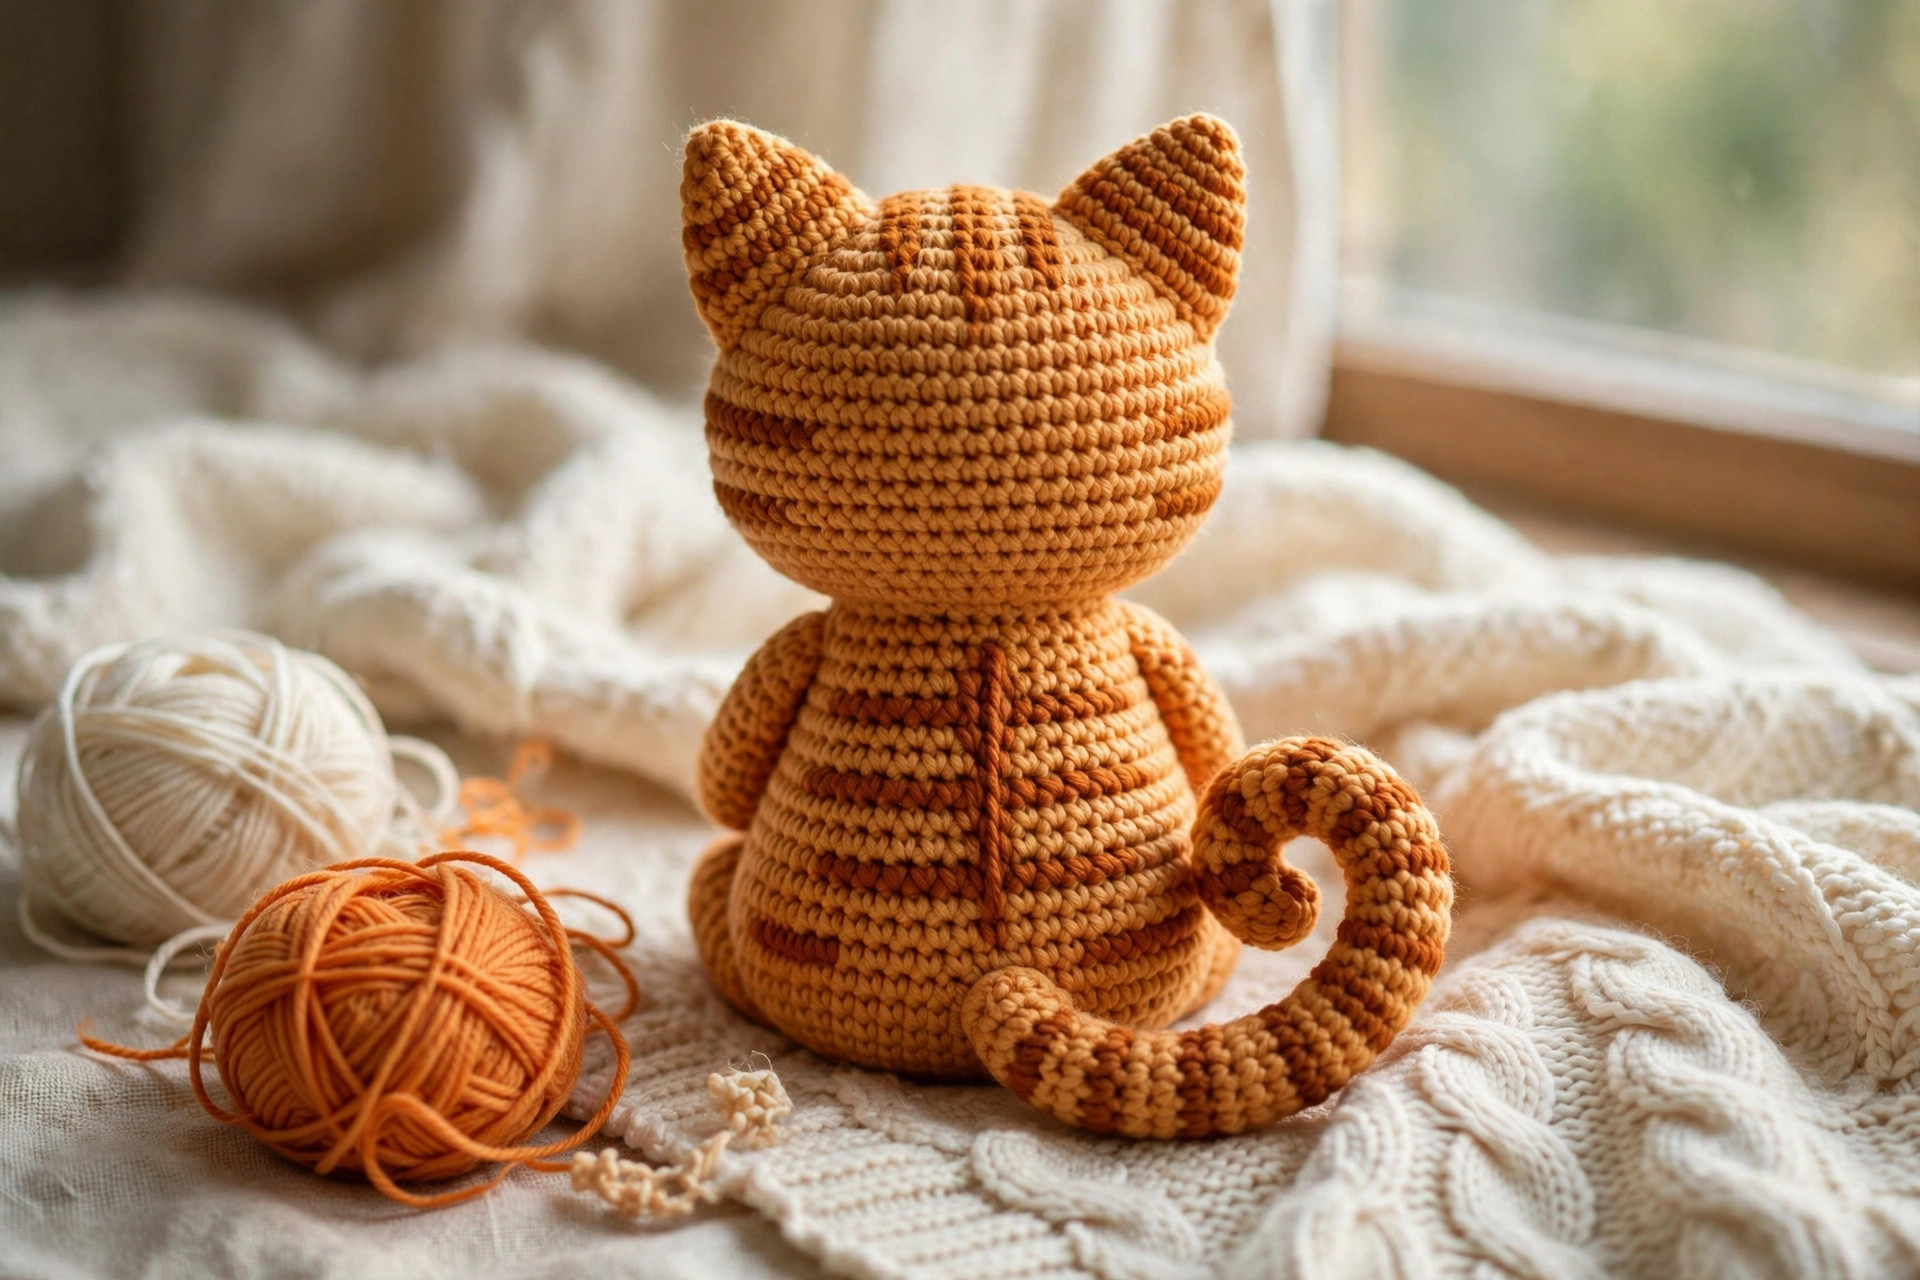
- Tail. Sew the tail to the lower back of the body, curving it upward and around to one side. Tack it in two spots — base and mid-tail — so the curl holds its shape.
- Paws and feet. Sew the front paws to the front of the body at R8–R9, angled slightly outward like she's sitting politely. Sew the back feet at the base front, toes pointing forward. She should now sit upright on her own — if she tips, nudge the feet a few millimeters forward.
Finishing touches
This is where a good cat becomes a great cat. Take fifteen unhurried minutes here; it's the difference between "homemade" and "handmade."
The nose and mouth. Thread pink floss doubled. Come up through the muzzle at its center (about R2 of the muzzle piece). Make three horizontal stitches to form the top of a triangle, then bring each side down to a point two rows below — fill the triangle with satin stitches. From the bottom point, take one short vertical stitch down, then two short diagonal stitches curving outward for the mouth. Keep everything small: a nose wider than 4 stitches looks clownish.
Whiskers (optional). Cut three 8 cm strands of white embroidery floss per side. Thread one at a time through the muzzle from one side to the other so both ends stick out, then knot tiny and trim. Real whiskers elevate the realism enormously in photos.
Blush cheeks. Rub the tiniest amount of pink chalk pastel or blush on a cotton bud and dab it on the cheeks. Seal with a spritz of hairspray from 30 cm away. Skip this if the cat is for a small child — go straight to the safety note in the FAQ.
Forehead stripes. With a darker orange or brown yarn, embroider three short vertical lines on the forehead between the ears, using simple straight stitches 4–5 stitches long. This is the classic tabby "M" marking and it photographs beautifully.
Three cute variations to try next
Once you've made one cat, you'll want a whole clowder. The same pattern, three personalities:
- Midnight black cat. Work everything in black yarn with green or yellow 12 mm safety eyes, and skip the forehead stripes. Add a tiny purple bow at the neck and you've got a Halloween decoration. Speaking of Halloween, our flip-face witch cat is the natural next project if you love spooky-season crochet.
- Gray tabby. Use medium gray for the main color, white for the muzzle, and charcoal for the stripes. Gray tabbies photograph like a dream against warm backgrounds — this is the colorway to make if you're planning to post yours on Pinterest.
- Sleepy kitten. Replace the safety eyes with embroidered closed eyes — two small curved lines in black floss. Instantly transforms the whole personality from "alert" to "nap time." This version is also the fully child-safe option (see the FAQ).
And if this project gave you the amigurumi bug, the celestial leaf dragon uses the same spiral techniques at a bigger, showpiece scale, while the little lamb baby snuggle gift set bundles a sweet amigurumi with matching accessories for gift-giving.
Troubleshooting tips
- You can see stuffing through the stitches. Your tension is too loose or your hook is too big. Switch to a 3.25 mm hook, or consciously tighten up — amigurumi fabric should be dense.
- The head wobbles on the neck. Almost always an under-stuffed neck. Unpick three or four stitches of the head-body join, pack in more fiberfill, and re-sew with two full passes.
- The eyes look crooked. Count, don't eyeball: 7 stitches apart, both between the same two rounds. Pin the eyes in place and look at the face straight-on in a mirror before pushing the washers on — mirrors reveal asymmetry your eyes miss.
- The magic ring keeps loosening. After R1, tug the tail firmly, then weave it through the first round in a circle before trimming. Or start with "ch 2, 6 sc in 2nd ch from hook" instead — slightly less tidy, completely secure.
- The tail won't hold its curl. Insert a short piece of floral wire or a pipe cleaner before sewing, bending it into shape. (Not for children's toys — see the FAQ.)
- Your yarn keeps splitting. Some acrylics split if your hook tip is sharp. Switch to a hook with a more rounded head, or slow down on the yarn-over.
Frequently asked questions
Is this crochet cat pattern really free?
Yes — the complete pattern above is free, no email signup, no PDF purchase required. If you'd like to support the site, sharing the post or saving it on Pinterest is the kindest thank-you.
What skill level is this pattern?
Confident beginner. If you can crochet a magic ring and single crochet in the round, you have every skill this pattern needs. The trickiest part is sewing the pieces together neatly, and the assembly section walks you through the exact order.
How long does it take to make?
About 3–4 hours total: roughly 2 hours of crocheting, 45 minutes of assembly and sewing, and 15–30 minutes of face embroidery and finishing. It's a perfect weekend-afternoon project.
Can I sell the finished cats I make?
Yes! You may sell finished cats made from this pattern in small batches (craft fairs, Etsy, gifts). Please credit Little Loop Finds as the pattern designer with a link back to this page. The pattern text and photos themselves may not be redistributed, republished, or sold.
Can I use a different yarn weight?
Absolutely. Use the hook size recommended on your yarn label minus 0.5 mm (so the fabric stays tight), and your cat will simply come out bigger or smaller. Chunky chenille yarn with a 5.5 mm hook makes a gloriously squishy 20 cm cat — a reader favorite variation.
Is this cat safe for babies and toddlers?
With two changes, yes: embroider the eyes instead of using safety eyes (see the Sleepy kitten variation), and skip any wire in the tail. Safety eyes are secure for older children and adults but are still small parts, so use your judgment for under-threes.
More free patterns to try
If this kitty was fun, keep the hook moving. The little lamb baby snuggle gift set pairs an amigurumi lamb with a lovey and hat for the ultimate baby gift, the star blanket makes a gorgeous backdrop for photographing your amigurumi, the woodland nursery mobile turns small plushies into nursery decor, and the autumn acorn granny square is a quick stash-buster for practicing your tension between bigger projects.
The box below contains an Etsy link. If you buy through it, we may earn a small commission at no extra cost to you. Learn more.
No time to make one?
Short on time? Find handmade crochet cats from independent makers on Etsy.
Browse on Etsy (opens Etsy in a new tab)