Autumn acorn medallion granny square pattern
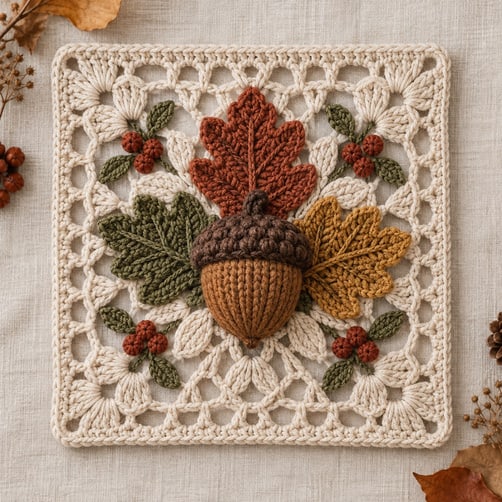
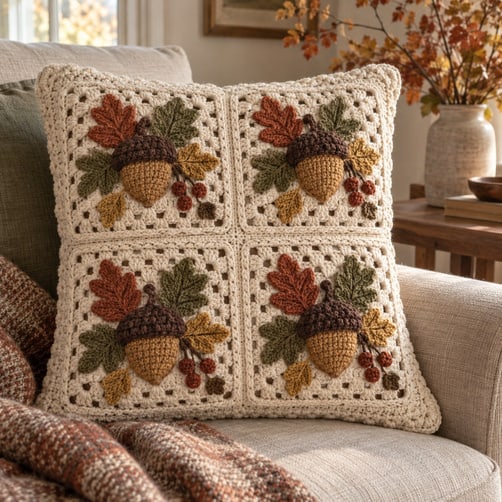
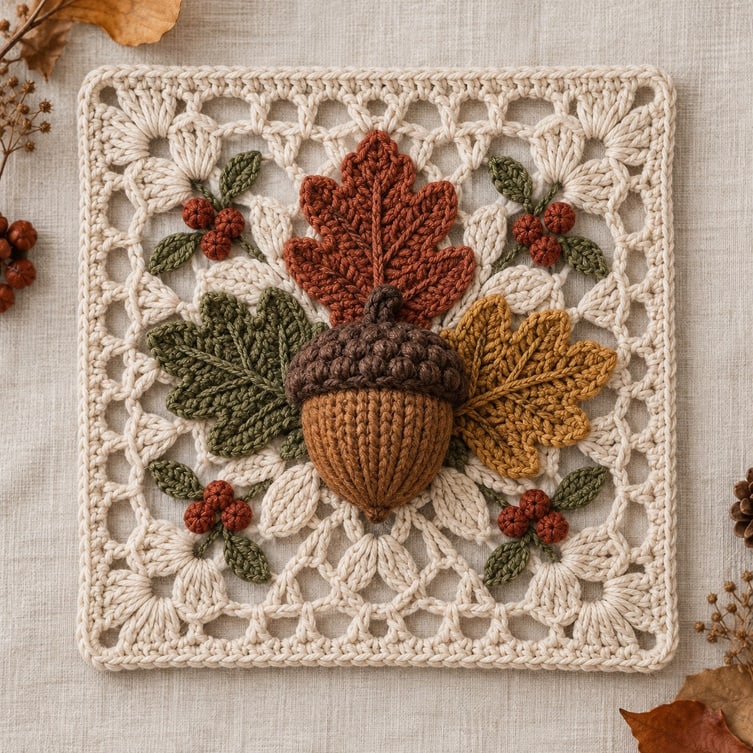
An airy oatmeal lace frame with a padded caramel acorn, a bobble-textured chestnut cap and three turning leaves in rust, olive and antique gold. One square makes a trivet-style panel or cushion centre — repeat it for a blanket, runner or wall hanging.

Autumn · Granny squares
- Finished size
- 20 × 20 cm / 8 × 8 in after blocking
- Yarn
- Sport / DK cotton, about 62 g
- Hook
- 2.5 mm
- Gauge
- 22 sc × 24 rows = 10 cm
- Skill
- Confident beginner to intermediate
- Terms
- US crochet terms
In this post
Materials & abbreviations
Use a smooth Sport / DK mercerized cotton or cotton-rich blend, about 220 m / 240 yd per 100 g. The amounts below are for one square and include a 10% working allowance.
| Colour | Design use | Approx. amount |
|---|---|---|
| Creamy oatmeal | Square frame, halo | 38 g / 84 m |
| Caramel brown | Acorn body | 7 g / 15 m |
| Chestnut brown | Cap, stem, veins | 5 g / 11 m |
| Warm rust | Long leaf, berries | 4 g / 9 m |
| Muted olive | Medium leaf, mini leaves | 4 g / 9 m |
| Antique gold | Halo ring, small leaf | 4 g / 9 m |
| Total | One completed square | 62 g / 137 m |
Hook and notions: 2.5 mm hook, 4 locking stitch markers, tapestry needle, rust-proof pins, tape measure, sharp scissors, blocking mats, and about 2 g of polyester fibre fill for the acorn only. No safety eyes are used — this is a decorative flat appliqué square, not a toy.
Abbreviations (US terms): mr magic ring · ch chain · sl st slip stitch · sc single crochet · hdc half double crochet · dc double crochet · tr treble crochet · inc 2 sc in the same stitch · dec sc2tog · FLO/BLO front or back loop only · st(s) stitch(es) · FO fasten off.
3-dc bobble: in the same stitch work three unfinished dc, leaving the last loop of each on the hook (4 loops); yarn over and pull through all 4. Counts as 1 stitch.
4-dc berry bobble: in the magic ring work four unfinished dc (5 loops on the hook); yarn over and pull through all 5. Counts as 1 stitch.
Invisible colour change: complete the final yarn-over of the last stitch with the new colour, then secure both tails on the wrong side.
Gauge & sizing
| Gauge area | Target |
|---|---|
| Single crochet fabric | 22 sc × 24 rows = 10 × 10 cm |
| Square checkpoint | Round 4 measures about 9 cm across |
| Final blocked square | 20 × 20 cm / 8 × 8 in |
Counting rule: chains used as corner spaces are listed separately and do not count as dc, hdc or sc. A bobble counts as one stitch. Check the stated total before starting the next round.
Tension: work the acorn, leaves, berries and halo firmly so they hold their shape, and keep the oatmeal frame slightly more relaxed so the lace opens during blocking. If Round 4 is more than 0.5 cm off, change hook size by 0.25 mm before continuing.
Construction overview
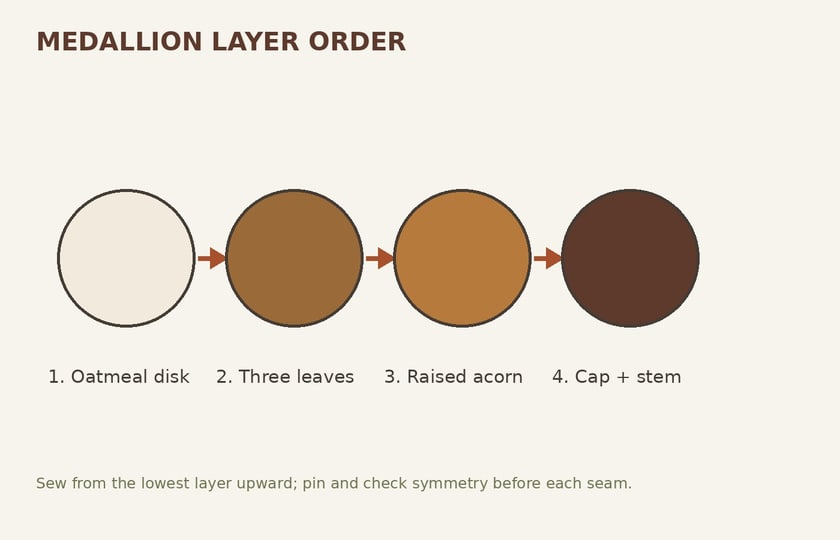
The oatmeal square stays airy and geometric while every coloured piece is made separately and layered from flat to raised. Block the frame and the halo disk before attaching any motifs, then lay everything out and pin it before you sew — the asymmetry is intentional, so take a quick photo of the pinned layout to restore it if a piece shifts.
The pattern
-
Step 1: Oatmeal geometric lace square
Work joined rounds in creamy oatmeal. Ch 3 at the start of a dc round counts as 1 dc; ch 2 at the start of an hdc round counts as 1 hdc. Join to the top of the beginning chain unless stated otherwise.
- R1: in mr, ch 3, 2 dc, ch 2; (3 dc, ch 2) ×3. Join. (12 dc + 4 ch-2 corners)
- R2: sl st into first corner. Ch 3, 2 dc, ch 2, 3 dc in same corner; ch 1. In each remaining corner (3 dc, ch 2, 3 dc), ch 1. Join. (24 dc)
- R3: sl st into first corner. Ch 3, 1 dc, ch 2, 2 dc in corner; ch 2, sc in next ch-1 space, ch 2. Repeat around. Join. (16 dc + 4 sc)
- R4: sl st into first corner. Ch 3, 1 dc, ch 2, 2 dc in corner; 3 dc in next ch-2 space, skip sc, 3 dc in next ch-2 space. Repeat around. Join. (40 dc)
- R5: sl st into first corner. Ch 3, 1 dc, ch 2, 2 dc in corner; ch 2, skip 1 dc, sc in next dc, ch 3, skip 2 dc, sc in next dc, ch 2, skip 1 dc. Repeat around. Join. (16 dc + 8 sc)
- R6: sl st into first corner. Ch 3, 1 dc, ch 2, 2 dc in corner; 3 dc in next ch-2 space, 5 dc in next ch-3 space, 3 dc in next ch-2 space. Repeat around. Join. (60 dc)
- R7: sl st into first corner. Ch 3, 1 dc, ch 2, 2 dc in corner; (ch 2, skip 2 dc, sc in next dc) ×3, ch 2, skip the final 2 side dc. Repeat around. Join. (16 dc + 12 sc + 16 ch-2 side spaces)
- R8: sl st into first corner. Ch 2, 1 hdc, ch 2, 2 hdc in corner; 3 hdc in each of the next 4 ch-2 side spaces. Repeat around. Join. (64 hdc)
- R9: ch 1, sc in each hdc; in each ch-2 corner (sc, ch 2, sc). Join with sl st to first sc. FO with a 30 cm tail. (72 sc)
Checkpoint: Round 4 should measure about 9 cm across. Wet-block the finished square to exactly 20 × 20 cm, opening each chain space evenly so all four diagonals match.
-
Step 2: Circular halo medallion
Work in a continuous spiral. Place a marker in the first stitch and do not join. Begin with oatmeal.
- R1: 6 sc in mr. (6)
- R2: inc in each st. (12)
- R3: (1 sc, inc) ×6. (18)
- R4: (2 sc, inc) ×6. (24)
- R5: (3 sc, inc) ×6. (30)
- R6: (4 sc, inc) ×6. (36)
- R7: change to antique gold on the final yarn-over of R6. (5 sc, inc) ×6. (42)
- R8: change back to oatmeal on the final yarn-over of R7. (6 sc, inc) ×6. Sl st in the next st to smooth the edge. FO with a 60 cm sewing tail. (48)
Block the disk to about 9 cm across and keep the antique-gold ring narrow and visible.
-
Step 3: Raised acorn, cap and stem
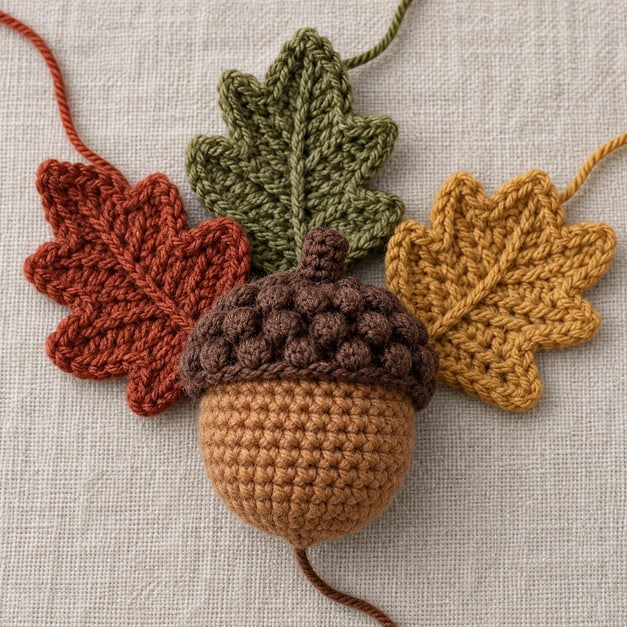
Acorn body — make 2 in caramel. Work around both sides of the foundation chain in continuous rounds, one marker in the first stitch.
- R1: ch 8. From the 2nd ch from the hook, sc in next 6 ch, 3 sc in the last ch; rotate and work the underside: sc in next 5 loops, 2 sc in the final loop. (16)
- R2: inc, 5 sc, inc in each of next 3 sts, 5 sc, inc in each of last 2 sts. (22)
- R3: (1 sc, inc), 5 sc, (1 sc, inc) ×3, 5 sc, (1 sc, inc) ×2. (28)
- R4: (2 sc, inc), 5 sc, (2 sc, inc) ×3, 5 sc, (2 sc, inc) ×2. (34)
- R5: BLO sc in each st. (34)
- R6: sc in each st, sl st in next st. FO the front with a 45 cm tail and the back with a 20 cm tail. (34)
Textured cap — chestnut. A turned semicircle; ch 1 or ch 2 at the start of a row does not count as a stitch.
- Row 1: in mr, ch 2, 6 hdc. Turn. (6)
- Row 2: ch 2, 2 hdc in each st. Turn. (12)
- Row 3: ch 1, (1 sc, inc) ×6. Turn. (18)
- Row 4: ch 1, (3-dc bobble in next st, sc in next st) ×9. Turn. (9 bobbles + 9 sc)
- Row 5: ch 1, sc in each st. FO with a 40 cm sewing tail. (18)
Stem — chestnut. Ch 7, sl st in the 2nd ch from the hook and in each remaining ch. FO with a 15 cm tail.
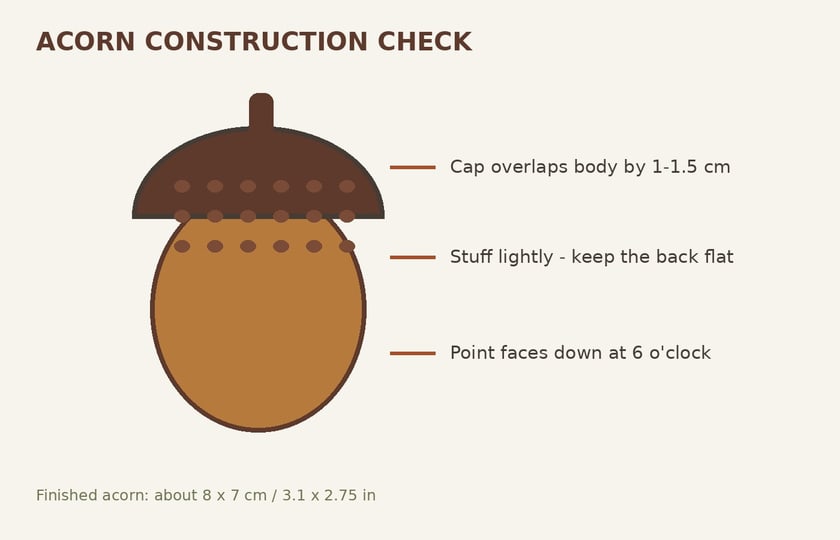
Stuffing: place the two ovals wrong sides together and whipstitch 26 of the 34 edge stitches, leaving an 8-stitch opening. Add only 1.5–2 g of polyfill, flatten the back, then close the remaining 8 stitches. The back should stay almost flat, not round like a toy.
-
Step 4: Three asymmetrical autumn leaves
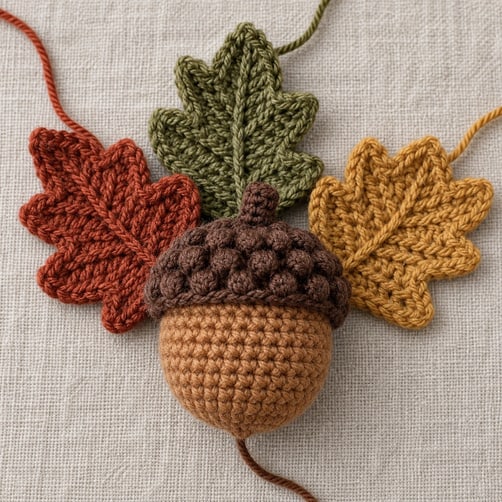
Work each leaf around both sides of its foundation chain; the 3 sc at the far end turn the tip. Keep the foundation chain slightly loose so the leaf stays flat.
- Long leaf — warm rust. Ch 10. From the 2nd ch: sl st, sc, hdc, dc, tr, tr, dc, hdc, 3 sc in the final ch; rotate and work the underside: hdc, dc, tr, tr, dc, hdc, sc, sl st. Join to the first sl st. (19 sts) Vein: ch 4; sl st in the 2nd ch and the next 2 ch, then surface sl st across 8 foundation-chain ridges to the tip. FO with a 30 cm tail.
- Medium leaf — muted olive. Ch 9. From the 2nd ch: sl st, sc, hdc, dc, tr, dc, hdc, 3 sc in the final ch; rotate: hdc, dc, tr, dc, hdc, sc, sl st. Join. (17 sts) Vein as above, across 7 ridges.
- Small leaf — antique gold. Ch 8. From the 2nd ch: sl st, sc, hdc, dc, hdc, sc, 3 sc in the final ch; rotate: sc, hdc, dc, hdc, sc, sl st. Join. (15 sts) Vein as above, across 6 ridges.
-
Step 5: Berry clusters and mini frame leaves
Berry clusters — make 4 (2 warm rust, 1 muted olive, 1 antique gold). In mr, (ch 2, 4-dc berry bobble, ch 1, sl st in ring) ×3. Pull the ring firmly closed. FO with a 25 cm tail. You should have a compact triangular cluster of three rounded bobbles with the centre hole fully closed.
Mini frame leaves — make 4 (2 muted olive, 2 antique gold). Ch 6. From the 2nd ch: sl st, sc, hdc, sc, 3 sc in the final ch; rotate: sc, hdc, sc, sl st. Join. (11 sts) Stem: ch 3; sl st in the 2nd ch and the next ch, then sl st to the leaf base. FO with a 20 cm tail.
-
Step 6: Block every piece before sewing
Wet-block the square to 20 × 20 cm and the halo to 9 cm across. Steam-shape the three large leaves separately, bending the rust leaf slightly left, the olive leaf slightly right and keeping the gold leaf straighter. Only then move on to assembly.
Assembly
Place every piece before sewing. Use rust-proof pins, look at the work from arm's length, and photograph the pinned arrangement so you can restore it if something shifts.
- Centre the halo. Align halo Round 1 with the square centre and the halo edge over square Rounds 5–6. Pin at 12, 3, 6 and 9 o'clock, then sew every second stitch of halo Round 8 to a solid stitch or back strand beneath — do not bridge open spaces.
- Long rust leaf. Base over halo Rounds 2–3, tip pointing to 10:30 and reaching just inside square Round 7, rotated about 35° counterclockwise from vertical. Sew the lower centre vein and the lower third of each edge; leave the upper two-thirds free.
- Medium olive leaf. Base over halo Rounds 2–3, tip at 2 o'clock, rotated about 55° clockwise. Keep 2–3 stitches of overlap beneath the rust leaf's upper base. Sew the lower centre and lower third only.
- Small gold leaf. Base over halo Rounds 3–4, tip at 4:30, angled about 30° downward from horizontal. Tuck 3–4 base stitches beneath the acorn body.
- Acorn body. Centre it vertically over the halo: the lower point sits over halo Round 7 at 6 o'clock and the top edge crosses halo Round 3. Pin at four points and whipstitch the flat back to the halo around all 34 edge stitches.
- Cap and stem. Overlap the cap across the top 1–1.5 cm of the body, keeping Row 5 horizontal and the nine bobbles centred. Sew Row 5 and both curved edges, leaving the bobbles free. Insert the stem behind the cap at 12 o'clock, expose 2.5 cm and sew its lower 3 sl sts securely.
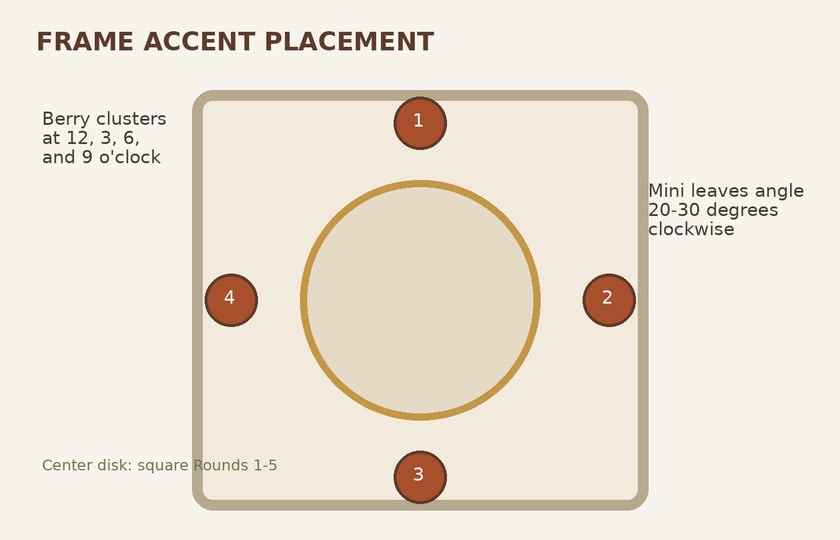
- Berry clusters. Place the cluster centres in the Round 7 ch-2 side spaces nearest 12, 3, 6 and 9 o'clock, at least 2.5 cm from the nearest corner. Sew through the magic-ring centre and once beneath each bobble.
- Mini leaves. One beside each cluster, angled 20–30° clockwise from its radial line. Sew the stem and first 3 edge stitches only so the tip stays dimensional.
- Final check. All tails secured, the square still 20 × 20 cm, and no accent projecting beyond the outer edge.
Finishing & tips
Weave each tail through at least 4 cm of matching-colour stitches, reverse direction once and trim. With chestnut, add one short straight stitch down the centre of the acorn body from cap Row 5 for a subtle ridge — do not pull it tight. Finger-shape the cap bobbles outward and curve the free leaf tips upward by 2–3 mm. Mist the finished square lightly, pin only the outer border to 20 × 20 cm, shield the padded acorn from direct steam, and let it dry completely before stacking or joining.
Five things that make the difference:
- Block the oatmeal frame before sewing, so the Round 7 ch-2 spaces open evenly
- Use only a whisper of stuffing and press the acorn flat between your palms
- Steam-shape each large leaf separately so the fan looks natural
- Carry sewing tails beneath the raised centre of each leaf, not around its edge
- Assemble on a grid mat, keeping the acorn vertical and the leaf fan asymmetrical
Common mistakes to avoid: treating bobbles as extra stitches (each counts as one, and an extra sc after every bobble widens the cap); missing the single skipped dc at either end of Round 5, which shifts the lace windows and stops Round 6 reaching 60 dc; overstuffing the acorn so it tips forward; sewing through both sides of an openwork chain instead of catching only the back strand; and placing all three leaves at equal angles — the design depends on long rust at 10:30, medium olive at 2 o'clock and small gold at 4:30.
Variations
- Colour: swap rust, olive and gold for burgundy, eucalyptus and ochre, keeping the oatmeal frame and caramel acorn unchanged.
- Size: worsted yarn with a 3.5 mm hook gives about a 25 cm square; fingering yarn with a 2.0 mm hook gives about 15 cm. Follow every stitch count exactly and block to a true square.
- Add-ons: omit two berry clusters for a quieter runner, or add a hanging loop — join oatmeal in a corner, ch 16, sl st back into the same corner, FO and secure.
The box below contains an Etsy link. If you buy through it, we may earn a small commission at no extra cost to you. Learn more.
No time to crochet one?
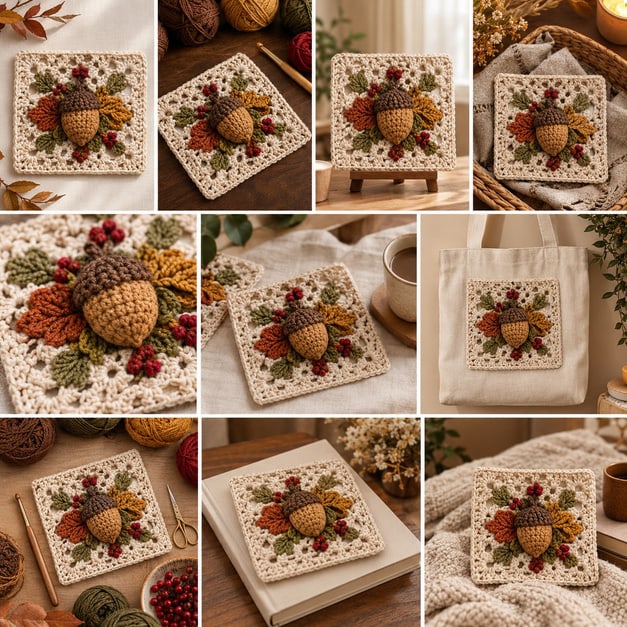
Find handmade autumn acorn granny squares and cushions from independent makers on Etsy.
Browse on Etsy (opens Etsy in a new tab)