Celestial leaf dragon crochet pattern: a sculptural amigurumi guide
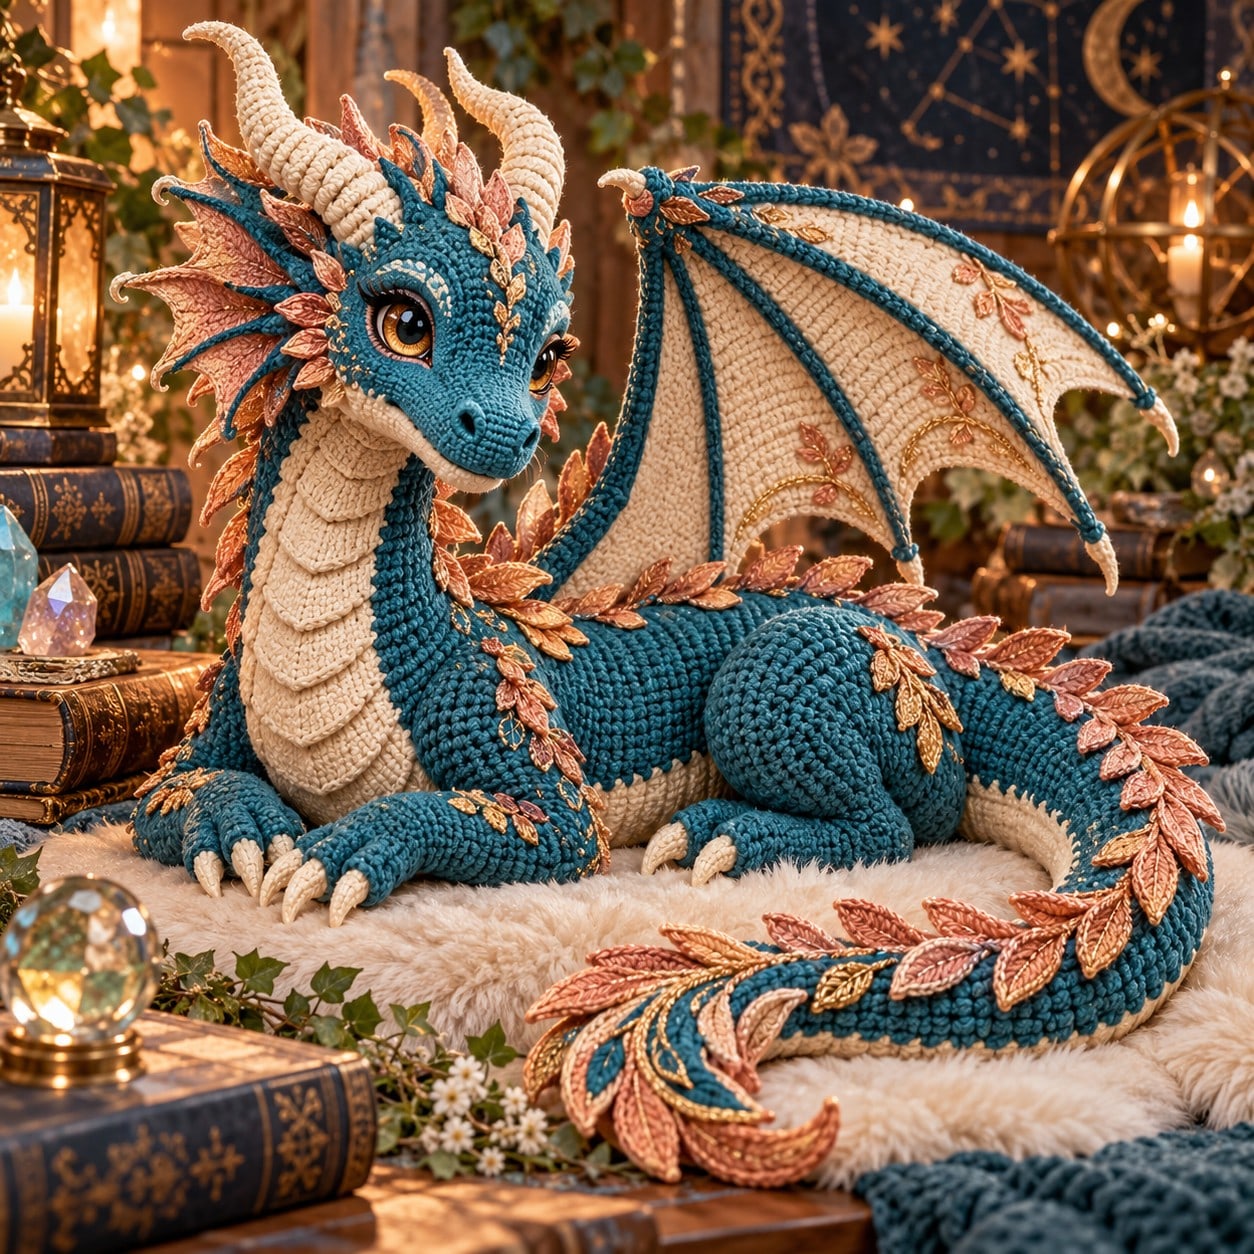
A sculptural, reclining fantasy dragon built from small modules: deep teal body, cream plated belly and horns, large cream wings, and layered copper, blush and gold leaf spines from crown to tail.

Fantasy · Crochet
- Finished length
- 38 cm / 15 in
- Wingspan
- 36 cm / 14 in
- Hooks
- 3.25 mm and 3.5 mm
- Yarn
- DK / light worsted (#3)
- Skill
- Intermediate to advanced
In this post
- At a Glance
- What's Included
- Materials, Yarn Palette and Tools
- Gauge, Measurements and Construction Chart
- Abbreviations and Stitch Notes
- Head Base and Muzzle
- Eyes, Horns and Facial Frills
- Neck, Body and Integrated Tail Core
- Cream Belly Foundation and Layered Plates
- Front Legs and Claws
- Hind Legs and Feet
- Leaf Spine Motifs and Placement Chart
- Wings — Make 2
- Final Assembly
- Finishing, Troubleshooting and Care
- Quick Reference Stitch-Count Chart
- Thank You
Some crochet projects are patterns, and some are builds. The Celestial Leaf Dragon is definitely a build — a sculptural, reclining fantasy dragon worked in small modules and assembled into a finished piece that sits about 38 cm long with a 36 cm wingspan. If you've ever wanted a dragon that looks like it belongs in a collector's display rather than a toy bin, this is the pattern.
The design pairs a deep teal body and long curved neck with a cream plated belly, two swept cream horns, layered copper, blush, and gold leaf spines running from crown to tail, and large cream wings with teal ribs. It's an intermediate-advanced project, and it's honest about that: the pattern asks you to measure, pin, and compare paired pieces for symmetry before sewing anything permanently. Work slowly, check stitch counts at the end of every shaping round, and pin all paired parts before sewing — that discipline is what makes the finished piece convincing.
This post walks through the entire pattern: materials, gauge, every component with round-by-round instructions, assembly, troubleshooting, and care.
At a Glance
| Pattern spec | Details |
|---|---|
| Finished length | Approx. 38 cm / 15 in from nose to relaxed tail curl |
| Height | Approx. 27 cm / 10.5 in to top of horns |
| Wingspan | Approx. 36 cm / 14 in |
| Yarn | DK / light worsted (#3) |
| Hooks | 3.25 mm and 3.5 mm |
| Construction | Separate head, muzzle, horns, belly panel, legs, wings, leaf spines; body and tail worked as one piece |
A note on the photos: The photographs are visual references for the intended look. Because yarn, stuffing, and personal tension vary, verify gauge and measurements before permanent assembly.
What's Included
- Full materials and yarn chart
- Gauge and finished measurements
- Abbreviations and construction order
- Round-by-round head, muzzle, and horn instructions
- Body/neck/tail construction and belly panel
- Front and hind legs with claws
- Leaf spine motifs and placement plan
- Two-piece wing instructions with rib placement
- Assembly map, measurement checks, troubleshooting, and care
Skill level and techniques
This is an intermediate-advanced pattern. You'll use:
- Continuous spiral single crochet
- Invisible decrease
- Working around a foundation chain
- Simple flat-row shaping
- Surface crochet / applied crochet details
- Stuffing and sculptural assembly
- Pinning for symmetry and reinforced hand sewing
Safety notes
- For display pieces, 18 mm safety eyes may be used. For a child-safe version, embroider the eyes instead.
- Do not add wire to horns, tail, or wings if the finished item will be given to a child. Shape with crochet, stuffing, and sewing only.
- Secure every decorative leaf and wing with repeated stitches. Bury yarn tails deeply.
- Inspect all parts after washing or heavy handling.
Materials, Yarn Palette and Tools
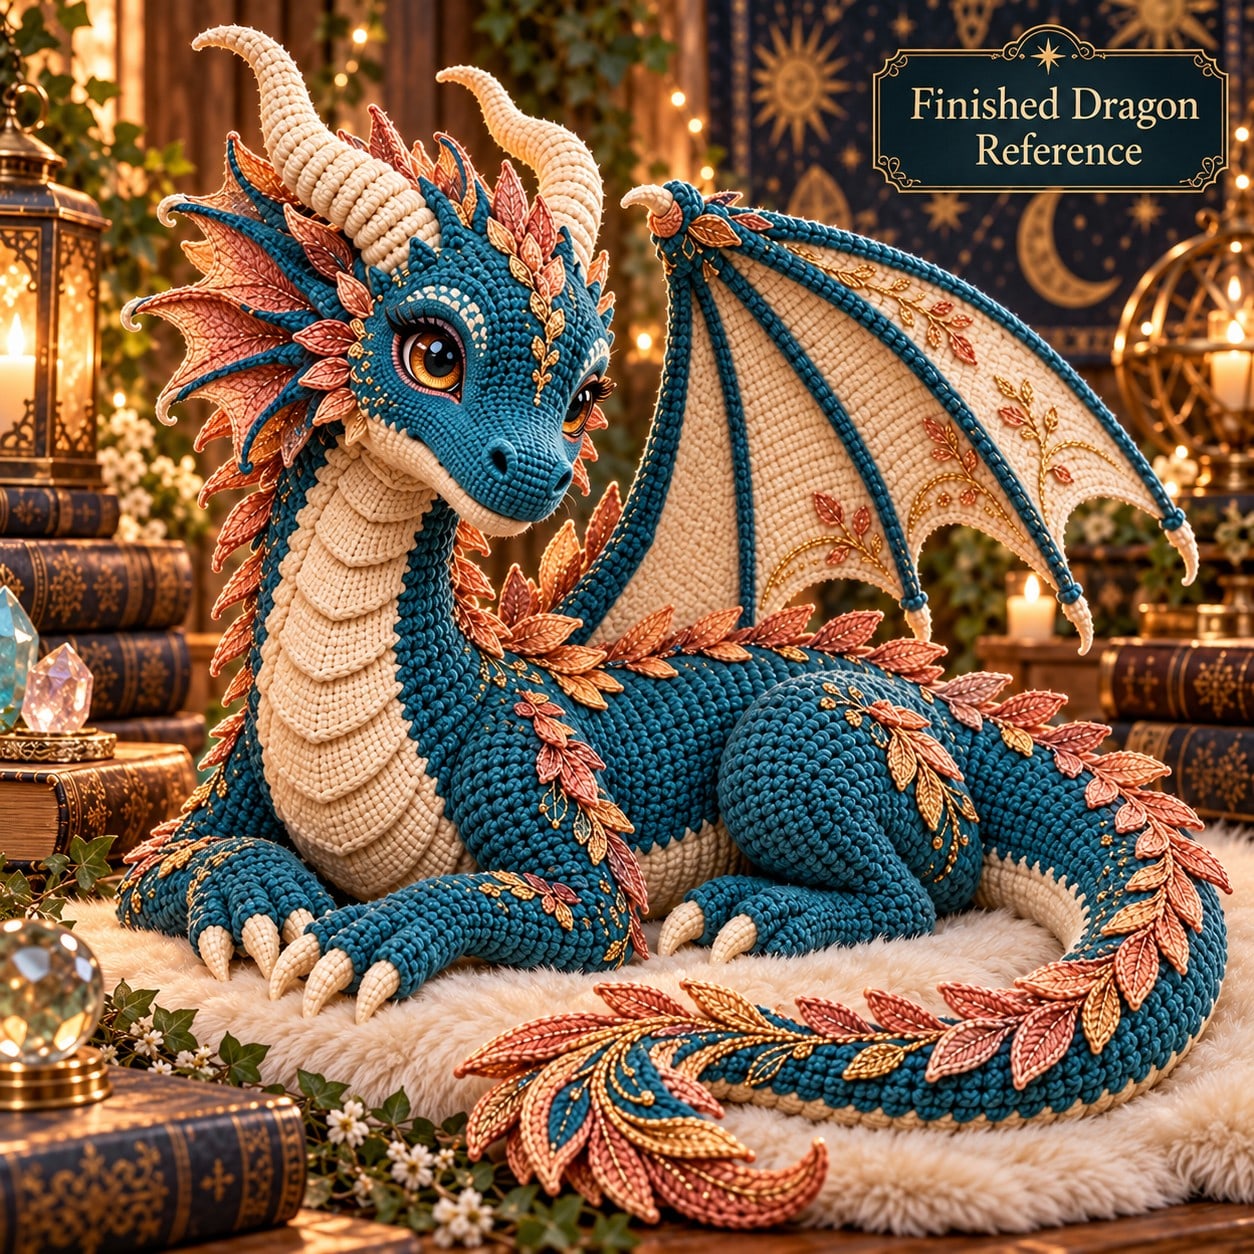
Because the palette does a lot of the design work, it's worth planning your yarn before you start. The dragon reads as a jewel-toned teal body with warm cream plates, and then the leaf spines do the decorative heavy lifting in copper rose, blush, and a touch of antique gold.
| Color / material | Recommended amount | Primary use |
|---|---|---|
| Deep teal DK yarn | 280 g / approx. 700–800 m | head, neck, body, tail, legs, wing frame |
| Warm cream DK yarn | 220 g / approx. 550–650 m | muzzle, belly, claws, horns, wing membrane |
| Copper rose DK yarn | 70 g / approx. 175 m | leaf spines and frills |
| Soft blush DK yarn | 35 g / approx. 90 m | secondary leaves / frills |
| Antique gold yarn or embroidery cotton | 15 g | small leaves and embroidery accents |
| Polyester fiberfill | 150–200 g | head, body, legs, horns |
Tools
| Tool | Use |
|---|---|
| 3.25 mm crochet hook | horns, claws, small leaf motifs |
| 3.5 mm crochet hook | head, body, legs, wings |
| Yarn/tapestry needle | assembly and weaving ends |
| Stitch markers | round start and placement points |
| Rust-resistant pins | symmetry checks before sewing |
| Flexible measuring tape | finished measurement checks |
| Scissors | yarn only — no fabric cutting |
| Blocking mat and pins | optional wing shaping |
Extras
| Item | Qty |
|---|---|
| 18 mm safety eyes | 2, optional |
| Strong matching sewing yarn | small amount |
The safety eyes are for a display version only. If you're making the dragon for a child, swap them for embroidered eyes.
Yarn substitute: Choose a smooth DK yarn with clear stitch definition. If your yarn is thicker or thinner, finished measurements and yardage will change.
Gauge, Measurements and Construction Chart
Gauge is not busywork on a sculptural piece like this — it's what makes the neck firm enough to hold the head, the belly panel lie flat, and the wings block to the right size. Hit the gauge and the measurement chart below becomes your road map.
Gauge: 18 single crochet stitches × 20 rounds = 10 × 10 cm / 4 × 4 in using the 3.5 mm hook in firm amigurumi tension. The fabric should be dense enough that stuffing does not show through.
Component measurement targets
| Component | Target measurement before assembly |
|---|---|
| Head | approx. 11 cm long × 8.5 cm high |
| Muzzle | approx. 6.5 cm long × 4 cm wide |
| Main horn (each) | approx. 11–12 cm along outside curve |
| Neck from head seam to shoulder | approx. 12 cm |
| Body widest circumference | approx. 33–35 cm |
| Tail from body join to tip | approx. 30–32 cm |
| Front leg | approx. 13 cm from shoulder seam to claw tip |
| Hind thigh | approx. 9 cm diameter at widest point |
| Hind foot | approx. 9 cm long |
| Wing each | approx. 18 cm high × 17–18 cm wide |
| Final wingspan | approx. 36 cm |
| Final dragon | approx. 38 cm long × 27 cm high |
Construction order
- Head base, muzzle and cream jaw patch
- Eyes, main horns, crown horns and facial frills
- Neck-body-tail core
- Front legs and claws
- Hind thighs, hind feet and claws
- Leaf spine motifs from crown to tail
- Two wings and surface ribs
- Cream belly foundation panel and overlapping neck plates
- Final assembly, embroidery, symmetry and care checks
Abbreviations and Stitch Notes
| Abbreviation | Meaning |
|---|---|
| MR | magic ring |
| ch | chain |
| sl st | slip stitch |
| sc | single crochet |
| hdc | half double crochet |
| dc | double crochet |
| tr | treble crochet |
| inc | 2 sc in the same stitch |
| dec | invisible single crochet decrease over 2 stitches |
| BLO | back loop only |
| FLO | front loop only |
| rnd | round |
| row | row |
| st / sts | stitch / stitches |
| FO | fasten off |
Working conventions
- Unless stated otherwise, amigurumi parts are worked in continuous spiral rounds.
- Mark the first stitch of each round and move the marker upward as you work.
- Numbers after an equals sign are the stitch count at the end of the round.
- Stuff gradually. Add small amounts frequently rather than one large piece.
- When making mirrored pairs, complete both pieces before sewing either one to the body.
Cutting / yarn preparation
No fabric cutting is required. Do not pre-cut structural yarn. Cut only when an instruction says FO. For decorative embroidery, prepare 45–60 cm / 18–24 in lengths so they do not fray or knot while stitching.
Head Base and Muzzle
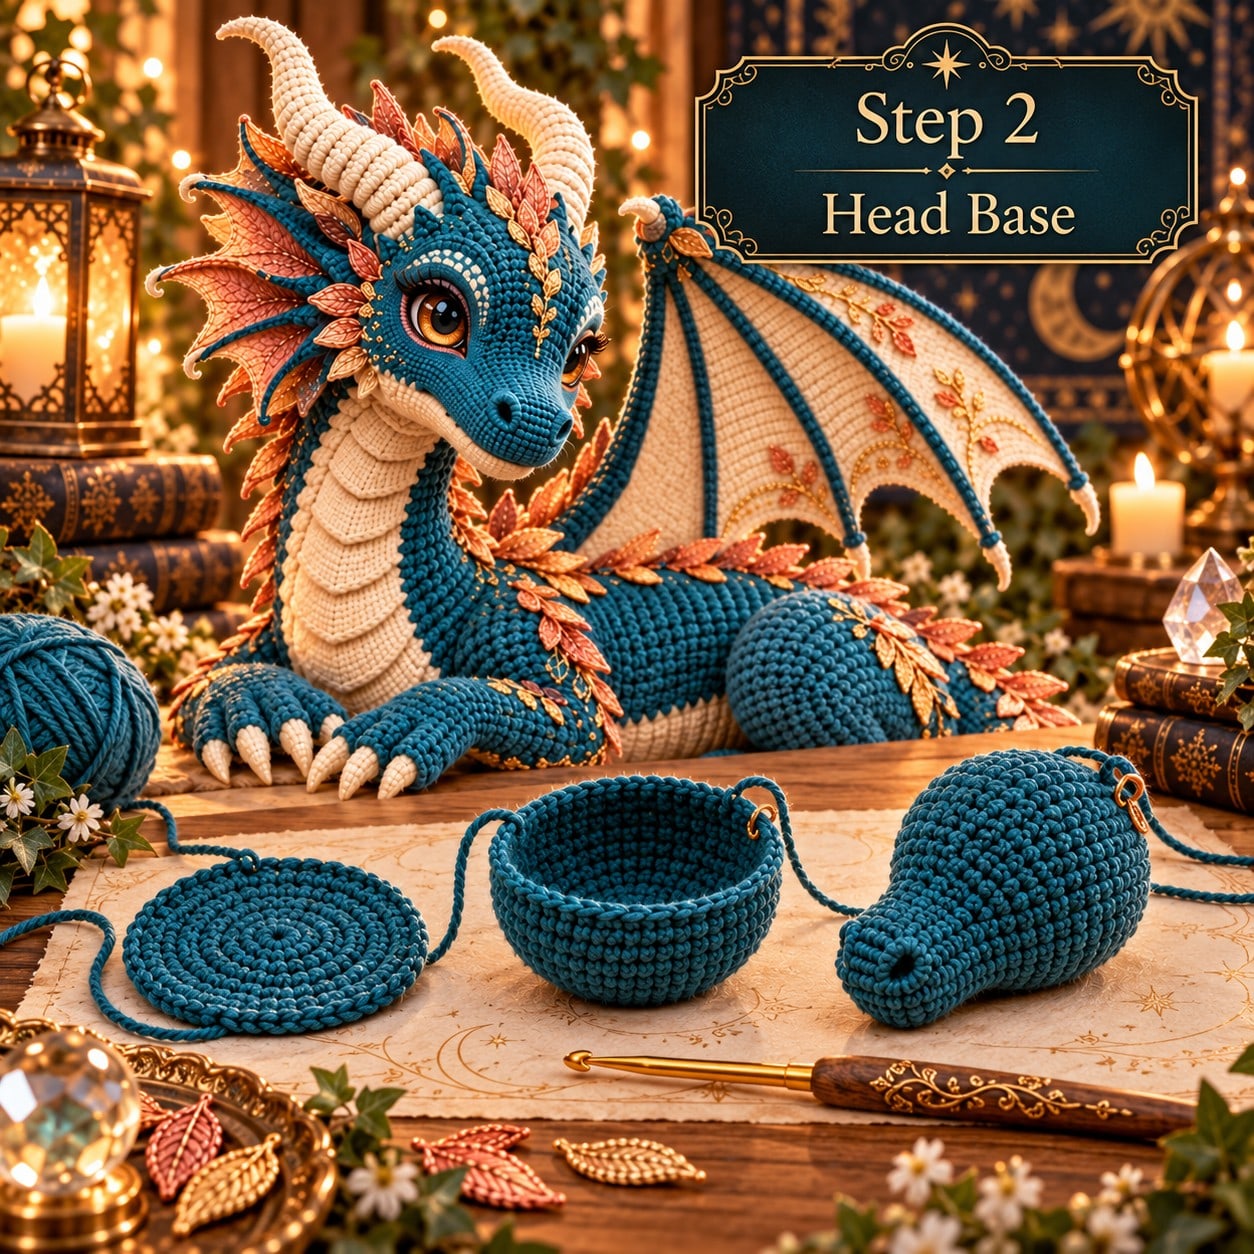
The head starts as a simple increasing sphere, but the last few rounds do something important: they stop early. The 24-stitch opening left at the end is not a mistake — it becomes the head-to-neck seam, so resist the urge to close it.
Head base — teal
| Round | Instruction | Count |
|---|---|---|
| R1 | 6 sc in MR | 6 |
| R2 | inc ×6 | 12 |
| R3 | (1 sc, inc) ×6 | 18 |
| R4 | (2 sc, inc) ×6 | 24 |
| R5 | (3 sc, inc) ×6 | 30 |
| R6 | (4 sc, inc) ×6 | 36 |
| R7 | (5 sc, inc) ×6 | 42 |
| R8–R12 | sc around | 42 each |
| R13 | (6 sc, inc) ×6 | 48 |
| R14–R18 | sc around | 48 each |
| R19 | (6 sc, dec) ×6 | 42 |
| R20 | (5 sc, dec) ×6 | 36 |
| R21 | (4 sc, dec) ×6 | 30 |
| R22 | (3 sc, dec) ×6 | 24 |
Stuff firmly during R19–R22. Leave the final 24-stitch opening unclosed; this opening becomes the head-to-neck seam. The round marker should sit on the underside/back so the visible face remains smooth.
Muzzle — teal
Ch 11. Starting in 2nd ch from hook:
| Round | Instruction | Count |
|---|---|---|
| R1 | sc 9, 3 sc in last ch; work along underside: sc 8, 2 sc in first ch | 22 |
| R2 | inc, sc 8, inc ×3, sc 8, inc ×2 | 28 |
| R3–R5 | sc around | 28 each |
| R6 | sc 6, dec, sc 12, dec, sc 6 | 26 |
| R7 | sc around | 26 |
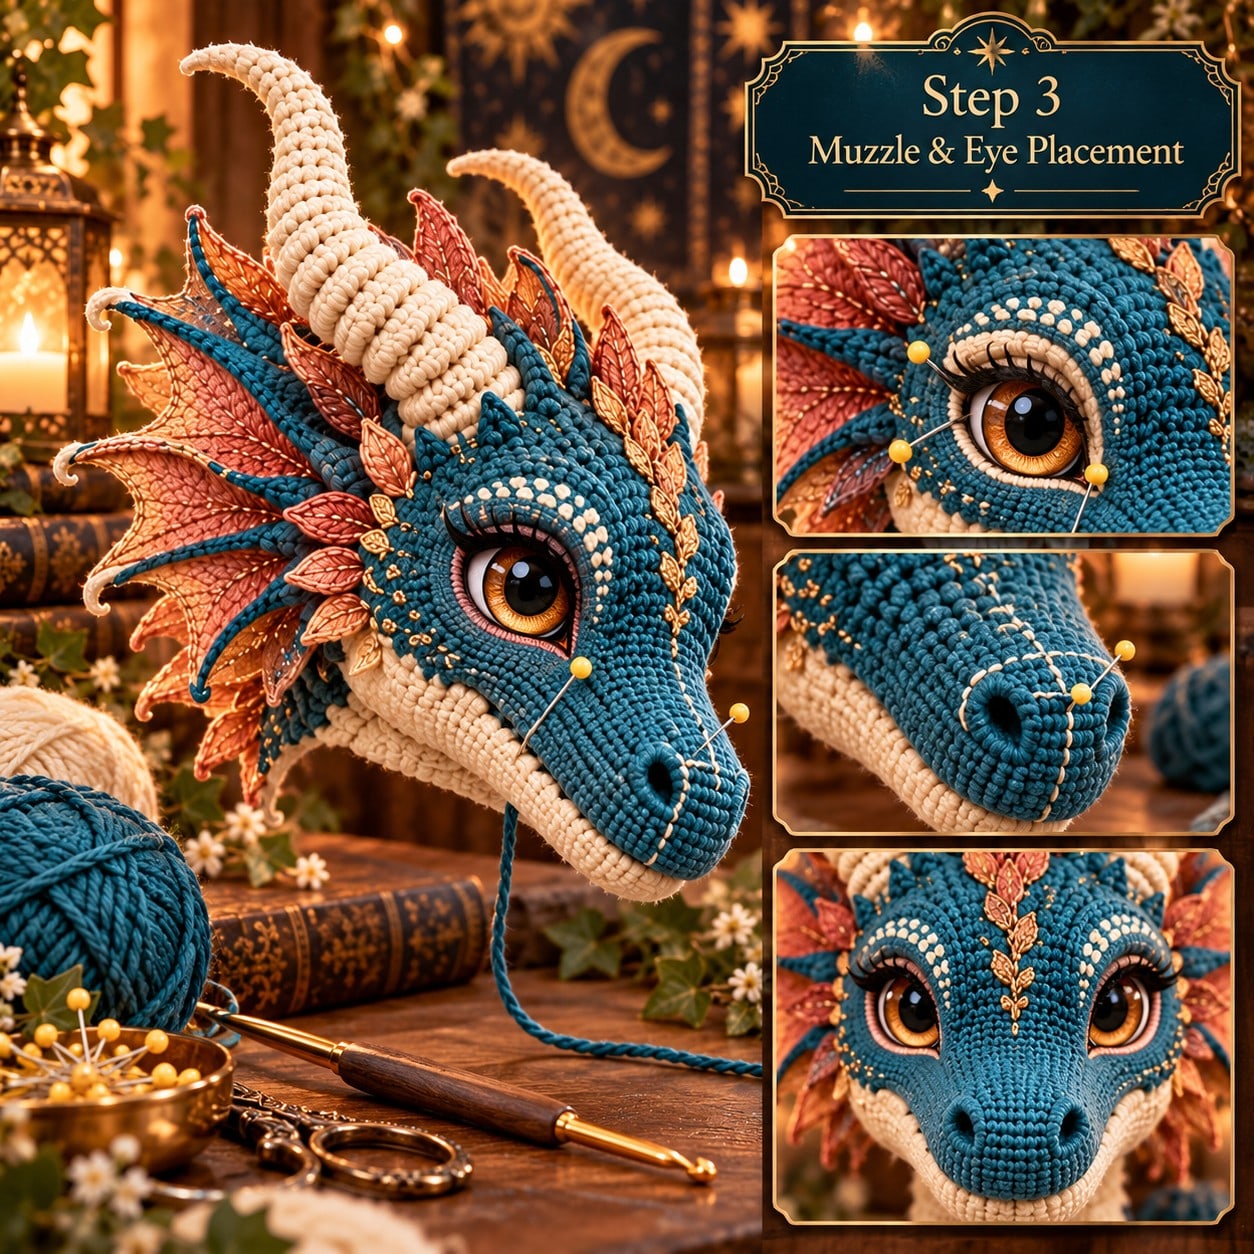
Lightly stuff the muzzle. Pin horizontally to the lower front of the head with its top edge around Head R11–R14. Sew through the muzzle edge and head stitches with small, even passes. Leave a soft transition at the cheeks rather than pulling the seam tight.
Cream jaw patch
Ch 9. Starting in 2nd ch, sc 7, 3 sc in last ch; work back along underside with sc 6, 2 sc in first ch = 18 sts. R2: inc at both rounded ends (4 increases total) while working sc along the straight sides = 22 sts. FO. Pin under the muzzle so 5–8 mm / ¼ in of cream remains visible around the lower edge, then sew flat.
Eyes, Horns and Facial Frills
Eye placement
Insert 18 mm safety eyes between Head R14 and R15, approximately 10 stitches apart measured across the front of the head. Before installing washers, compare both side views. For embroidered eyes, mark the same positions and stitch the eye shape after final assembly.
Main horns — make 2 in cream
| Round | Instruction | Count |
|---|---|---|
| R1 | 4 sc in MR | 4 |
| R2–R3 | sc around | 4 |
| R4 | (1 sc, inc) ×2 | 6 |
| R5–R7 | sc around | 6 |
| R8 | (2 sc, inc) ×2 | 8 |
| R9–R11 | sc around | 8 |
| R12 | (3 sc, inc) ×2 | 10 |
| R13–R15 | sc around | 10 |
| R16 | (4 sc, inc) ×2 | 12 |
| R17–R19 | sc around | 12 |
| R20 | (5 sc, inc) ×2 | 14 |
| R21–R23 | sc around | 14 |
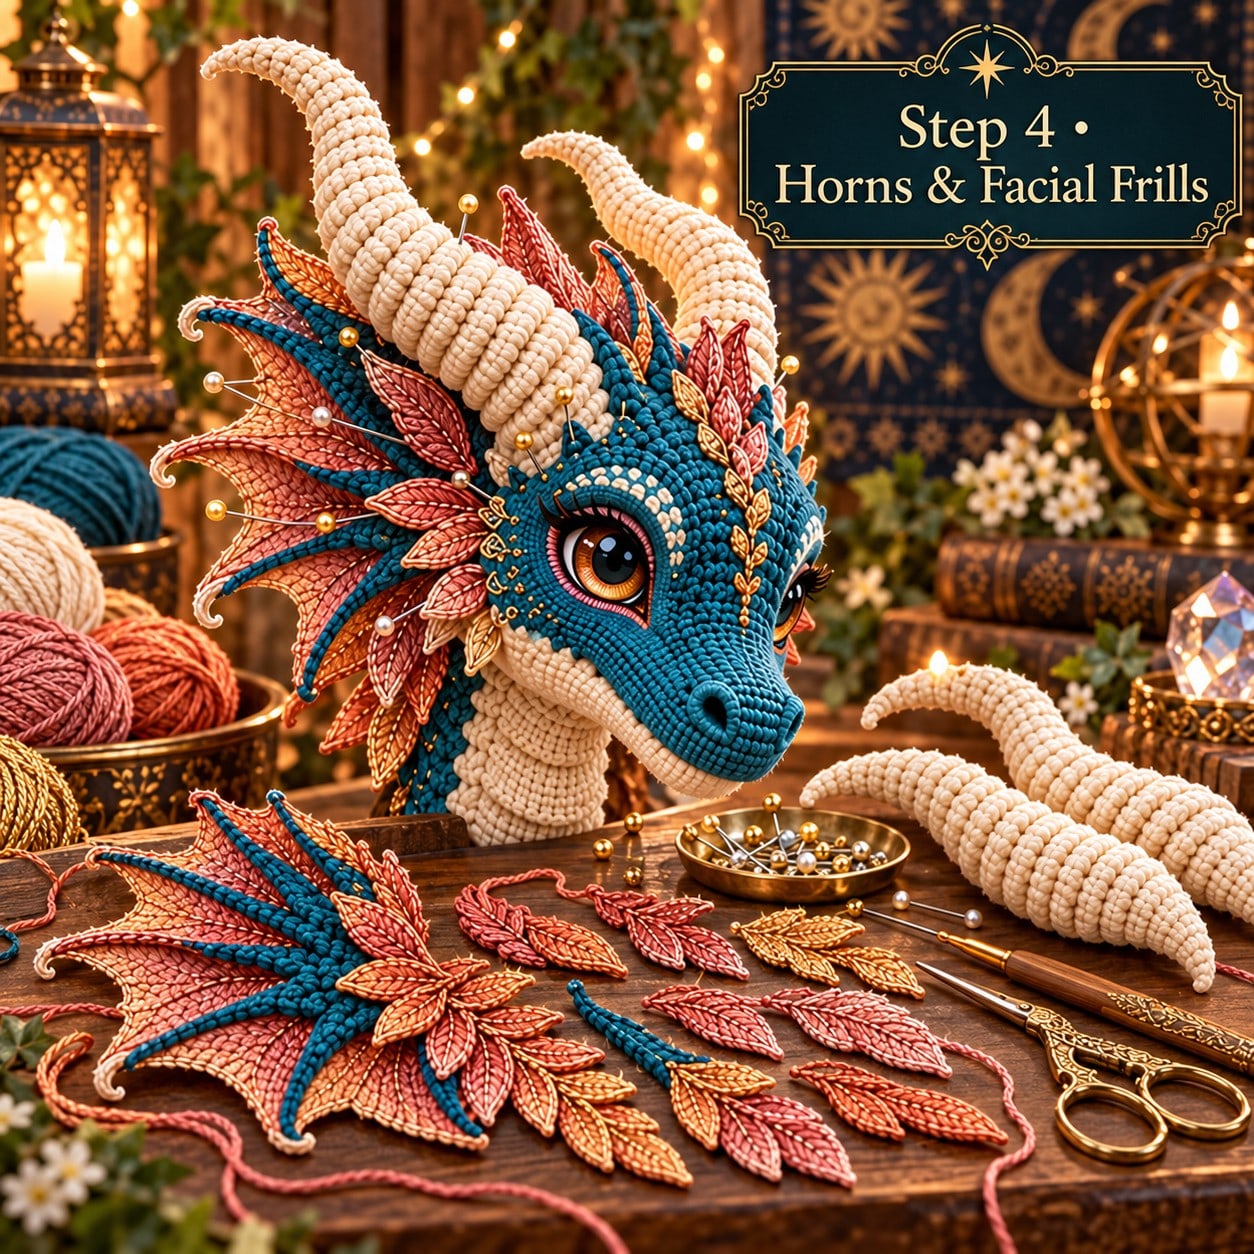
Stuff each horn lightly. To create the swept curve without wire, pinch the inner curve and make 3 small horizontal tacking stitches through R7–R9, R13–R15 and R18–R20. This shortens the inner side and creates a natural bend. Pin the horn bases between Head R7–R12, 6–7 stitches apart at the center line, then sew securely.
Small crown horns — make 4
R1: 4 sc in MR. R2–R3: 4 sc. R4: (1 sc, inc) ×2 = 6. R5–R6: 6 sc. R7: (2 sc, inc) ×2 = 8. R8: 8 sc. FO with a long tail. Stuff only the lower half. Arrange two smaller horns on each side behind the main horns.
Facial frills
Make 12–16 leaf motifs using the Small Leaf pattern, mixing copper, blush, and gold. Pin the longest leaves immediately behind the jawline, medium leaves around the cheek/temple, and the smallest leaves above the brows and between the horns. Sew only after checking front-view symmetry.
Neck, Body and Integrated Tail Core
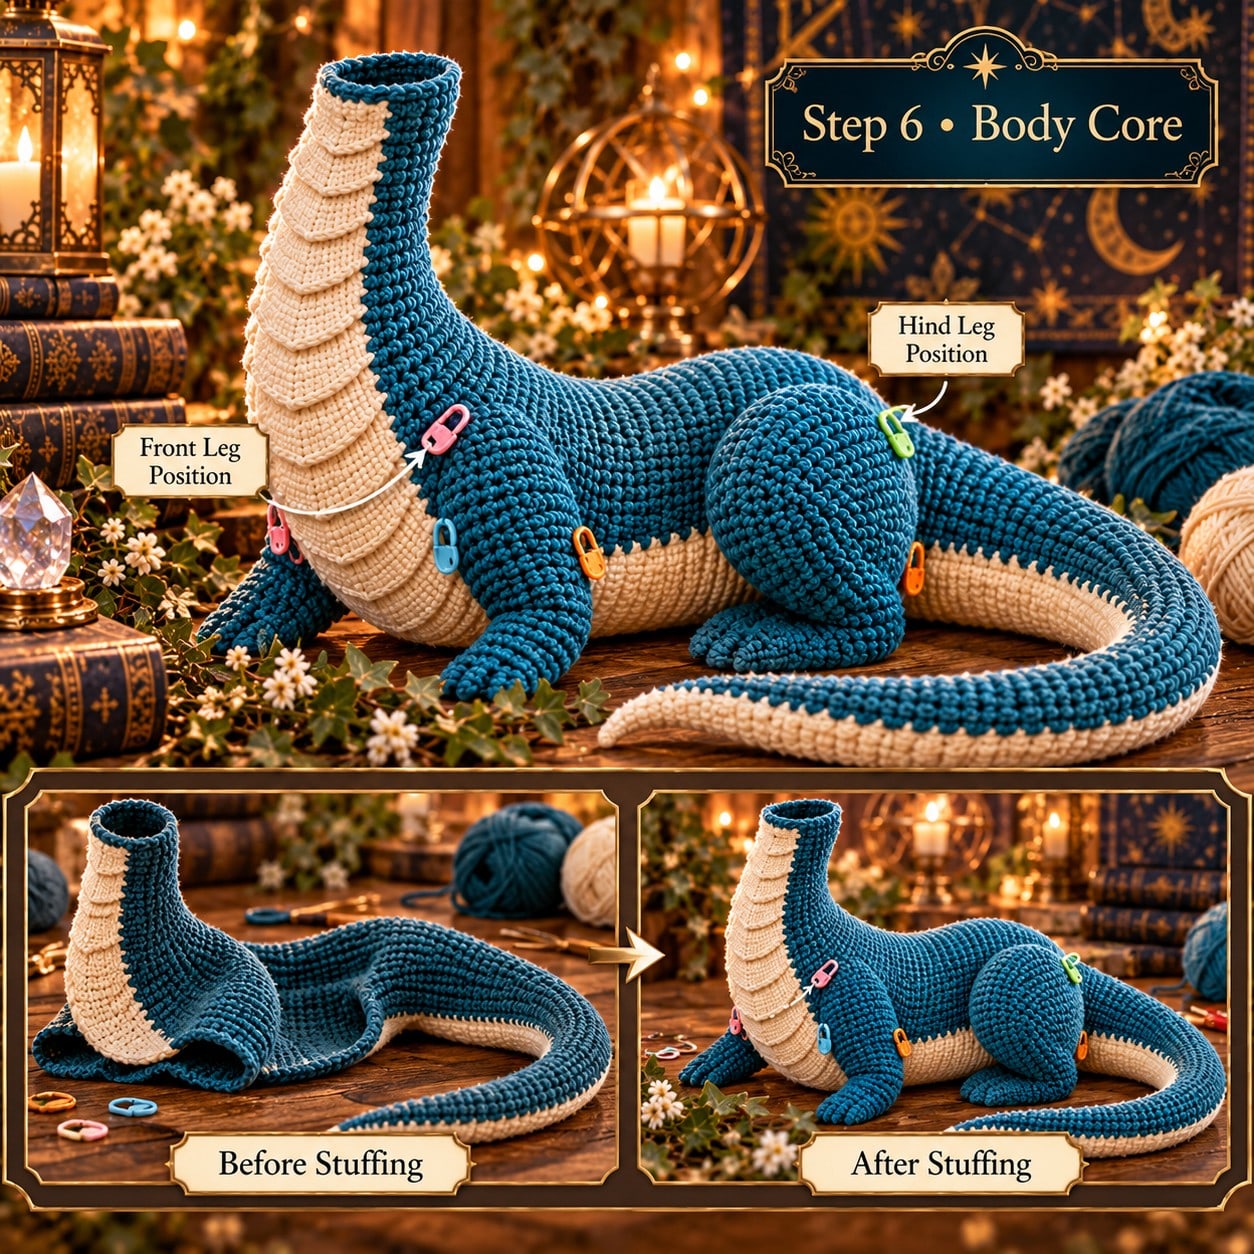
This is the biggest single piece in the pattern, and it's worked as one continuous spiral from the neck opening all the way to the tail tip — 82 rounds of shaping. Begin at the neck and leave a 50 cm / 20 in starting tail for attaching to the head, then stuff as you go: firm through the neck and shoulders, moderate through the torso, and progressively lighter down the tail so the last 15–20 rounds stay flexible enough to curl around the body.
| Round | Instruction | Count |
|---|---|---|
| R1–R4 | sc around | 24 each |
| R5 | (3 sc, inc) ×6 | 30 |
| R6–R7 | sc around | 30 each |
| R8 | (4 sc, inc) ×6 | 36 |
| R9–R10 | sc around | 36 each |
| R11 | (5 sc, inc) ×6 | 42 |
| R12–R13 | sc around | 42 each |
| R14 | (6 sc, inc) ×6 | 48 |
| R15–R20 | sc around | 48 each |
| R21 | (7 sc, inc) ×6 | 54 |
| R22–R23 | sc around | 54 each |
| R24 | (8 sc, inc) ×6 | 60 |
| R25–R33 | sc around | 60 each |
| R34 | (8 sc, dec) ×6 | 54 |
| R35–R36 | sc around | 54 each |
| R37 | (7 sc, dec) ×6 | 48 |
| R38–R39 | sc around | 48 each |
| R40 | (6 sc, dec) ×6 | 42 |
| R41–R42 | sc around | 42 each |
| R43 | (5 sc, dec) ×6 | 36 |
| R44–R47 | sc around | 36 each |
| R48 | (4 sc, dec) ×6 | 30 |
| R49–R53 | sc around | 30 each |
| R54 | (3 sc, dec) ×6 | 24 |
| R55–R60 | sc around | 24 each |
| R61 | (2 sc, dec) ×6 | 18 |
| R62–R68 | sc around | 18 each |
| R69 | (1 sc, dec) ×6 | 12 |
| R70–R77 | sc around | 12 each |
| R78 | dec ×6 | 6 |
| R79–R82 | sc around; stuff very lightly, then close | 6 each |
Stuff R1–R24 firmly for neck support, R25–R42 moderately for the torso, and the tail progressively lighter from R43 onward. The last 15–20 rounds should remain flexible enough to curl around the body.
Cream Belly Foundation and Layered Plates
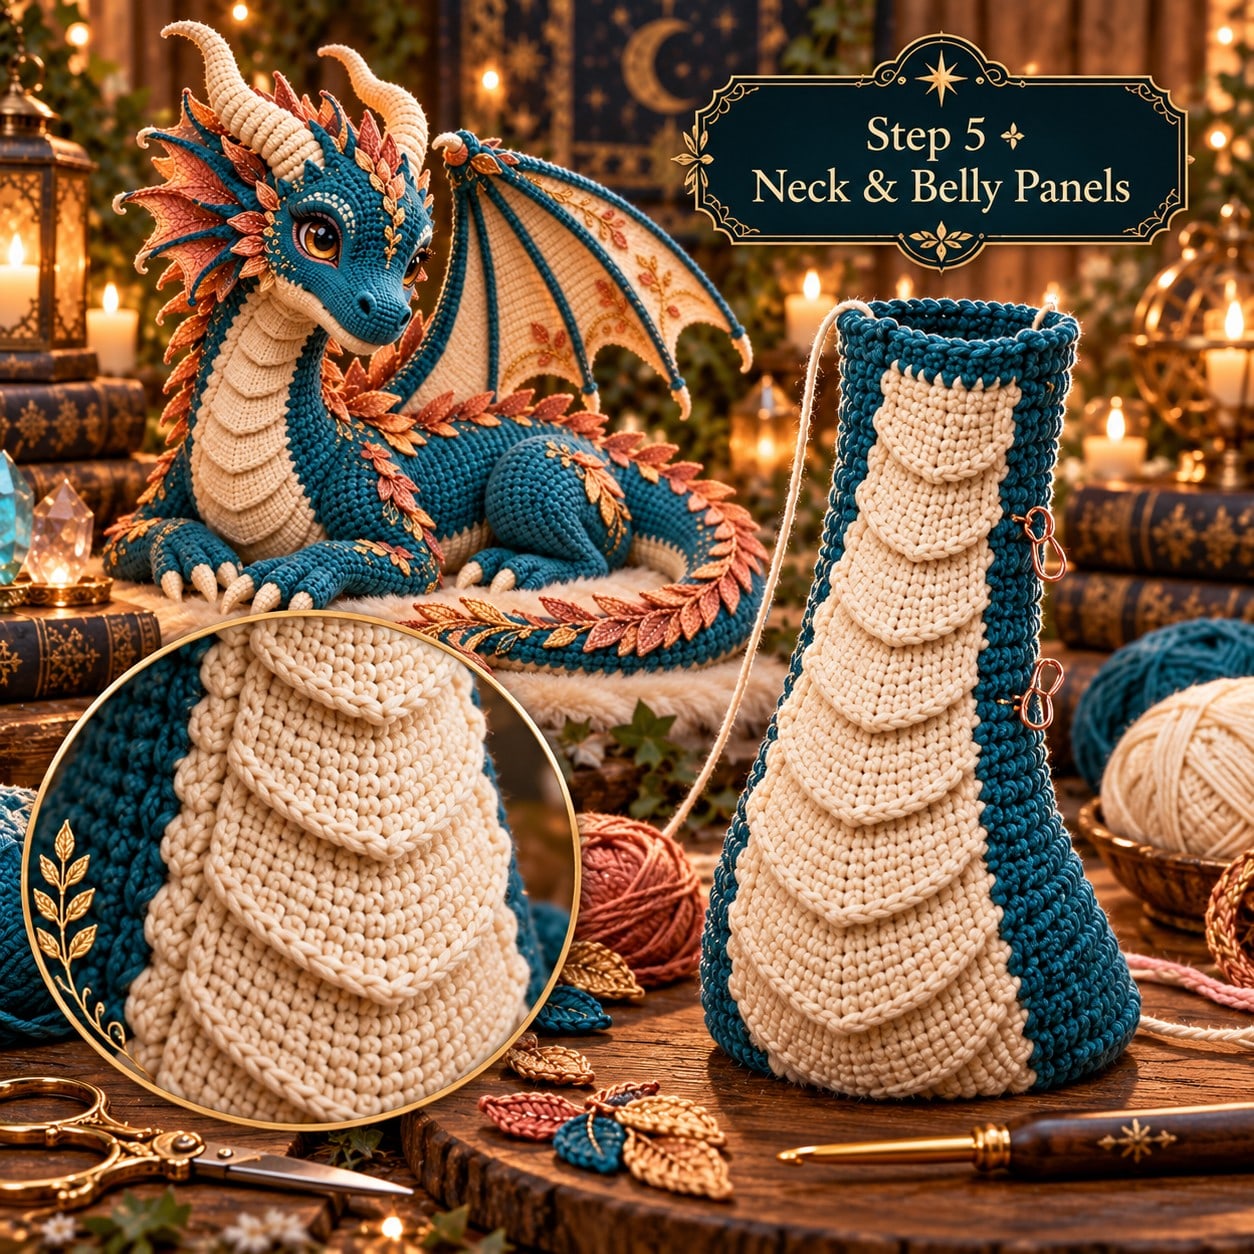
Foundation strip — cream, 3.5 mm hook
Ch 8. Row 1: sc in 2nd ch and across = 7. Ch 1, turn after every row unless stated otherwise.
| Rows | Instruction | Count |
|---|---|---|
| Rows 2–6 | sc 7 | 7 |
| Row 7 | inc, sc 5, inc | 9 |
| Rows 8–11 | sc 9 | 9 |
| Row 12 | inc, sc 7, inc | 11 |
| Rows 13–20 | sc 11 | 11 |
| Row 21 | inc, sc 9, inc | 13 |
| Rows 22–32 | sc 13 | 13 |
| Row 33 | dec, sc 9, dec | 11 |
| Rows 34–40 | sc 11 | 11 |
| Row 41 | dec, sc 7, dec | 9 |
| Rows 42–50 | sc 9 | 9 |
| Row 51 | dec, sc 5, dec | 7 |
| Rows 52–64 | sc 7 | 7 |
At gauge the strip should be about 31–33 cm long. If your core is longer or shorter, add or remove plain rows in the center torso section (Rows 22–32), not at the neck or tail taper.
Overlapping neck plates — make 9
For Plate 1 ch 7; for Plates 2–5 ch 9; for Plates 6–9 ch 11. Work across the chain with sc, then 3 sc in the final chain and sc back along the underside to create a narrow oval. Work one additional sc round. FO. Pin the plates from chin downward, overlapping each lower plate by about one-third of its height. Sew only along the upper curved edge so the lower edge remains slightly raised.
Attach belly foundation
Center the narrow end under the neck and pin along the entire underside through the body and tail base. The 13-stitch section should sit under the widest torso. Sew both long edges with small whipstitches. Stop the belly strip where the tail becomes narrow; the last tail section remains teal.
Front Legs and Claws
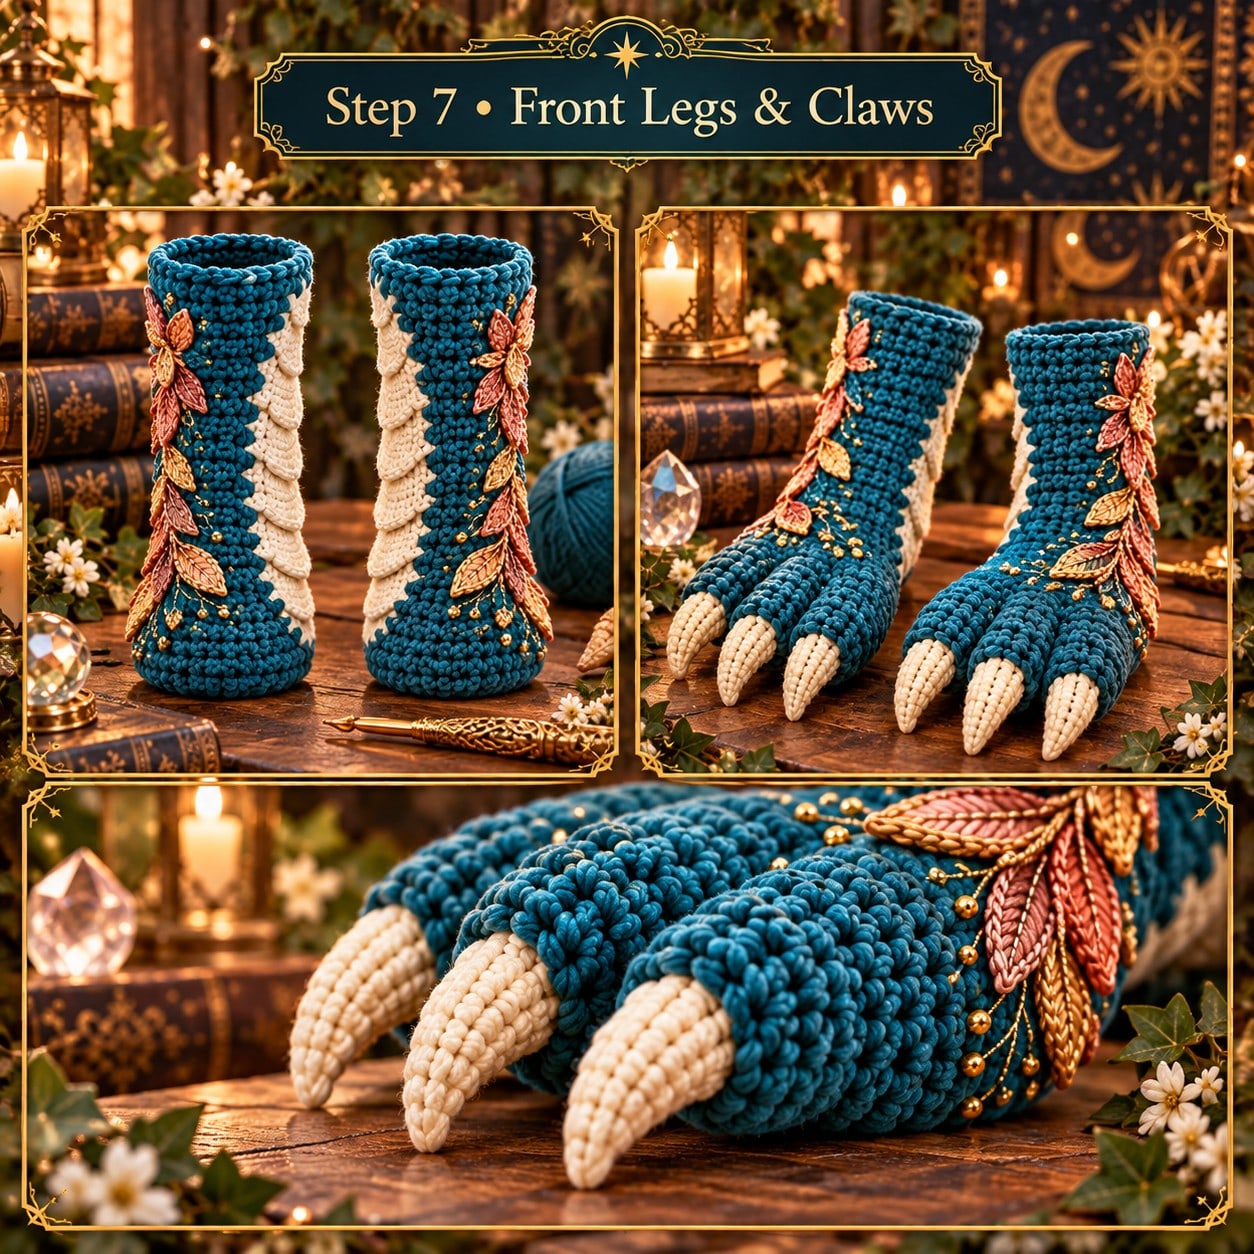
Cream claws — make 8
| Round | Instruction | Count |
|---|---|---|
| R1 | 4 sc in MR | 4 |
| R2–R4 | sc around | 4 each |
| R5 | sc 2, dec | 3 |
| R6 | sc around; FO | 3 |
Front leg — make 2 in teal
| Round | Instruction | Count |
|---|---|---|
| R1 | 6 sc in MR | 6 |
| R2 | inc ×6 | 12 |
| R3 | (1 sc, inc) ×6 | 18 |
| R4 | (2 sc, inc) ×6 | 24 |
| R5–R7 | sc around | 24 each |
| R8 | (2 sc, dec) ×6 | 18 |
| R9–R18 | sc around | 18 each |
| R19 | (1 sc, dec) ×6 | 12 |
| R20–R22 | sc around; FO with long tail | 12 each |
Stuff the paw firmly, then reduce stuffing through the upper tube so the leg can rest naturally. Flatten the closed upper edge. Sew four claws across the front of the paw, spacing them evenly. Pin the legs immediately below the chest, approximately 4.5–5 cm apart from center to center. The paws should face forward and rest flat.
Optional cream inner-leg stripe
Ch 4. Sc 3 across for 16–18 rows. FO and sew the narrow strip down the inner/front side of each leg before the legs are attached to the body.
Hind Legs and Feet
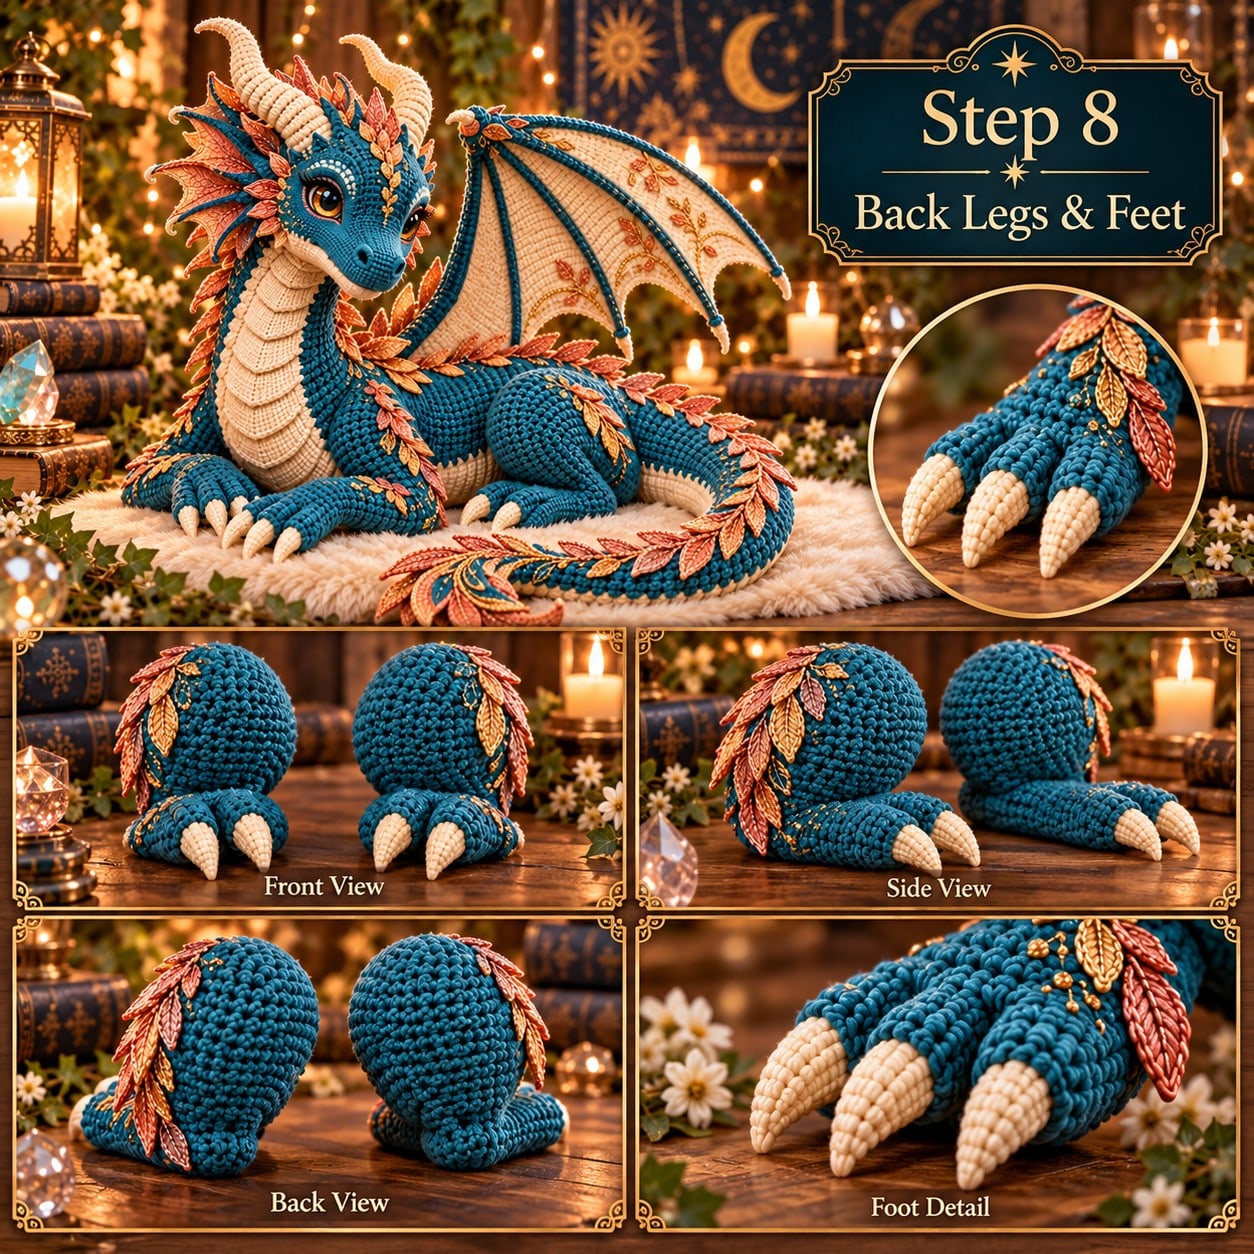
Hind thigh — make 2 in teal
| Round | Instruction | Count |
|---|---|---|
| R1 | 6 sc in MR | 6 |
| R2 | inc ×6 | 12 |
| R3 | (1 sc, inc) ×6 | 18 |
| R4 | (2 sc, inc) ×6 | 24 |
| R5 | (3 sc, inc) ×6 | 30 |
| R6 | (4 sc, inc) ×6 | 36 |
| R7–R13 | sc around | 36 each |
| R14 | (4 sc, dec) ×6 | 30 |
| R15–R17 | sc around | 30 each |
| R18 | (3 sc, dec) ×6 | 24 |
| R19–R21 | sc around; FO with long tail | 24 each |
Hind foot — make 2 in teal
| Round | Instruction | Count |
|---|---|---|
| R1 | 6 sc in MR | 6 |
| R2 | inc ×6 | 12 |
| R3 | (1 sc, inc) ×6 | 18 |
| R4 | (2 sc, inc) ×6 | 24 |
| R5–R7 | sc around | 24 each |
| R8 | (2 sc, dec) ×6 | 18 |
| R9–R13 | sc around; FO with long tail | 18 each |
Make 6 claws using the claw pattern above and sew three to each hind foot. Stuff the thighs firmly and feet moderately. Sew each foot to the lower/front edge of a thigh at approximately a 90-degree angle. Pin the thighs to the widest side of the body (around Body R27–R35), slightly behind the shoulder line. The knees should angle forward and the feet should rest beside the belly.
Leaf Spine Motifs and Placement Chart
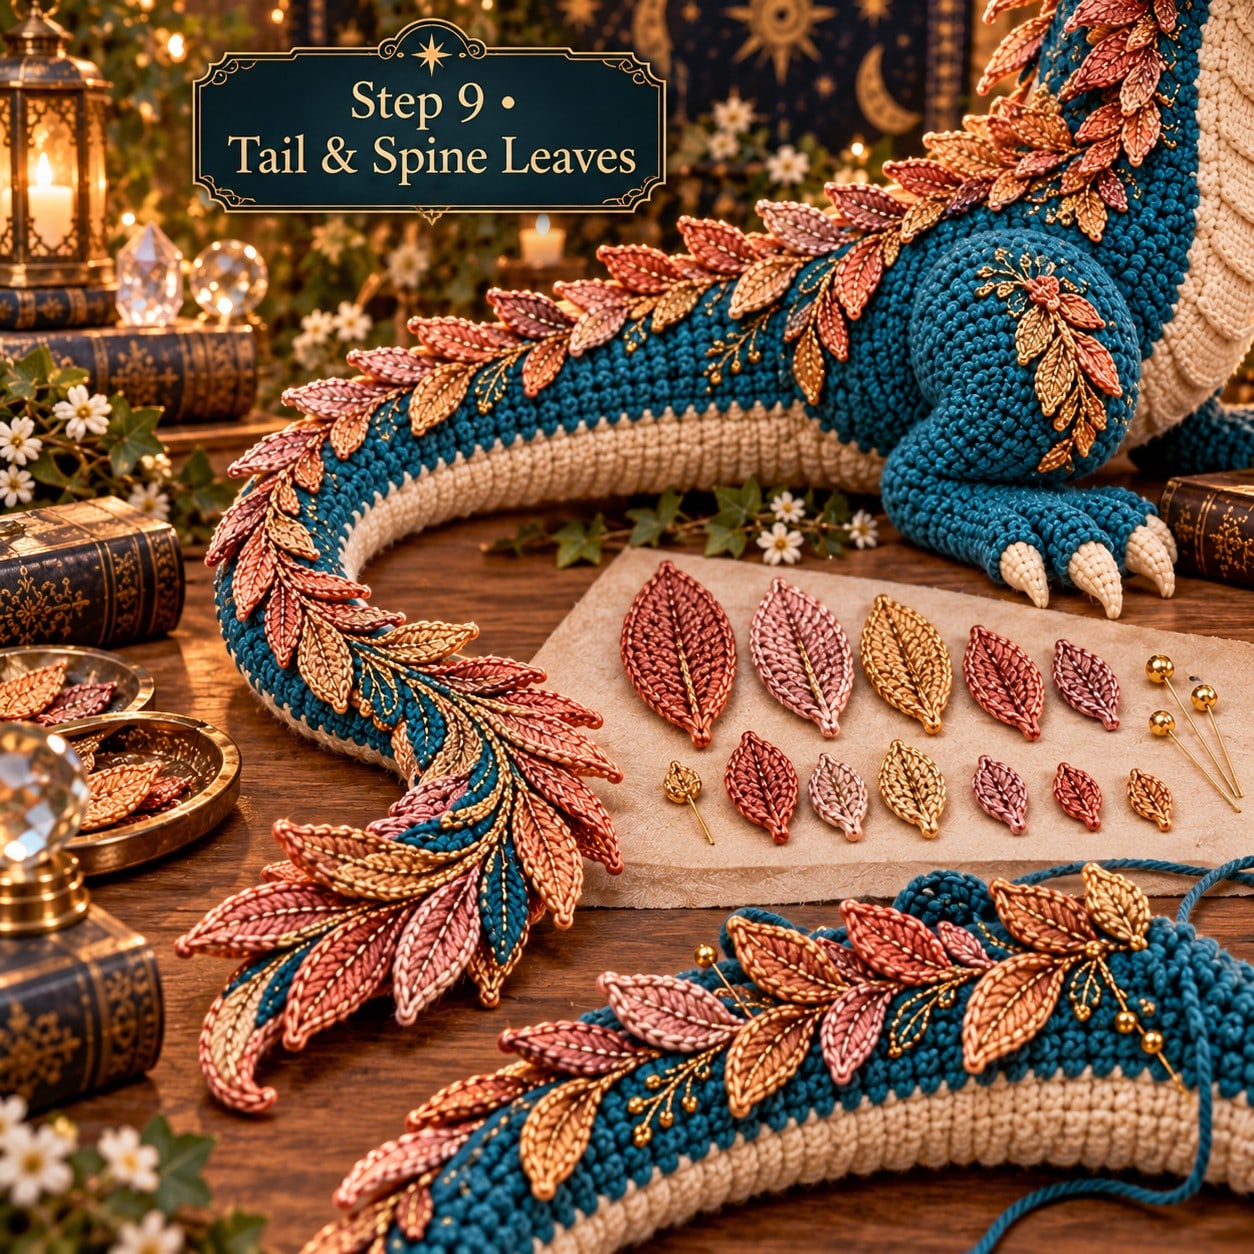
The leaves are what give this dragon its name, and also what make every finished dragon look a little different. Work three sizes and mix them in overlapping rows rather than a mechanical pattern.
Small leaf — make 10–14
Ch 6. Starting in 2nd ch: sc, hdc, dc, hdc, 3 sc in last ch; working along the opposite side of the foundation chain: hdc, dc, hdc, sc. Join with sl st. FO with a long sewing tail. Approx. 3.5–4 cm long.
Medium leaf — make 12–16
Ch 8. Starting in 2nd ch: sc, hdc, dc, tr, dc, hdc, 3 sc in last ch; along opposite side: hdc, dc, tr, dc, hdc, sc. Join. FO. Approx. 5–5.5 cm long.
Large leaf — make 8–10
Ch 10. Starting in 2nd ch: sc, hdc, dc, tr, double-treble, tr, dc, hdc, 3 sc in last ch; along opposite side work the stitches in reverse order back to the beginning. Join. FO. Approx. 6.5–7 cm long.
Placement chart
| Zone | Suggested size / quantity | Placement |
|---|---|---|
| Cheeks and crown | 8–10 small/medium | fan outward behind jaw and brows |
| Back of neck | 6–8 medium/large | overlap upward toward crown |
| Shoulder to hip | 8–10 medium | single staggered spine line |
| Tail base | 6–8 medium/large | densest section |
| Tail middle | 6–8 medium/small | reduce size gradually |
| Tail tip | 4–6 small | fan around final curve |
For a natural botanical look, do not alternate colors mechanically. Use copper as the dominant color, blush as the secondary tone, and gold sparingly as a highlight. Pin the entire spine line before sewing any motif.
Wings — Make 2
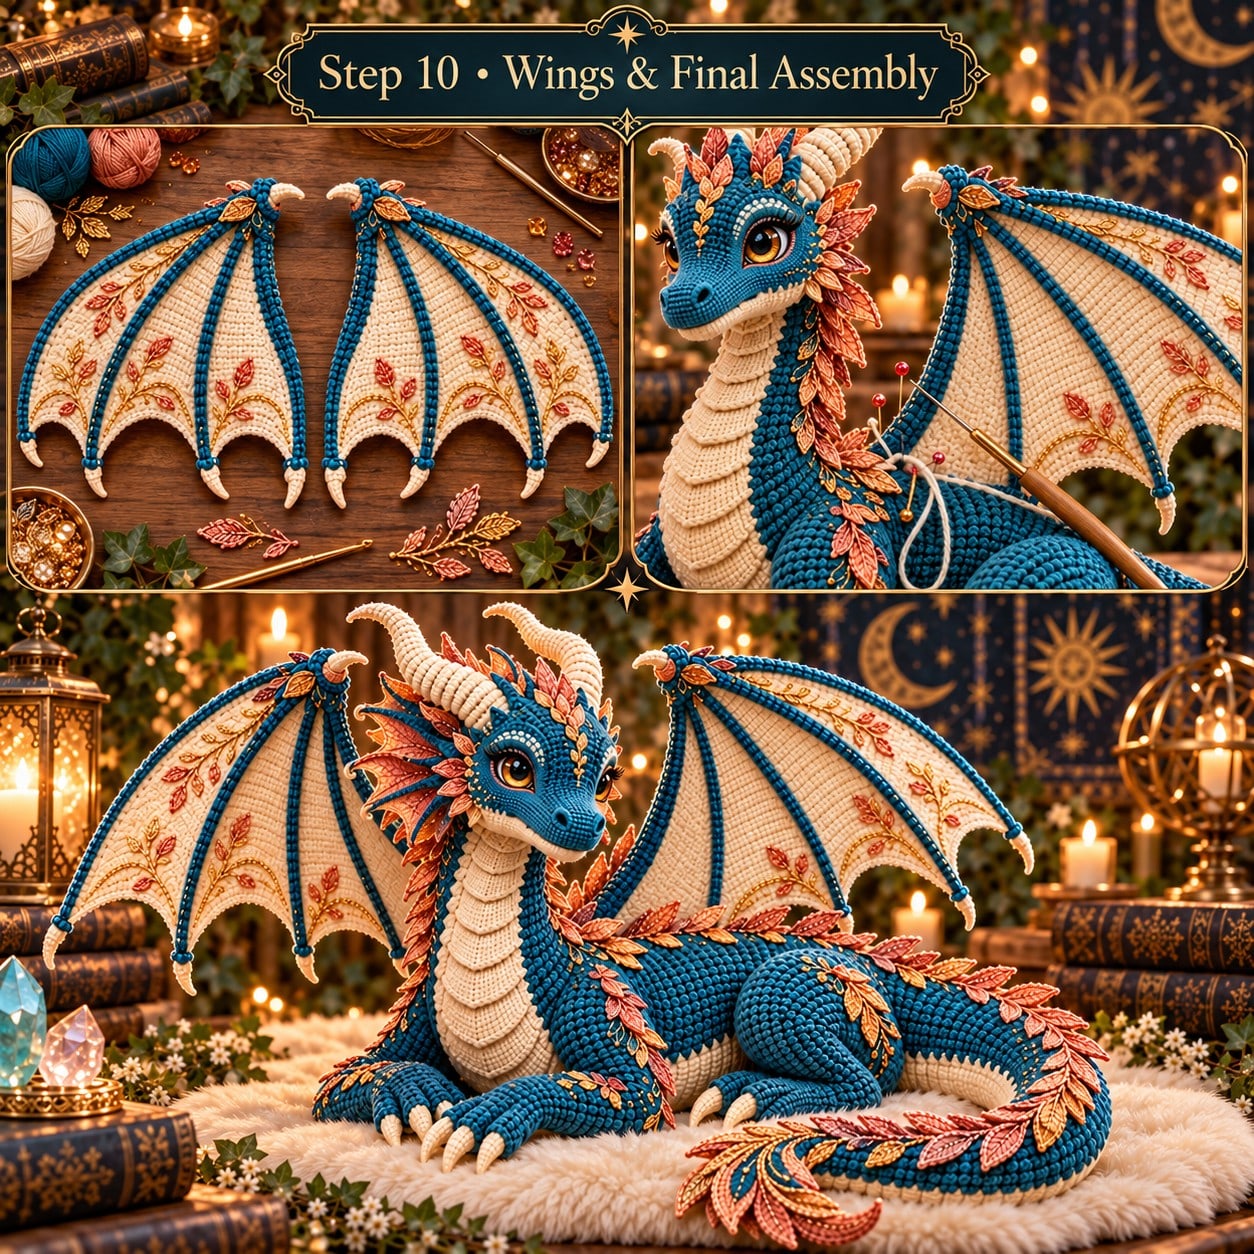
Cream membrane — 3.5 mm hook
Ch 41. Row 1: sc in 2nd ch and across = 40. Ch 1, turn after each row.
| Row | Instruction | Count |
|---|---|---|
| Row 2 | sc across | 40 |
| Row 3 | dec, sc across to last 2 sts, dec | 38 |
| Row 4 | sc across | 38 |
| Row 5 | dec, sc across to last 2 sts, dec | 36 |
| Row 6 | sc across | 36 |
| Row 7 | dec, sc across to last 2 sts, dec | 34 |
| Row 8 | sc across | 34 |
| Row 9 | dec, sc across to last 2 sts, dec | 32 |
| Row 10 | sc across | 32 |
| Row 11 | dec, sc across to last 2 sts, dec | 30 |
| Row 12 | sc across | 30 |
| Row 13 | dec, sc across to last 2 sts, dec | 28 |
| Row 14 | sc across | 28 |
| Row 15 | dec, sc across to last 2 sts, dec | 26 |
| Row 16 | sc across | 26 |
| Row 17 | dec, sc across to last 2 sts, dec | 24 |
| Row 18 | dec at outer edge only, sc remaining stitches | 23 |
| Row 19 | dec at outer edge only, sc remaining stitches | 22 |
| Row 20 | dec at outer edge only, sc remaining stitches | 21 |
| Row 21 | dec at outer edge only, sc remaining stitches | 20 |
| Row 22 | dec at outer edge only, sc remaining stitches | 19 |
| Row 23 | dec at outer edge only, sc remaining stitches | 18 |
At the end of Row 23, FO cream. The panel should form a broad tapered triangle. If your gauge matches, the top edge is approx. 22 cm before framing and the height is approx. 16–18 cm.
Teal outer frame
Join teal at the wing root corner. Work sc evenly around the top edge, outer edge, and lower edge, placing 3 sc in each sharp corner. Work a second sc round on the top and outer edge only to strengthen the frame. FO at the root.
Surface ribs
Mark four points along the lower edge so the spans are visually even. With teal yarn, surface slip stitch from the wing root to each marked point, creating four rib lines. Do not pull tightly; the membrane must stay flat. Add a small cream horn tip at the outer top corner if desired: R1 4 sc in MR, R2–R4 4 sc, R5 dec twice = 2, FO and sew to the frame tip.
Lower scallop shaping
Along the lower cream edge, join cream at the root. Repeat sl st in next st, skip 1, 5 dc in next st, skip 1 as evenly as possible across the lower edge. Adjust one plain sc near the outer tip if needed so the final scallop sits symmetrically.
Final Assembly
- Pin the head to the 24-stitch neck opening. Align the center underside of the muzzle with the center of the cream belly panel. Sew the seam twice: first around the circumference, then a second reinforcing pass through alternating stitches.
- Attach both front legs below the chest. Check that four claws face forward and that both paws touch the table.
- Attach assembled hind legs at the widest body side points, with knees forward and feet slightly tucked.
- Curl the tail around the body. Add a few hidden tacking stitches only if you want a permanent display pose.
- Pin both wings behind the shoulder line, approximately 2.5–3 cm behind the neck seam. Angle them upward and outward. Sew around the root area with repeated passes; do not sew the entire lower wing edge to the body.
- Pin and sew all leaf spines from crown to tail, then add any small gold embroidery accents.
- Embroider nostril highlights, eyebrow accents, and optional gold dots only after the main structure is complete.
Attachment measurement chart
| Part | Placement guide |
|---|---|
| Head | centered on 24-stitch neck opening |
| Main horns | bases between Head R7–R12; 6–7 sts apart |
| Eyes | between Head R14–R15; about 10 sts apart |
| Front legs | below chest; approx. 4.5–5 cm center-to-center |
| Hind thighs | Body R27–R35 at widest side points |
| Wing roots | 2.5–3 cm behind neck seam; equal height on both sides |
| Back leaf spine | centered from back of crown to tail tip |
Final measurements
- Length: approx. 38 cm / 15 in nose to relaxed tail curl
- Height: approx. 27 cm / 10.5 in to horn tip
- Wingspan: approx. 36 cm / 14 in
- Body should sit without rolling to either side
- No stuffing should be visible through the fabric
Finishing, Troubleshooting and Care
Finishing checklist
- All seams are reinforced and yarn tails buried in multiple directions.
- Main horns match in angle and height.
- Face is symmetrical from front view.
- Both front paws and both hind feet touch the same surface.
- Wing roots are equally high and wings open at similar angles.
- Belly panel lies flat without puckering.
- Leaf spines are firmly sewn and do not twist.
- Tail curl is smooth and not overstuffed.
Troubleshooting chart
| Problem | Likely cause | Fix |
|---|---|---|
| Neck bends forward | neck under-stuffed | add small stuffing pieces through seam before closing |
| Head tilts sideways | neck seam misaligned | remove a section of seam, repin center marks, resew |
| Body rolls | hind legs uneven or belly overstuffed | reposition legs and redistribute stuffing |
| Tail will not curl | tail overstuffed | remove stuffing from final 15–20 rounds |
| Wings droop | root seam too narrow | resew a wider root area behind shoulder |
| Wing membrane ripples | surface ribs too tight | remove rib and restitch with relaxed tension |
| Leaves look random | motifs sewn individually without layout | pin the full spine line first, then sew |
| Claws point sideways | paw rotated during assembly | repin paw/leg seam and check front view |
Care
Spot clean whenever possible. Do not machine wash a heavily embellished display dragon. Reshape the neck, tail, and wings while damp and dry flat. Store so the wings are not crushed. If washing is necessary, hand wash gently in cool water with mild detergent. Before selling or gifting, gently pull every horn, leaf, claw, and wing root.
Quick Reference Stitch-Count Chart
Use this chart as a final arithmetic check while crocheting. It does not replace the full instructions.
- Head: 6-12-18-24-30-36-42; hold 42; increase to 48; taper 42-36-30-24
- Muzzle: 22 → 28; hold 28; taper to 26
- Main horn: 4 → 6 → 8 → 10 → 12 → 14
- Body core: 24 → 30 → 36 → 42 → 48 → 54 → 60; taper 54-48-42-36-30-24-18-12-6
- Front leg: 6-12-18-24; taper 18; hold; taper 12
- Hind thigh: 6-12-18-24-30-36; taper 30-24
- Hind foot: 6-12-18-24; taper 18
- Wing membrane: 40; decrease 2 sts every other row to 24; then 1 st per row to 18
Piece count checklist
| Piece | Qty |
|---|---|
| Head | 1 |
| Muzzle | 1 |
| Cream jaw patch | 1 |
| Main horns | 2 |
| Small crown horns | 4 |
| Front legs | 2 |
| Front claws | 8 |
| Hind thighs | 2 |
| Hind feet | 2 |
| Hind claws | 6 |
| Wings | 2 |
| Belly foundation | 1 |
| Neck plates | 9 |
| Leaf/frill motifs | approx. 32–44 total |
Because the leaf motifs are decorative, the exact number can be adjusted after pinning. All structural piece counts above should be completed before final assembly.
Thank You
Thank you for making the Celestial Leaf Dragon. Work slowly, check stitch counts at the end of every shaping round, and pin all paired parts before sewing. The finished piece is most convincing when symmetry, dense stuffing in the neck, softer stuffing in the tail, and careful wing placement are all balanced.
Pattern use
You may use this pattern to make finished handmade items for personal use or small-scale selling. Do not copy, resell, upload, redistribute, or claim the written pattern or its images as your own.
Before publishing or selling the pattern
Complete one physical test crochet from this document and record any tension-specific adjustments. A test crochet is the only reliable way to confirm that the written measurements match your exact yarn, hook, and stuffing choices.
The box below contains an Etsy link. If you buy through it, we may earn a small commission at no extra cost to you. Learn more.
No time to make one?
Find handmade crochet dragons from independent makers on Etsy.
Browse on Etsy (opens Etsy in a new tab)