12-point ombré star blanket crochet pattern
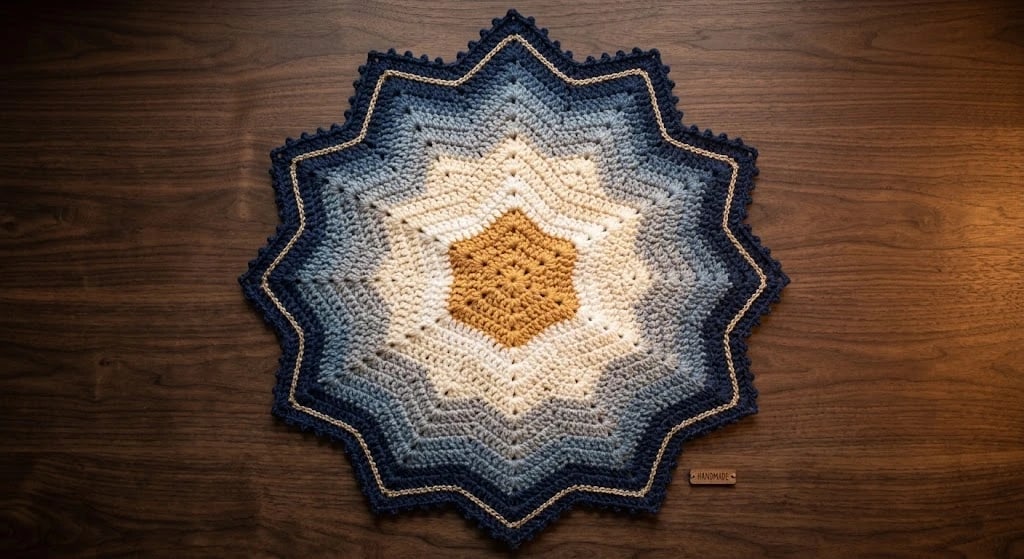
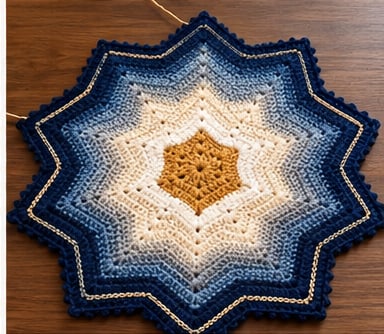
A warm amber centre radiates into cream rays, cool slate and steel-blue bands and a textured navy border traced with a fine gold line, worked in joined rounds you can stop early for a mat or keep going for a full blanket.

Blankets · Crochet
- Finished size
- About 80–100 cm / 31–39 in
- Making time
- About 12–20 hours
- Hook
- 5.0 mm, worsted/aran yarn
- Colours
- 6 plus a gold accent
- Skill
- Intermediate
In this post
A dramatic midnight-blue starburst with a warm amber centre, cream rays, cool slate tones, a gold surface outline and a textured navy edge. This star blanket crochet pattern turns that design into a practical, round-by-round guide you can scale from a decorative mat up to a baby blanket or throw.
At a glance
| Project | 12-point decorative starburst mat or blanket |
| Skill level | Intermediate (counting, increases, decreases, surface slip stitch) |
| Terminology | US crochet terms |
| Suggested hook | 5.0 mm (adjust for your yarn and desired density) |
| Yarn | Worsted / aran-weight cotton or easy-care acrylic, one consistent weight |
| Estimated diameter | Approx. 80–100 cm / 31–39 in, highly gauge-dependent |
| Construction | Joined rounds; 12 repeating sectors with raised peaks |
| Working time | 12–20 hours, depending on size and experience |
What you will make
You begin at the amber centre, establish 12 evenly spaced rays, then expand the star through cream, sand, slate gray, steel blue and navy. A raised gold contour line and a small-picot navy edge finish it. The colour bands are proportional rather than a stitch-for-stitch copy, which makes the design easy to resize: stop early for an accent mat, or keep adding balanced rounds for a full star blanket.
Materials and tools
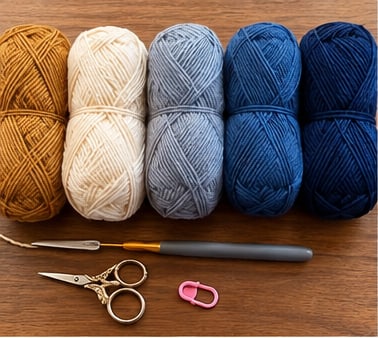
| Colour | Approx. amount and use |
|---|---|
| Mustard gold | 80–120 g, centre |
| Ivory cream | 180–240 g, inner starburst |
| Warm stone / sand | 100–150 g, transition |
| Slate gray | 130–200 g, transition |
| Dusty steel blue | 130–200 g, outer star |
| Deep navy | 180–260 g, wide edge and picots |
| Thin antique gold accent | 20–40 g, surface contour |
Tools: 5.0 mm crochet hook, 12 stitch markers, tapestry needle, scissors, tape measure, pins and blocking mats.
Yarn estimates are approximate, not measured usage. Buy extra if you want a larger blanket, a denser fabric or matching dye lots.
Abbreviations (US terms)
| Abbreviation | Meaning |
|---|---|
| ch / sl st | Chain / slip stitch |
| sc / hdc / dc | Single / half double / double crochet |
| tr | Treble crochet |
| st(s) / sp | Stitch(es) / space |
| inc | 2 dc in one stitch |
| dc2tog | Double crochet two stitches together |
| ch-2 corner | Two-chain peak at each of the 12 star tips |
| RS / FO | Right side / fasten off |
Gauge, symmetry and pattern logic
Make a 12 × 12 cm (about 5 × 5 in) double crochet swatch and measure your stitches per 10 cm after it dries. Keep 12 markers at the intended tips and count the stitches between markers after every round. The star edge comes from adding stitches at each point and removing stitches at each valley.
Tip shaping convention: at every marked peak, work (dc, ch 2, dc) into the ch-2 corner. At the midpoint valley between two peaks, work one dc2tog across the two centre stitches. Work 1 dc in every other stitch unless the fabric needs adjusting to stay flat. Peak increases and valley decreases balance each other, so check the fabric every one or two rounds rather than relying on fixed counts.
Step-by-step instructions
1. Crochet the mustard centre
Make a magic ring.
- Round 1: ch 3 (counts as 1 dc), 11 dc into the ring; sl st to the top of the ch-3. (12 dc)
- Round 2: ch 3, 1 dc in the same st, 2 dc in each remaining st; join. (24 dc)
- Round 3: (1 dc, 2 dc in next st) 12 times; join. (36 dc)
- Round 4: (2 dc, 2 dc in next st) 12 times; join. (48 dc)
Keep working ordinary flat-circle increases, adding 12 stitches per round, until the amber centre measures roughly 14–18 cm. It should lie flat with no cupping or ruffling.
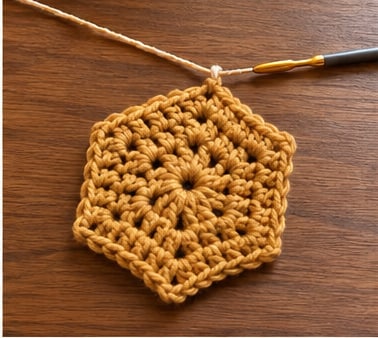
2. Place 12 peak markers
Spread the centre flat and divide the last round into 12 equal sectors. Place a contrasting marker at the middle of each sector; these mark the star tips. If the last round is not divisible by 12, add a few evenly spaced increases first. A quick photo from directly above makes it easy to check the spacing later.
3. Start the cream transition
Join ivory at a valley midpoint. Work along to the first marker and make (dc, ch 2, dc) in the marked stitch. Work on towards the next valley and make one dc2tog across the two valley stitches. Repeat around, then join with a sl st. Move each marker up into its new ch-2 peak as you go. Work 2–3 cream rounds, keeping all 12 peaks clearly aligned.
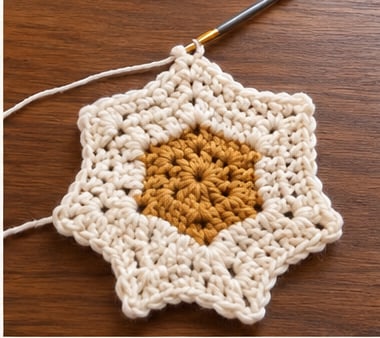
4. Build longer cream rays
Continue in cream. In every peak ch-2 space work (dc, ch 2, dc), make one dc2tog at each valley, and work 1 dc in every other stitch. The points lengthen a little with each round. After each round, check that all 12 rays are equal in length and the piece lies flat. Stop when the cream section reaches roughly the inner third of your intended radius.
5. Add the sand relief band
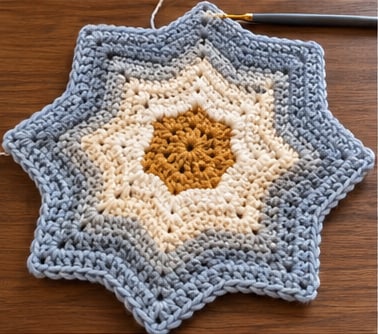
Change to warm sand at the start of a round and work 2–4 rounds with the same peak and valley shaping. For a ridged line, work one round in back loops only, then go back to working through both loops. Keep the ch-2 openings visible so the points stay sharp instead of softening into a circle.
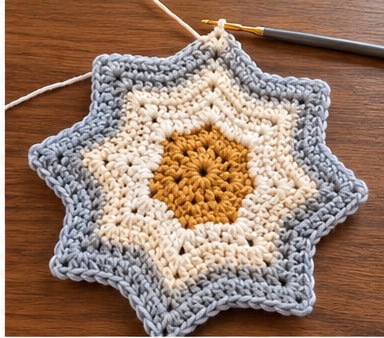
6. Blend into slate gray
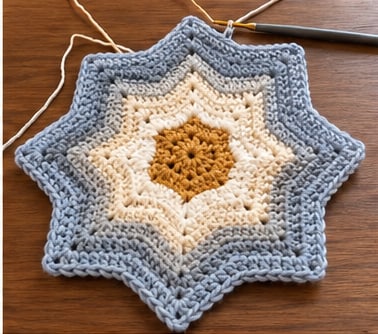
Join slate gray and work about 3–5 rounds, matching the same peak and valley positions every time. For a little texture, work one round of hdc between two dc rounds, adjusting the shaping as needed. If the edge starts to curl, go back to dc and check your tension.
7. Extend the steel-blue points
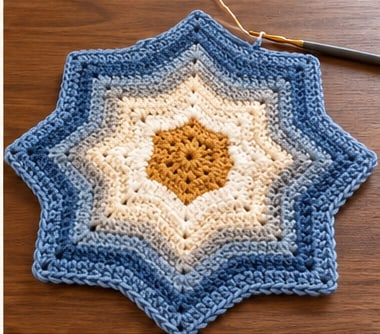
Switch to dusty steel blue and work 3–5 rounds, keeping the same corners and valley decreases. Add rounds here if you want a bigger blanket. Measure the point-to-point diameter at four positions to catch any stretching early. Keep the last blue round especially tidy, because the navy frames its outline.
8. Crochet the deep-navy border
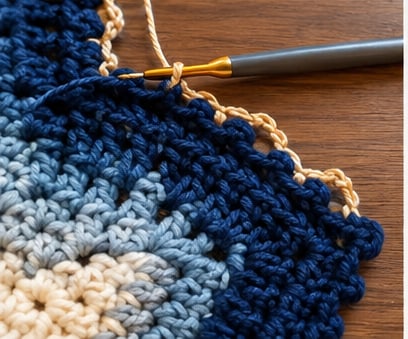
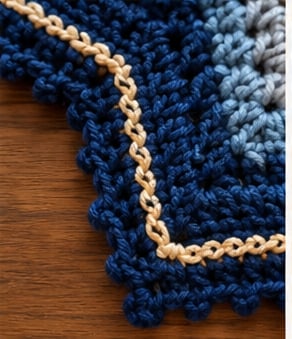
Join deep navy and work 2–3 rounds following the peaks and valleys. For the decorative final round, work sc in next 3 sts, picot (ch 3, sl st in first ch) and repeat around, easing the repeats neatly around each tip. Add an extra sc near a corner only if the fabric pulls. Keep the picots small and evenly spaced rather than large and floppy.
9. Add the gold contour
With the antique-gold accent yarn, surface slip stitch a continuous line about 1–2 cm inside the outer edge, following all 12 points. You can also embroider the line with a tapestry needle. Keep it loose enough that the blanket still lies flat, then weave the tails into the wrong side.
Finishing, blocking and care
- Lay the piece flat, check that all 12 peaks are the same size and gently ease each corner into line.
- Weave every tail through several stitches on the wrong side; avoid bulky knots.
- If the fibre label allows, lightly damp-block and pin the 12 corners at equal spacing. Let it dry fully before removing the pins.
- If you use it as a floor mat, add a separate non-slip rug underlay. Crochet fabric alone is not slip-resistant.
- Wash according to the yarn label and support the piece when lifting it wet so the points do not stretch.
Troubleshooting
| Problem | Fix |
|---|---|
| The piece bowls upward | Too few increases, too many valley decreases or tight tension. Add evenly spaced increases in the next round and recheck. |
| The outer edge ripples | Too many increases or loose tension. Drop unnecessary increases and check the peaks. |
| The 12 points look uneven | Place markers consistently and count stitches on both sides of each tip. |
| The gold contour puckers | The surface stitching is too tight. Pull it out and rework with more slack. |
| The mat slides on the floor | Use a non-slip rug pad; do not rely on the yarn alone. |
Ideas for personalising
Try terracotta and moss for autumn, pearl and pale blue for a winter snowflake, or navy and cream for a coastal room. For a smaller accent mat, stop after the slate band and finish with a plain sc edge. To turn this into a full-size star blanket, keep adding balanced rounds to each colour section until you reach the size you want.
Finished star blanket
The box below contains an Etsy link. If you buy through it, we may earn a small commission at no extra cost to you. Learn more.
No time to make one?
Find handmade crochet star blankets from independent makers on Etsy.
Browse on Etsy (opens Etsy in a new tab)