Flip-face witch cat crochet pattern: reversible pumpkin amigurumi
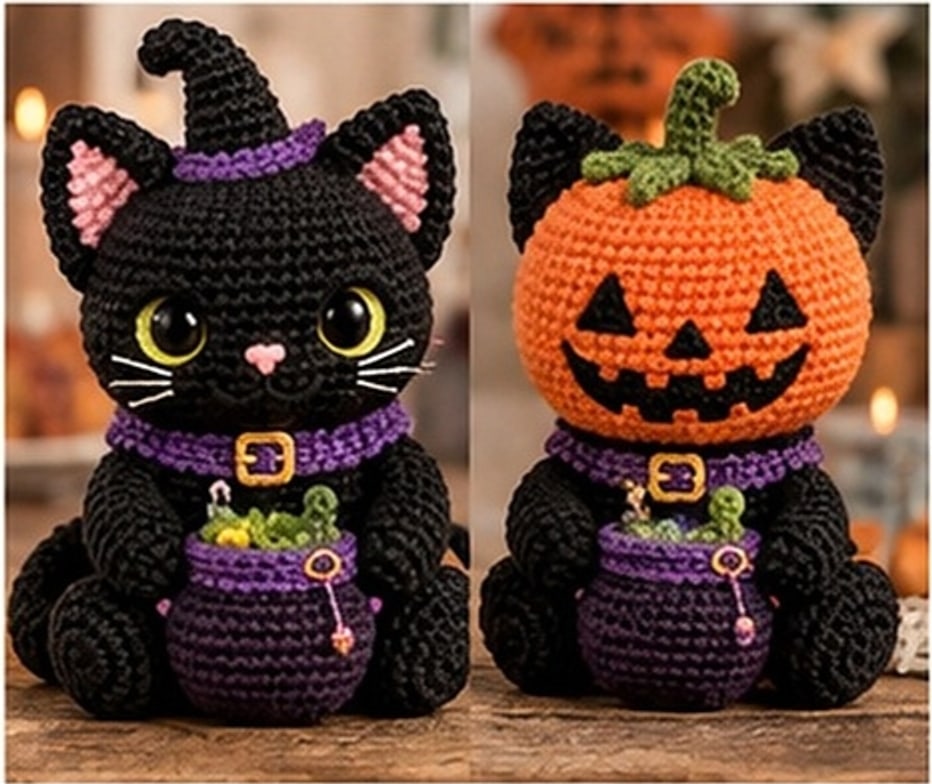
One cat, two faces: a black witch cat with a head that flips over to a jack-o'-lantern pumpkin, holding a tiny cauldron that doubles as a refillable catnip pouch.

Halloween · Crochet
- Finished height
- 12–14 cm / 4.7–5.5 in
- Making time
- About 6–8 hours
- Hook
- 2.5 mm, sport/DK cotton
- Parts
- 9, worked in spiral rounds
- Skill
- Confident beginner to intermediate
In this post
- At a Glance
- What's Included
- Pattern Overview
- Materials and Tools
- Abbreviations (US Crochet Terms)
- Gauge and Sizing Notes
- Parts List
- Part 1: Body (Sitting Base)
- Part 2: Sitting Legs (Make 2)
- Part 3: Cat-Face Head (Front Side)
- Part 4: Pumpkin-Face Head (Back Side)
- Part 5: Ears (Make 2)
- Part 6: Tail
- Part 7: Witch Collar
- Part 8: Mini Cauldron with Catnip Pouch
- Part 9: Final Assembly
- Finishing Touches and Embroidery Check
- Troubleshooting
- Care Instructions
- Variations and Ideas
- Final Thoughts
One cat, two faces, endless Halloween fun. The Flip-Face Witch Cat is a round, chubby sitting black cat with a reversible head: one side is a sweet black cat face with bright eyes and embroidered whiskers, and the other is a grinning jack-o'-lantern pumpkin. The two heads are crocheted back-to-back and joined at the neck, so you can pull the head up and flip it over to switch the look in seconds.
The cat wears a purple witch-style collar with a tiny gold buckle and holds a miniature cauldron that is more than decoration — it doubles as a refillable catnip pouch. That makes this pattern part Halloween display piece and part interactive cat toy. The long, slightly curved tail finishes the silhouette and can be used as a hanging loop, so the finished cat also works as an ornament or bag charm.
This post walks through the complete pattern: materials, gauge, abbreviations, every part with round-by-round instructions, the reversible-head assembly, face embroidery, the catnip pouch, troubleshooting, and care.
At a Glance
| Pattern spec | Details |
|---|---|
| Finished height (sitting) | Approx. 12–14 cm / 4.7–5.5 in |
| Finished width | Approx. 10–11 cm / 3.9–4.3 in including paws |
| Skill level | Confident beginner to intermediate |
| Yarn | Sport / DK weight cotton |
| Hook | 2.5 mm |
| Construction | Body, legs, reversible two-sided head, ears, tail, collar and cauldron worked separately in continuous spiral rounds, then sewn together |
| Estimated time | 6–8 hours (beginner) · 3.5–5 hours (experienced) |
What's Included
- Full materials list with yarn amounts by color
- US crochet abbreviations and gauge guidance
- Round-by-round body and sitting legs
- Cat-face head and pumpkin-face head, matched for the reversible join
- Ears, tail, witch collar and mini cauldron with catnip pouch
- Step-by-step final assembly, including how the flip mechanism works
- Face embroidery guide for both sides
- Troubleshooting, safety notes and care instructions
Skill level and techniques
This is a confident-beginner to intermediate pattern. If you can work a magic ring, single crochet, increases and invisible decreases, you already have the core skills. The pattern also uses:
- Continuous spiral rounds (no joining at the end of rounds)
- Color changes between black, orange, purple, green and pink details
- Light stuffing and sculptural shaping
- Sewing separate pieces together
- Simple embroidery for whiskers, noses, paw pads and pumpkin features
- Optional felt appliqué for the pumpkin face and collar buckle
Pattern Overview
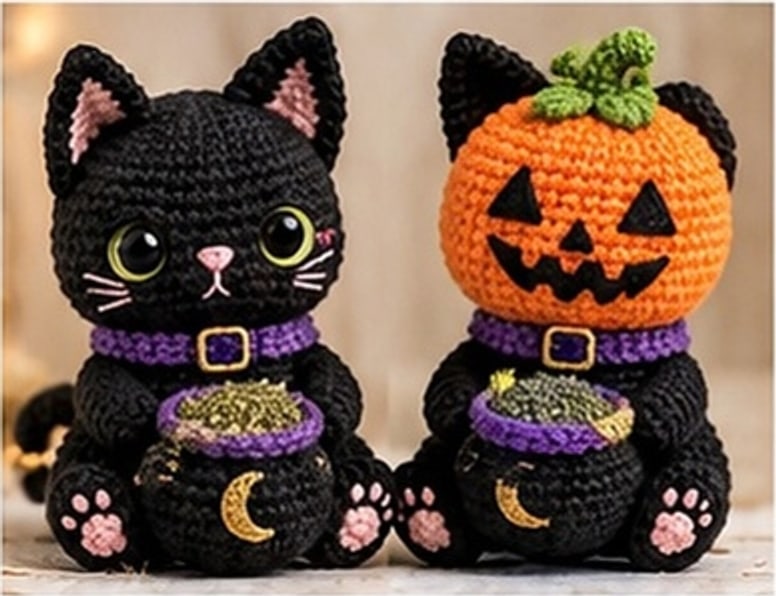
The Flip-Face Witch Cat is built from eight parts: the sitting body, two legs, the cat-face head, the pumpkin-face head, two ears, the tail, the witch collar, and the mini cauldron. The clever part is the head. Instead of one head with a face on the front, you crochet two shallow domed heads — one black, one orange — and join them back-to-back at their open neck edges. The joined double head is then sewn to the body. Because each dome is only lightly stuffed and the join sits at the neck, the whole head can be pulled upward and turned inside-out over itself, revealing the other face.
On the cat side, the face is formed with 10 mm safety eyes in light green or gold, a small pink embroidered nose, white whiskers and a tiny pink blush detail. On the pumpkin side, the jack-o'-lantern face is worked in black — two triangle eyes, a small triangle nose and a wide zigzag grin — topped with a green crocheted stem and leaves. The ears stay attached through the flip: they peek out above whichever face is showing, black with pink inner ears on the cat side and silhouetted behind the pumpkin on the other.
The body is a firm, rounded sitting base. Two plump legs are sewn to the front so the cat sits stably and appears to hold the cauldron between its paws. Pink paw pads are embroidered or appliquéd onto the feet. The cauldron sits at the front of the body, trimmed in purple with a gold crescent-moon motif, and its open top holds a small removable fabric pouch for catnip.
It is a good pattern for Halloween gifting, seasonal shelf decor, craft-fair stock, or a handmade toy for your own cat. Made in cotton with a small hook, it is sturdy, washable (with the catnip removed), and small enough to finish over a couple of evenings.
Materials and Tools
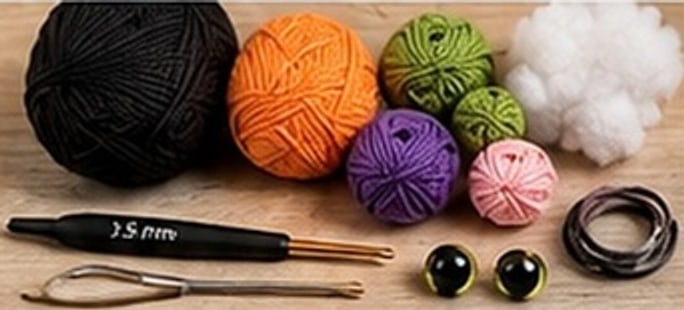
Cotton yarn is recommended because it gives crisp stitch definition, holds the reversible head's shape, and stands up better to being batted around by a cat. Amounts below are for Sport/DK weight cotton.
| Color | Amount (approx.) | Used for |
|---|---|---|
| Black | 35 g / 95 m | Body, cat head, ears, legs, tail, cauldron |
| Pumpkin orange | 15 g / 40 m | Pumpkin head |
| Purple | 10 g / 25 m | Witch collar, cauldron trim |
| Green | 3 g / 8 m | Pumpkin stem and leaves |
| Pink | 2 g / 5 m | Inner ears, paw pads, nose, blush |
| Gold or light green | Small amount | Buckle detail, eye color accents |
| White | Small amount | Whisker embroidery |
Other materials
- Crochet hook: 2.5 mm
- Safety eyes: 10 mm, light green or gold (1 pair)
- Polyester fiberfill stuffing, approx. 20–25 g
- Stitch markers
- Tapestry needle and scissors
- Pins for assembly
- Thin drawstring cord or yarn, approx. 20 cm (for the cauldron pouch)
- Small fabric pouch: thin cotton or tea-bag fabric for the catnip insert
- Catnip (optional)
- Small amount of black felt (optional, for the buckle or pumpkin face appliqué)
Abbreviations (US Crochet Terms)
| Abbreviation | Meaning |
|---|---|
| mr | Magic ring (adjustable loop) |
| ch | Chain |
| sl st | Slip stitch |
| sc | Single crochet |
| hdc | Half double crochet |
| dc | Double crochet |
| inc | Increase (2 sc in the same stitch) |
| dec | Invisible decrease (sc 2 together) |
| FLO | Front loop only |
| BLO | Back loop only |
| st(s) | Stitch(es) |
| FO | Fasten off |
Gauge and Sizing Notes
Exact gauge is not essential, but tight tension is important so stuffing does not show through the stitches. With DK cotton and a 2.5 mm hook, the body should feel firm and hold its shape well. If your stitches look loose and the stuffing peeks through, go down to a 2.25 mm hook. If crocheting feels painfully tight and the fabric curls hard, try a 2.75 mm hook.
The two head halves must match each other. Crochet them with the same hook, the same yarn weight and the same tension, and count stitches at the end of every round. Both heads finish on the same 12-stitch neck opening, which is what allows them to be joined evenly back-to-back.
Unless stated otherwise in a section: use the specified yarn color, work in a continuous spiral without joining rounds, and place a stitch marker in the first stitch of every round.
Before you start: safety notes
- Safety eyes are not suitable for children under 3 or for unsupervised pet play — they can work loose. For a child-safe or pet-safe version, embroider the eyes with yarn instead.
- If the finished cat is a pet toy, skip small glued or loosely sewn decorations. Embroider the moon, buckle and paw pads rather than adding beads or charms.
- Sew the ears, tail, collar and cauldron on with repeated stitches and bury the tails deeply. Check all joins after washing or rough play.
- Always remove the catnip pouch before washing, and let the cat dry completely before refilling it.
Parts List
- Body (sitting base)
- Sitting legs (make 2)
- Cat-face head (front side)
- Pumpkin-face head (back side)
- Ears (make 2)
- Tail
- Witch collar
- Mini cauldron with catnip pouch
- Final assembly
Part 1: Body (Sitting Base)
Use black yarn. Work in continuous spiral rounds.
The body is a plump dome with a slightly flattened base so the cat sits without tipping. It is stuffed firmly — this is the foundation everything else attaches to, so take a moment to shape it round and even before you fasten off.
- Round 1: 6 sc in mr. (6 sts)
- Round 2: inc × 6. (12 sts)
- Round 3: (1 sc, inc) × 6. (18 sts)
- Round 4: (2 sc, inc) × 6. (24 sts)
- Round 5: (3 sc, inc) × 6. (30 sts)
- Round 6: sc in each st around. (30 sts)
- Round 7: sc in each st around. (30 sts)
- Round 8: (4 sc, inc) × 6. (36 sts)
- Round 9: sc in each st around. (36 sts)
- Round 10: sc in each st around. (36 sts)
- Round 11: (4 sc, dec) × 6. (30 sts)
- Round 12: (3 sc, dec) × 6. (24 sts)
- Round 13: (2 sc, dec) × 6. (18 sts)
- Round 14: sc in each st around. (18 sts)
- Round 15: sc in each st around. (18 sts)
Fasten off, stuff firmly, and leave a long tail for sewing. The finished body is about 5 cm tall. The 18-stitch opening at the top is the neck edge where the reversible head will be attached.
Part 2: Sitting Legs (Make 2)
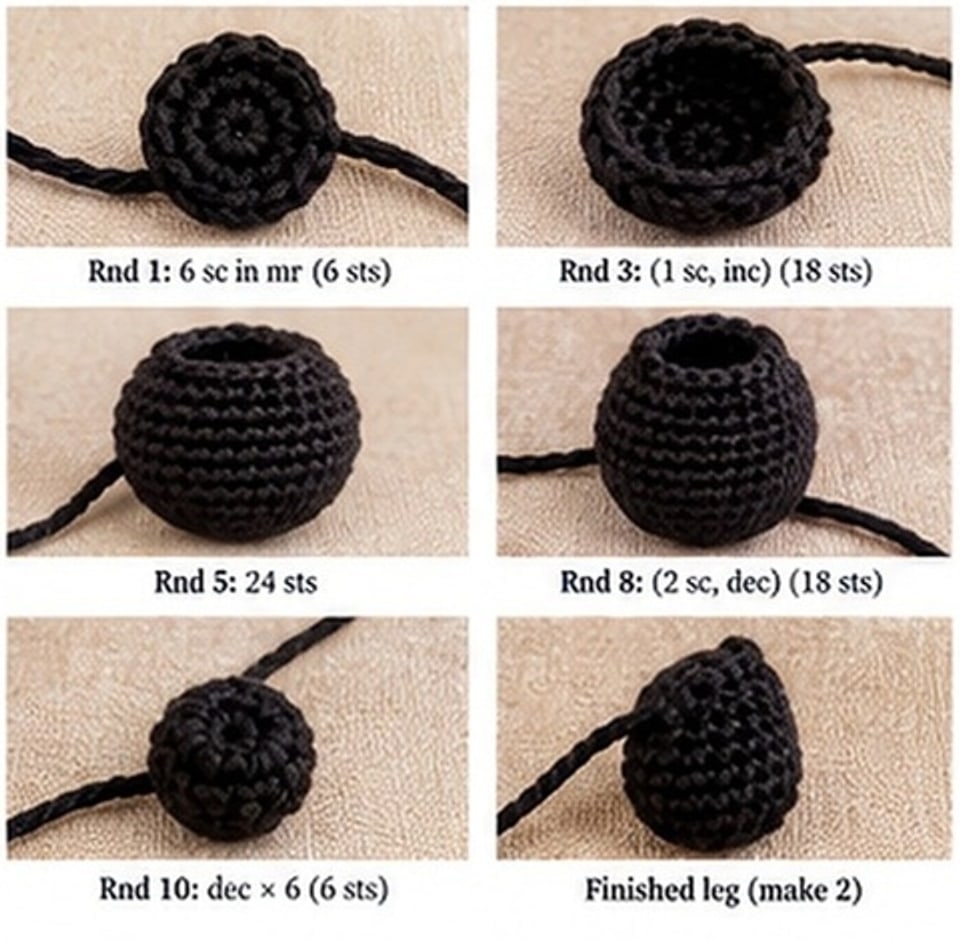
Use black yarn. Make 2 identical legs.
Each leg is a small rounded piece that sits at the front of the body, giving the cat its seated posture and framing the cauldron. Stuff them lightly — they should be plump but still able to sit flat against the body.
- Round 1: 6 sc in mr. (6 sts)
- Round 2: inc × 6. (12 sts)
- Round 3: (1 sc, inc) × 6. (18 sts)
- Round 4: (2 sc, inc) × 6. (24 sts)
- Rounds 5–7: sc in each st around. (24 sts)
- Round 8: (2 sc, dec) × 6. (18 sts)
- Round 9: (1 sc, dec) × 6. (12 sts)
- Round 10: dec × 6. (6 sts)
Fasten off, stuff lightly, and leave a long tail on each leg for sewing.
Attaching the legs to the body
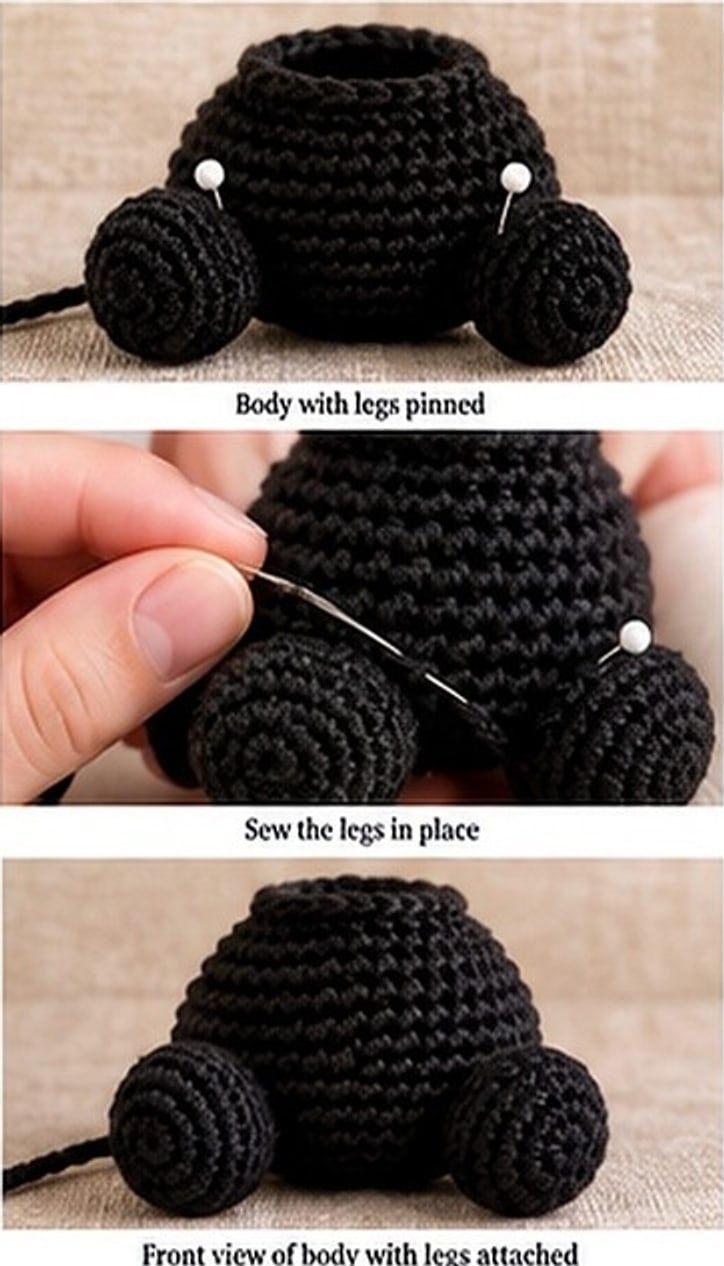
- Pin the legs to the front of the body between Rounds 3–6, spacing them so the cauldron will sit neatly between them.
- Check from the front, top and both sides that the legs are symmetrical — small placement differences are very visible on a sitting figure.
- Sew each leg securely using its long tail, stitching all the way around the join. Bury the tails inside the body.
Leave the body and legs assembled as one unit while you make the head pieces.
Part 3: Cat-Face Head (Front Side)
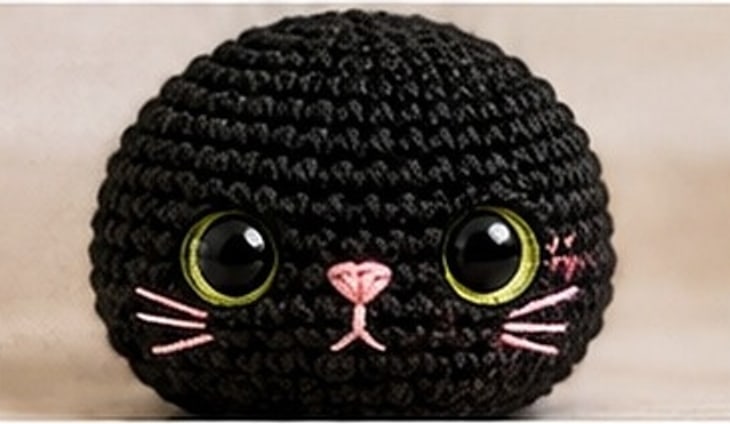
Use black yarn.
This is the front half of the reversible head. It is a shallow dome, lightly stuffed so it can invert during the flip. Do not close it completely — the open neck edge is joined to the pumpkin head later.
- Round 1: 6 sc in mr. (6 sts)
- Round 2: inc × 6. (12 sts)
- Round 3: (1 sc, inc) × 6. (18 sts)
- Round 4: (2 sc, inc) × 6. (24 sts)
- Round 5: (3 sc, inc) × 6. (30 sts)
- Round 6: (4 sc, inc) × 6. (36 sts)
- Round 7: sc in each st around. (36 sts)
- Rounds 8–11: sc in each st around. (36 sts)
- Round 12: (4 sc, dec) × 6. (30 sts)
- Round 13: (3 sc, dec) × 6. (24 sts)
- Round 14: (2 sc, dec) × 6. (18 sts)
- Round 15: (1 sc, dec) × 6. (12 sts)
Stuff lightly and evenly. Do not fasten off tightly closed — leave the 12-stitch opening and a long tail for joining.
Cat face details
Add the face before joining the heads, while you can still reach the inside to secure the eyes.
- Eyes: Place the 10 mm safety eyes between Rounds 12–13, about 8–9 stitches apart. Push a pin through first, check the spacing from the front, and only then click the backs on. For a pet-safe or child-safe version, embroider closed or round eyes with black and white yarn instead.
- Nose: Embroider a small pink triangle or heart-shaped nose centered between and just below the eyes, with a short vertical line beneath it.
- Whiskers: With white yarn, add three short straight stitches fanning out on each cheek.
- Blush (optional): Add a tiny pink stitch cluster or a few short pink lines beside one eye for the cute detail shown in the photos.
Part 4: Pumpkin-Face Head (Back Side)
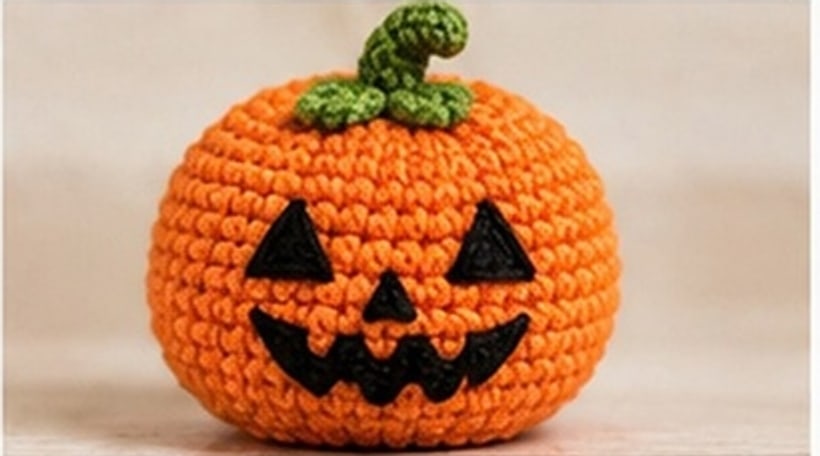
Use pumpkin orange yarn.
The pumpkin head is the mirror half of the reversible head. It uses exactly the same shaping as the cat head so the two domes match in diameter and neck size — that match is what makes the flip smooth rather than lopsided.
- Round 1: 6 sc in mr. (6 sts)
- Round 2: inc × 6. (12 sts)
- Round 3: (1 sc, inc) × 6. (18 sts)
- Round 4: (2 sc, inc) × 6. (24 sts)
- Round 5: (3 sc, inc) × 6. (30 sts)
- Round 6: (4 sc, inc) × 6. (36 sts)
- Rounds 7–11: sc in each st around. (36 sts)
- Round 12: (4 sc, dec) × 6. (30 sts)
- Round 13: (3 sc, dec) × 6. (24 sts)
- Round 14: (2 sc, dec) × 6. (18 sts)
- Round 15: (1 sc, dec) × 6. (12 sts)
Stuff lightly, keeping the stuffing soft and evenly spread so the dome can invert. Leave the 12-stitch opening and a long tail for joining.
Pumpkin face details
The jack-o'-lantern face can be embroidered with black yarn or cut from black felt and sewn or securely stitched on. Embroidery is the safer choice for a pet toy.
- Eyes: Two upright triangles, positioned symmetrically on the upper half of the dome.
- Nose: One small triangle centered between the eyes.
- Mouth: A wide zigzag grin below the nose, with two upward points at the corners. Work it as surface embroidery following the stitch lines, or chain-stitch the outline and fill it in.
- Stem and leaves: With green yarn, crochet a small curved stem at the top center of the pumpkin and two small leaves beside it. Sew them down firmly — the stem is the part most likely to be grabbed during the flip, so reinforce it with several passes of yarn.
Check the face from a distance before you join the heads. Triangle eyes that look even up close can drift apart when the dome is curved, so pin or chalk the positions first.
Part 5: Ears (Make 2)
Use black yarn, with pink for the inner ear. Make 2.
Each ear is a small pointed triangle that sits on top of the joined head. Because the head flips, the ears need to be sewn on after the two head halves are joined (see Final Assembly) — but crochet them now so all the pieces are ready together.
Work each ear as a small triangle: begin with a few stitches at the base and decrease toward the point so the ear tapers naturally, keeping it flat rather than stuffed. Work a matching smaller pink triangle for the inner ear and sew or embroider it onto the front of the black ear before attaching. The finished ears should be firm enough to stand upright; if your yarn is soft, work tightly or hold the yarn double for the ear pieces only.
Pin both ears before sewing anything permanently. On the finished cat they sit between Rounds 5–8 of the head, spaced symmetrically above the eyes. Check them from the pumpkin side too — they should peek out neatly behind the pumpkin without covering the stem.
Part 6: Tail
Use black yarn.
The tail is a long, narrow tube worked in continuous spiral rounds, lightly stuffed or left unstuffed so it stays flexible and curved. Work it long enough to curl around the side of the body as shown in the photos. When finished, curve it gently by sewing a few small tacking stitches along the inside of the curl, or simply shape it by hand — the sitting body supports it.
At the tip, form a small loop: this is the hanging loop that lets the finished cat double as an ornament or bag charm. Sew the base of the tail securely to the back-side of the body, low down so the cat still sits flat, and reinforce the join with several passes. The tail takes a lot of handling during the head flip, so do not rely on a single ring of stitches.
Part 7: Witch Collar
Use purple yarn, with gold for the buckle.
The collar is a flat purple band that wraps around the neck, sitting over the head-to-body join and hiding the seam. Work it as a short strip of single crochet rows long enough to circle the neck comfortably, then join or overlap the ends at the back. It should sit snugly without strangling the reversible join — test the flip with the collar pinned in place before you sew it down, and leave enough ease for the head to pass through its motion.
At the front center, add the buckle: embroider a small gold rectangle, or cut a tiny buckle shape from gold or black felt and stitch it on. On the display version, a miniature buckle charm can be used, but embroider it instead for any cat that will be given to a child or a pet.
Part 8: Mini Cauldron with Catnip Pouch
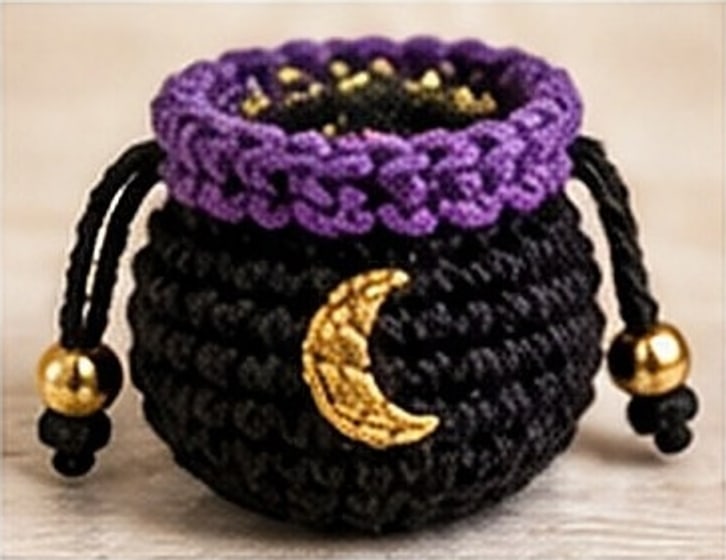
Use black yarn with a purple trim.
The cauldron is the cat's signature accessory: a small round pot that sits between the front paws and holds the refillable catnip pouch. It is worked from the base upward, and the final front-loop round creates the rim that the purple trim and drawstring sit on.
- Round 1: 6 sc in mr. (6 sts)
- Round 2: inc × 6. (12 sts)
- Round 3: (1 sc, inc) × 6. (18 sts)
- Round 4: (2 sc, inc) × 6. (24 sts)
- Round 5: (3 sc, inc) × 6. (30 sts)
- Rounds 6–8: sc in each st around. (30 sts)
- Round 9: (3 sc, dec) × 6. (24 sts)
- Round 10: (2 sc, dec) × 6. (18 sts)
- Round 11: (1 sc, dec) × 6. (12 sts)
- Round 12: FLO sc in each st around. (12 sts)
Fasten off and weave in the ends. Work or sew a purple trim around the rim. Embroider a gold crescent moon (and small stars, if you like) on the front of the cauldron — embroidery keeps it pet-safe, while felt or charm moons are best reserved for display-only pieces.
Making the catnip pouch
- Cut a small pouch from thin cotton or tea-bag fabric, sized to sit inside the cauldron without bulging the sides.
- Fill it loosely with dried catnip — a teaspoon or two is plenty for a toy this size — and close it with the drawstring cord, tied off or sewn shut.
- Tuck the pouch into the cauldron with the cord ends tucked in or tied into the small side loops shown in the photos.
To refresh the toy, remove the pouch, refill or replace the catnip, and tuck it back in. Never sew loose catnip directly into the crocheted cauldron: the crochet fabric has gaps, and loose catnip will work its way out during play. The removable pouch keeps the toy washable and the catnip effective for longer.
Part 9: Final Assembly
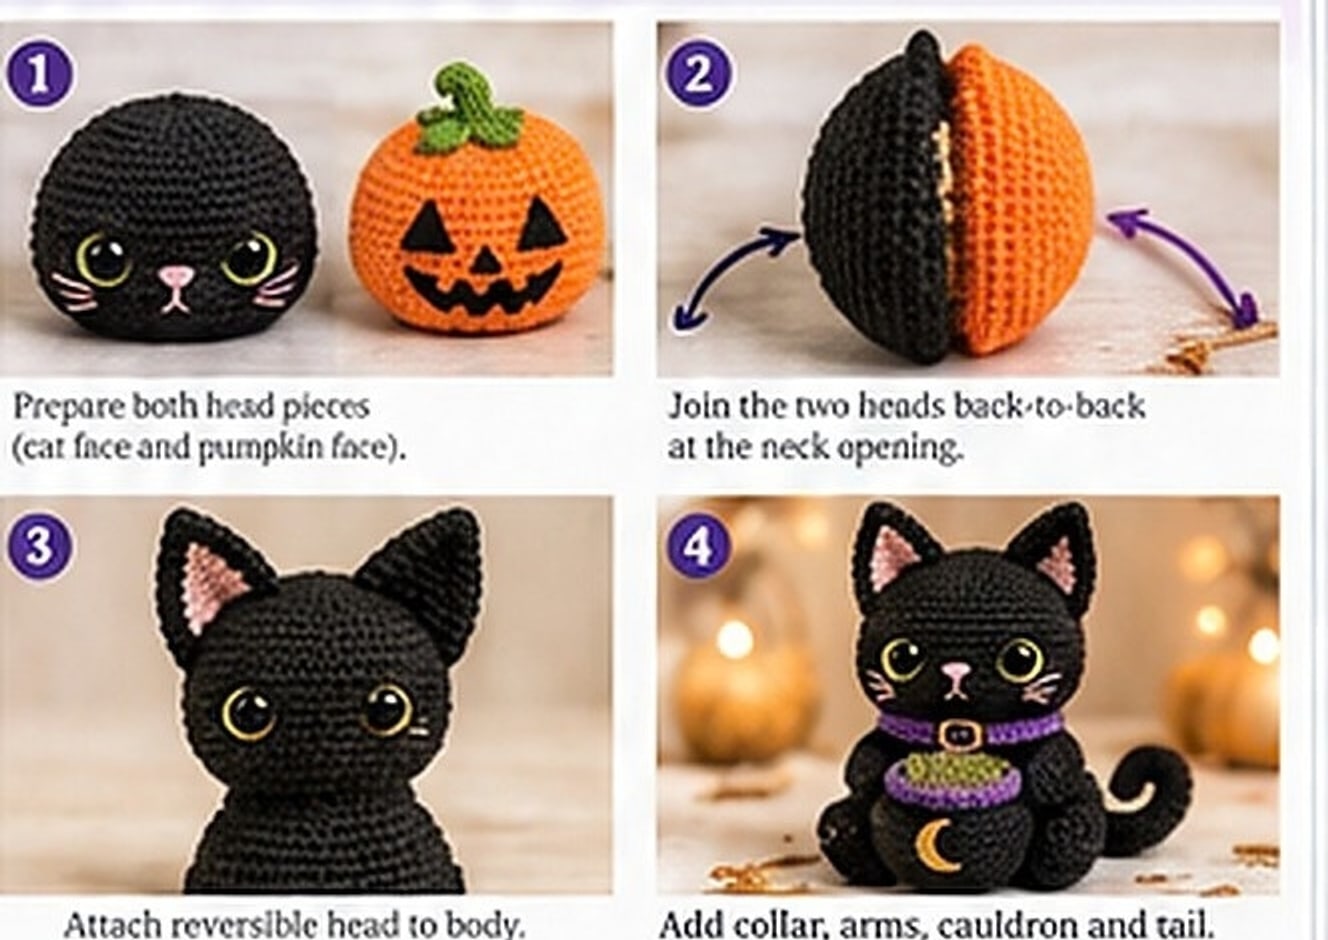
Assemble in this order. Pin everything first, check the cat from all sides, and sew only when you are happy with the placement.
Step 1: Prepare both head pieces
Finish the cat-face head and the pumpkin-face head, each lightly stuffed with its 12-stitch neck opening left open. Both faces should already be embroidered and the safety eyes secured. Add the pumpkin stem and leaves now as well, reinforcing them well.
Step 2: Join the two heads back-to-back
Place the two heads together with their open neck edges aligned, cat face pointing one way and pumpkin face the other. Using the long tails, whipstitch or mattress-stitch the two 12-stitch openings together all the way around, matching stitch for stitch. Keep the stuffing soft and distributed to both sides as you close — overstuffing is the main cause of a stiff, hard-to-flip head. The joined piece should feel like one soft double-domed ball.
Step 3: Attach the reversible head to the body
Center the joined head on the body's 18-stitch neck opening and pin it in place. Sew around the neck with small, firm stitches, checking that the cat face looks straight ahead and the pumpkin face sits exactly opposite. Sew a second reinforcing pass — the neck takes the strain every time the head flips.
Step 4: Add the ears, collar, cauldron and tail
- Ears: Pin the ears between Rounds 5–8 of the head, symmetric above the cat eyes. Sew through both layers of each ear base so they stand upright and survive flipping.
- Collar: Wrap the collar around the neck over the join, overlap or join the ends at the back, and tack it in place. Add the gold buckle at the front center. Test the flip again before final sewing.
- Cauldron: Position the cauldron at the front of the body between the legs, as if the cat is holding it. Sew it to the body (and lightly to the legs if needed) so it cannot swing loose. Insert the catnip pouch last.
- Tail: Sew the tail base to the lower back/side of the body, curve it around, and form the small hanging loop at the tip.
- Paw pads: Embroider or appliqué the pink paw pads onto the front of the feet: one larger pad with three or four small toe beans above it on each foot.
Flipping the head
To switch faces, hold the body firmly, grip the head and pull it gently upward and over, turning the double dome inside-out so the hidden face comes to the front. It should flip with gentle pressure. If it resists, the head is overstuffed or the collar is too tight — ease the collar first, and if needed remove a little stuffing through the neck seam and re-close it.
Finishing Touches and Embroidery Check
Before you call it finished, run through this check with the cat in front of you:
- Both faces are centered and level — eyes horizontal, noses on the center line.
- Whiskers are symmetric, three per side, angled slightly upward.
- The pumpkin grin is wide and even, with the corner points at the same height.
- The gold moon on the cauldron faces forward and reads clearly.
- The buckle sits at the front center of the collar from both head positions.
- All yarn tails are buried and no stuffing shows at any seam.
- The flip works smoothly in both directions, several times in a row.
Weave in any remaining ends by passing them through the body or head several times in different directions before trimming, so they cannot work back out during play.
Troubleshooting
The head will not flip. The most common cause is overstuffing. The double head needs to be soft enough to invert, so stuff both halves lightly and evenly. A too-tight collar can also lock the head in place — re-pin the collar with more ease and test before sewing.
One face looks bigger than the other. The two heads must finish on identical stitch counts (36 sts at the widest, 12 sts at the neck). Count at the end of every round, and crochet both halves with the same hook and tension, ideally in the same sitting.
Stuffing shows through the black yarn. Your tension is too loose for the hook. Drop to a 2.25 mm hook, and pull the magic ring fully closed. Black yarn hides a lot, but gaps will show against white stuffing under bright light.
The cat tips over. Check that the body base is flat and firmly stuffed, and that the cauldron is centered between the legs. A slightly under-stuffed body or an off-center cauldron will tip a sitting figure every time.
The ears fold over after flipping. Sew through both layers at the ear base with several firm passes, and position the ears so the head passes beside them rather than dragging over them. A tighter-worked ear holds its point better.
The pumpkin face looks wonky. Pin or chalk the triangle positions on the curved dome before embroidering. Faces embroidered freehand on a curve almost always drift — marking first fixes most of it.
Care Instructions
- Remove the catnip pouch before washing.
- Hand wash gently in cool water with mild soap, or spot clean for display pieces. Cotton versions can handle a gentle machine wash inside a laundry bag.
- Reshape while damp, paying attention to the head dome and ears, and dry flat away from direct heat.
- Refresh the catnip every few weeks: swap the pouch filling rather than adding loose catnip to the cauldron.
- Inspect ears, tail, collar and cauldron joins periodically, especially if a real cat plays with it, and re-sew anything that loosens.
Variations and Ideas
- Display-only version: Use safety eyes, a felt or charm buckle, and a glued felt moon for the crispest look. Hang it by the tail loop as a Halloween ornament.
- Pet-toy version: Embroider all features (eyes, moon, buckle, paw pads), skip beads and charms, double-sew every join, and keep the catnip pouch removable.
- Color swaps: A grey or cream cat with the same pumpkin flip works beautifully for a softer autumn look. The collar also reads well in deep green or rust instead of purple.
- Bag charm: Work the pattern as written and use the tail loop to attach a clasp, or add a small split ring through the loop.
- Gift set: Pair the finished cat with a small sachet of spare catnip and a care tag explaining the flip — it is the feature everyone wants demonstrated.
Final Thoughts
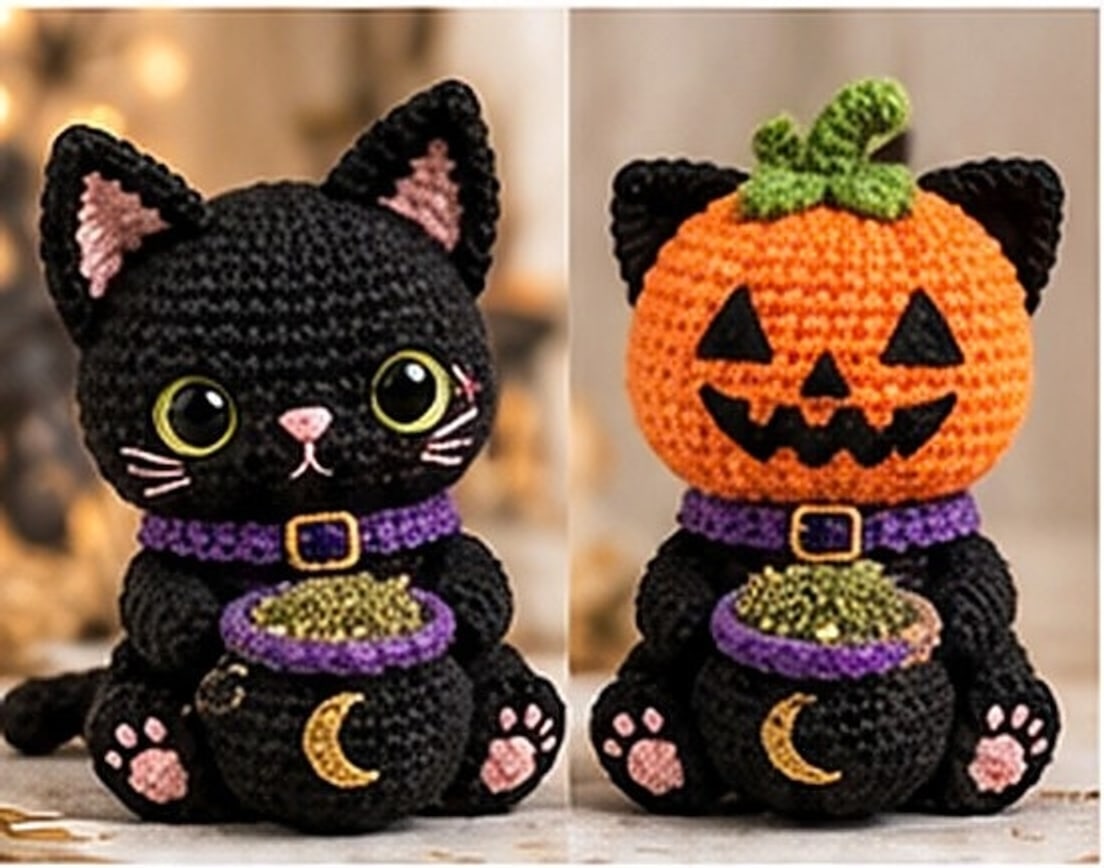
The Flip-Face Witch Cat packs a lot of personality into 12–14 cm: a sweet black cat on one side, a cheeky jack-o'-lantern on the other, and a working catnip cauldron in between. The construction is simpler than it looks — two matching domes, a firm little body, and patient assembly — and the flip never fails to make people smile.
Take your time joining the heads and test the flip before the collar goes on permanently. Once that mechanism moves smoothly, everything else is decoration. Happy crocheting, and happy Halloween!
Pattern details
- Format: PDF tutorial, US crochet terms
- Skill level: Confident beginner to intermediate
- Finished size: approx. 12–14 cm (4.7–5.5 in) tall, 10–11 cm (3.9–4.3 in) wide
- Designer: Handmade with Love for Your Etsy Shop
Keywords: flip face witch cat crochet pattern, reversible pumpkin amigurumi, Halloween cat crochet, catnip cauldron toy, black cat amigurumi, jack-o'-lantern crochet pattern, reversible head amigurumi, Halloween crochet gift
The box below contains an Etsy link. If you buy through it, we may earn a small commission at no extra cost to you. Learn more.
No time to make one?
Find handmade reversible Halloween cat amigurumi from independent makers on Etsy.
Browse on Etsy (opens Etsy in a new tab)