Free crochet parrot pattern: tropical amigurumi bird
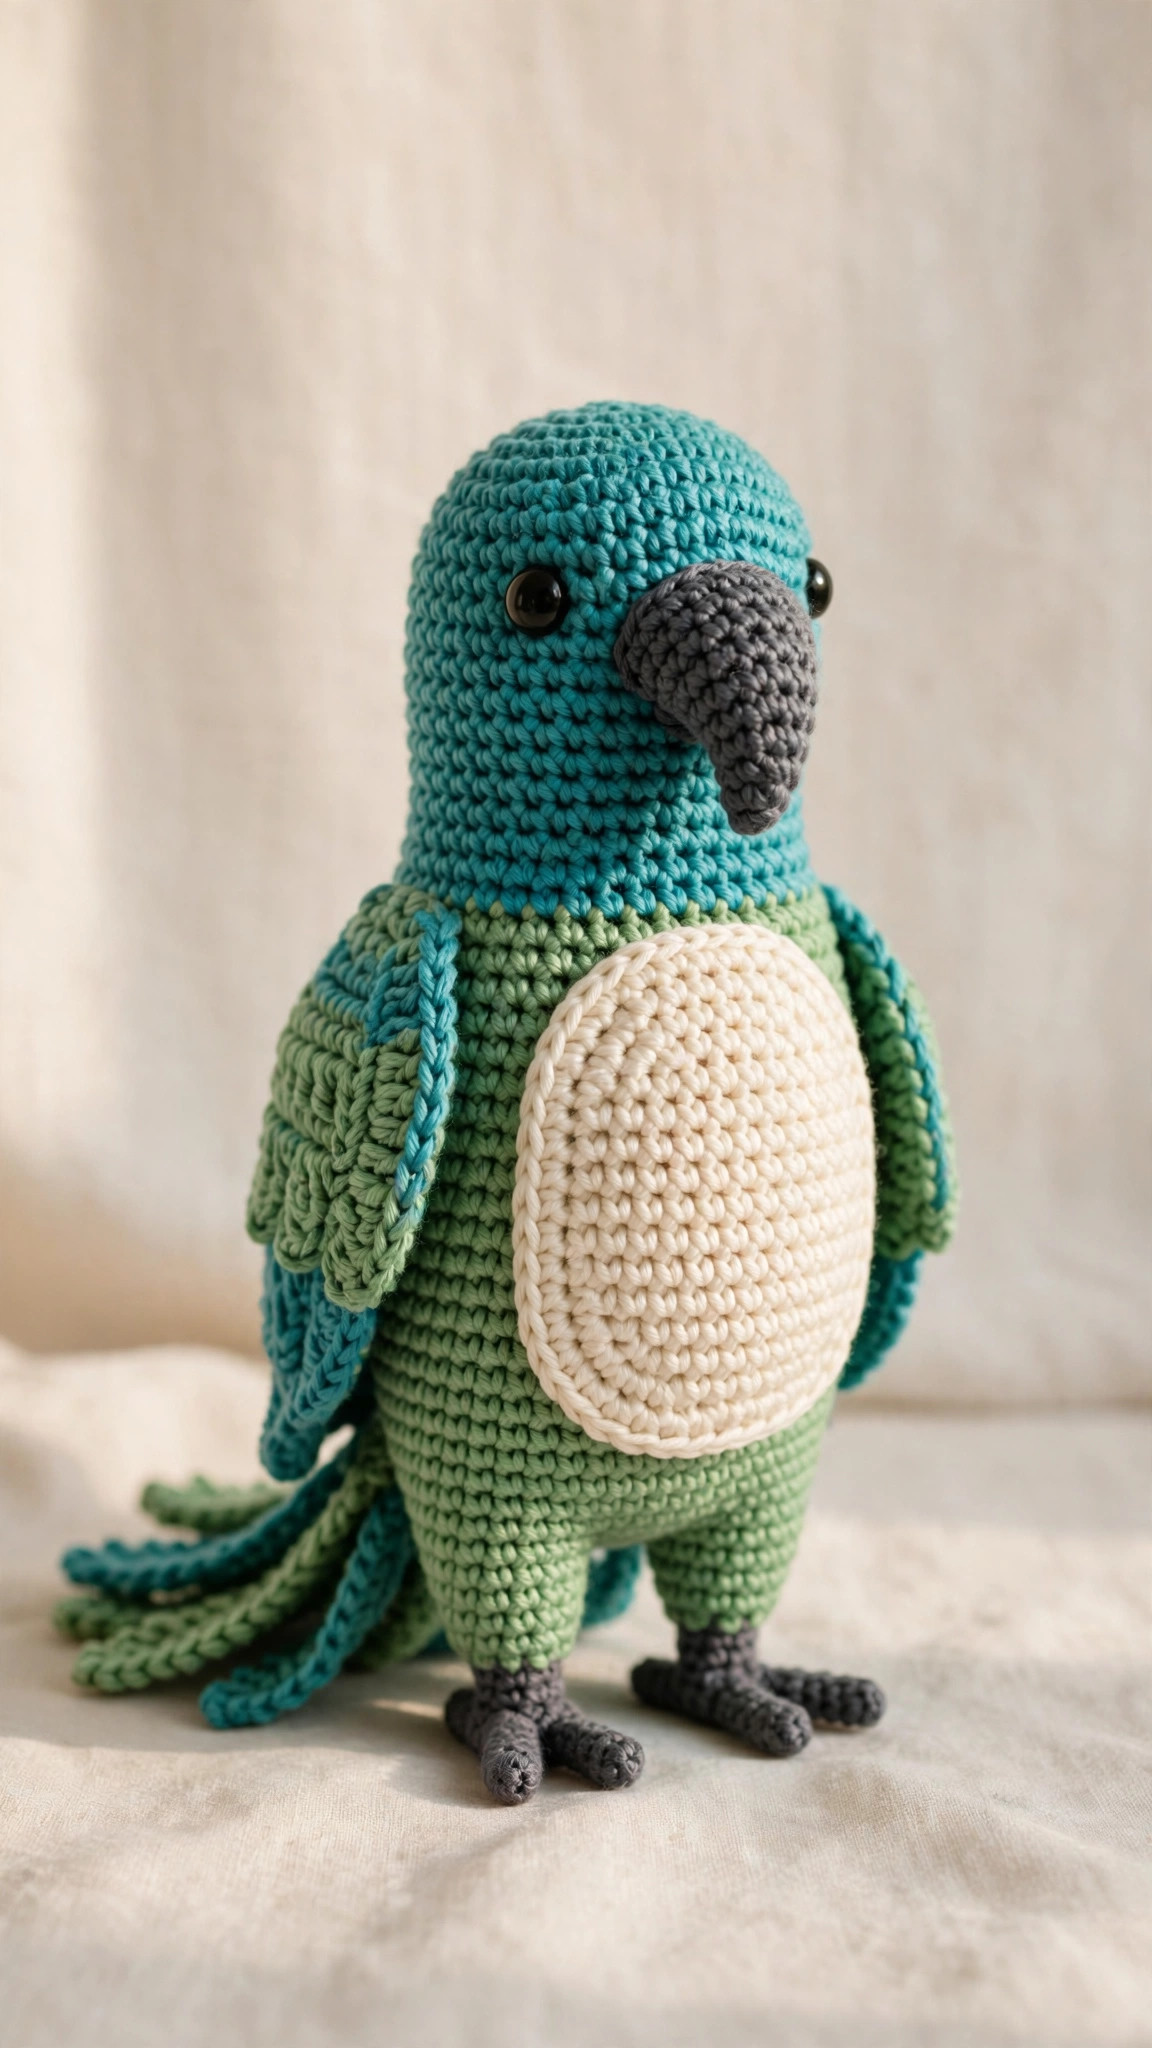
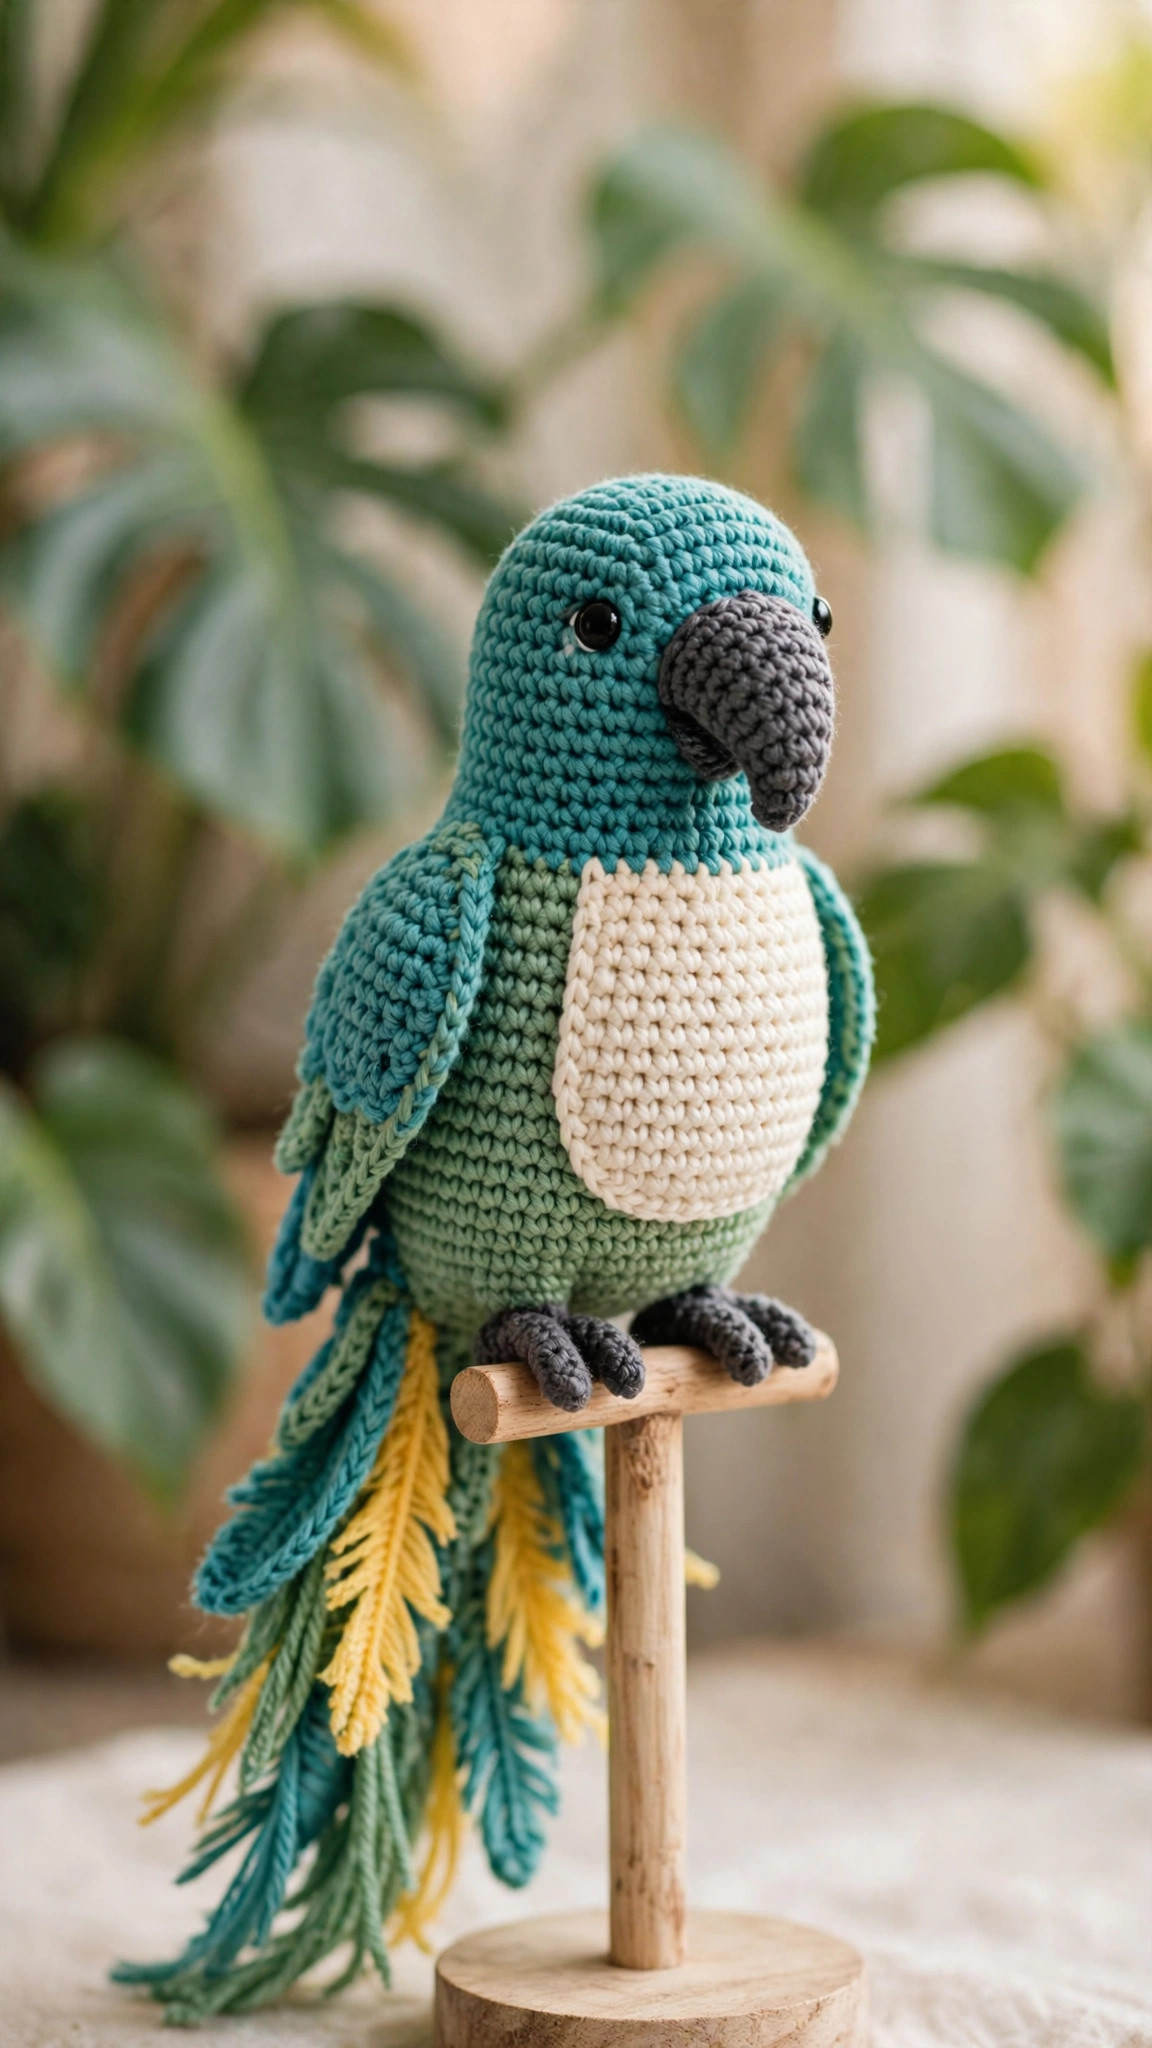
A tropical amigurumi parrot with a curved two-piece beak, teal-and-green color blocking, a cream belly panel and a dramatic layered tail — worked in simple single-crochet spirals from 16 small pieces you sew together over one colorful weekend.

Amigurumi · Crochet
- Finished size
- About 25 cm / 10 in tall
- Making time
- About 5–6 hours
- Hook
- 3.5 mm, worsted-weight yarn
- Pieces
- 16 pieces to assemble
- Skill
- Beginner
In this post
Some birds whisper. This one shouts — in the best possible way. This original free crochet parrot pattern gives you a plump 25 cm (10 in) amigurumi parrot: a teal head, a leaf-green color-blocked body, a cream belly panel, and a curved beak built from two separate pieces — because a real parrot's beak is never one sad grey lump. The tail is a layered fan of flat-worked feathers, and the whole bird is worked in simple single-crochet spirals. No exotic stitches — just patient rounds and bold color.
Why you'll love this free crochet parrot pattern
Most bird patterns cheat the two details that make a parrot a parrot: the beak and the tail. The beak becomes a cone; the tail, three sad chains. Not here. The beak is two pieces — a long upper beak bent into the classic hooked curve with one clever anchoring stitch, over a smaller lower beak — so the profile reads as parrot from across the room. The tail feathers are worked flat in rows, tapered stitch by stitch, then layered and fanned for a dramatic silhouette.
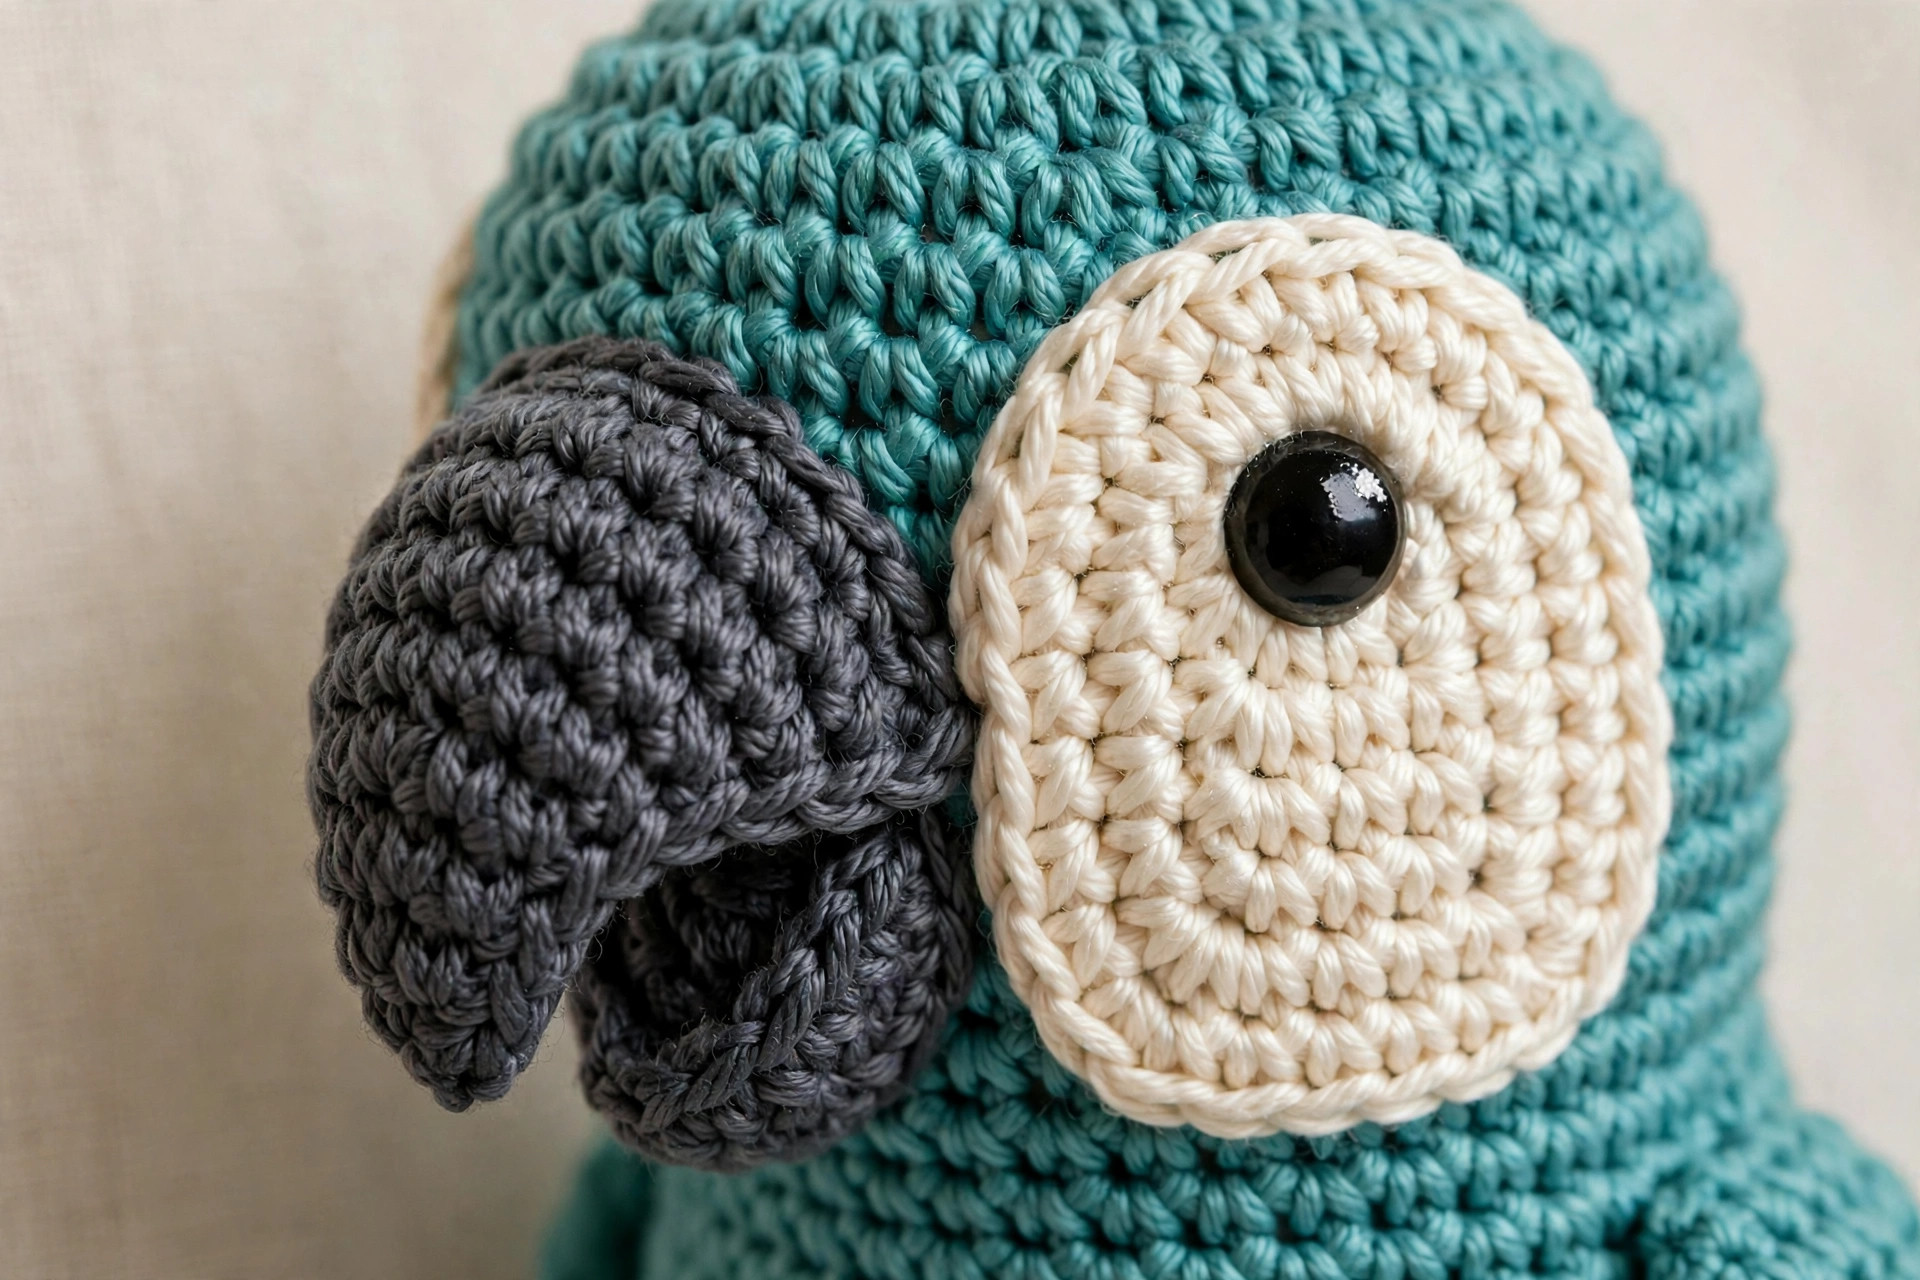
The body uses simple color blocking: leaf-green bands broken by teal chest and shoulder bands that flow into the teal head, so the colors look tailored, not random. The cream belly panel is sewn on like a waistcoat — a crisp color edge with no stranded colorwork inside. Even the face gets the full treatment: little cream face patches behind the eyes, like a real macaw's facial patch, with safety-eye and fully embroidered options.
Loved the upright build of our flamingo crochet pattern? This parrot is its natural next project: same spiral foundations, bolder color, a tail worth photographing.
Materials you'll need
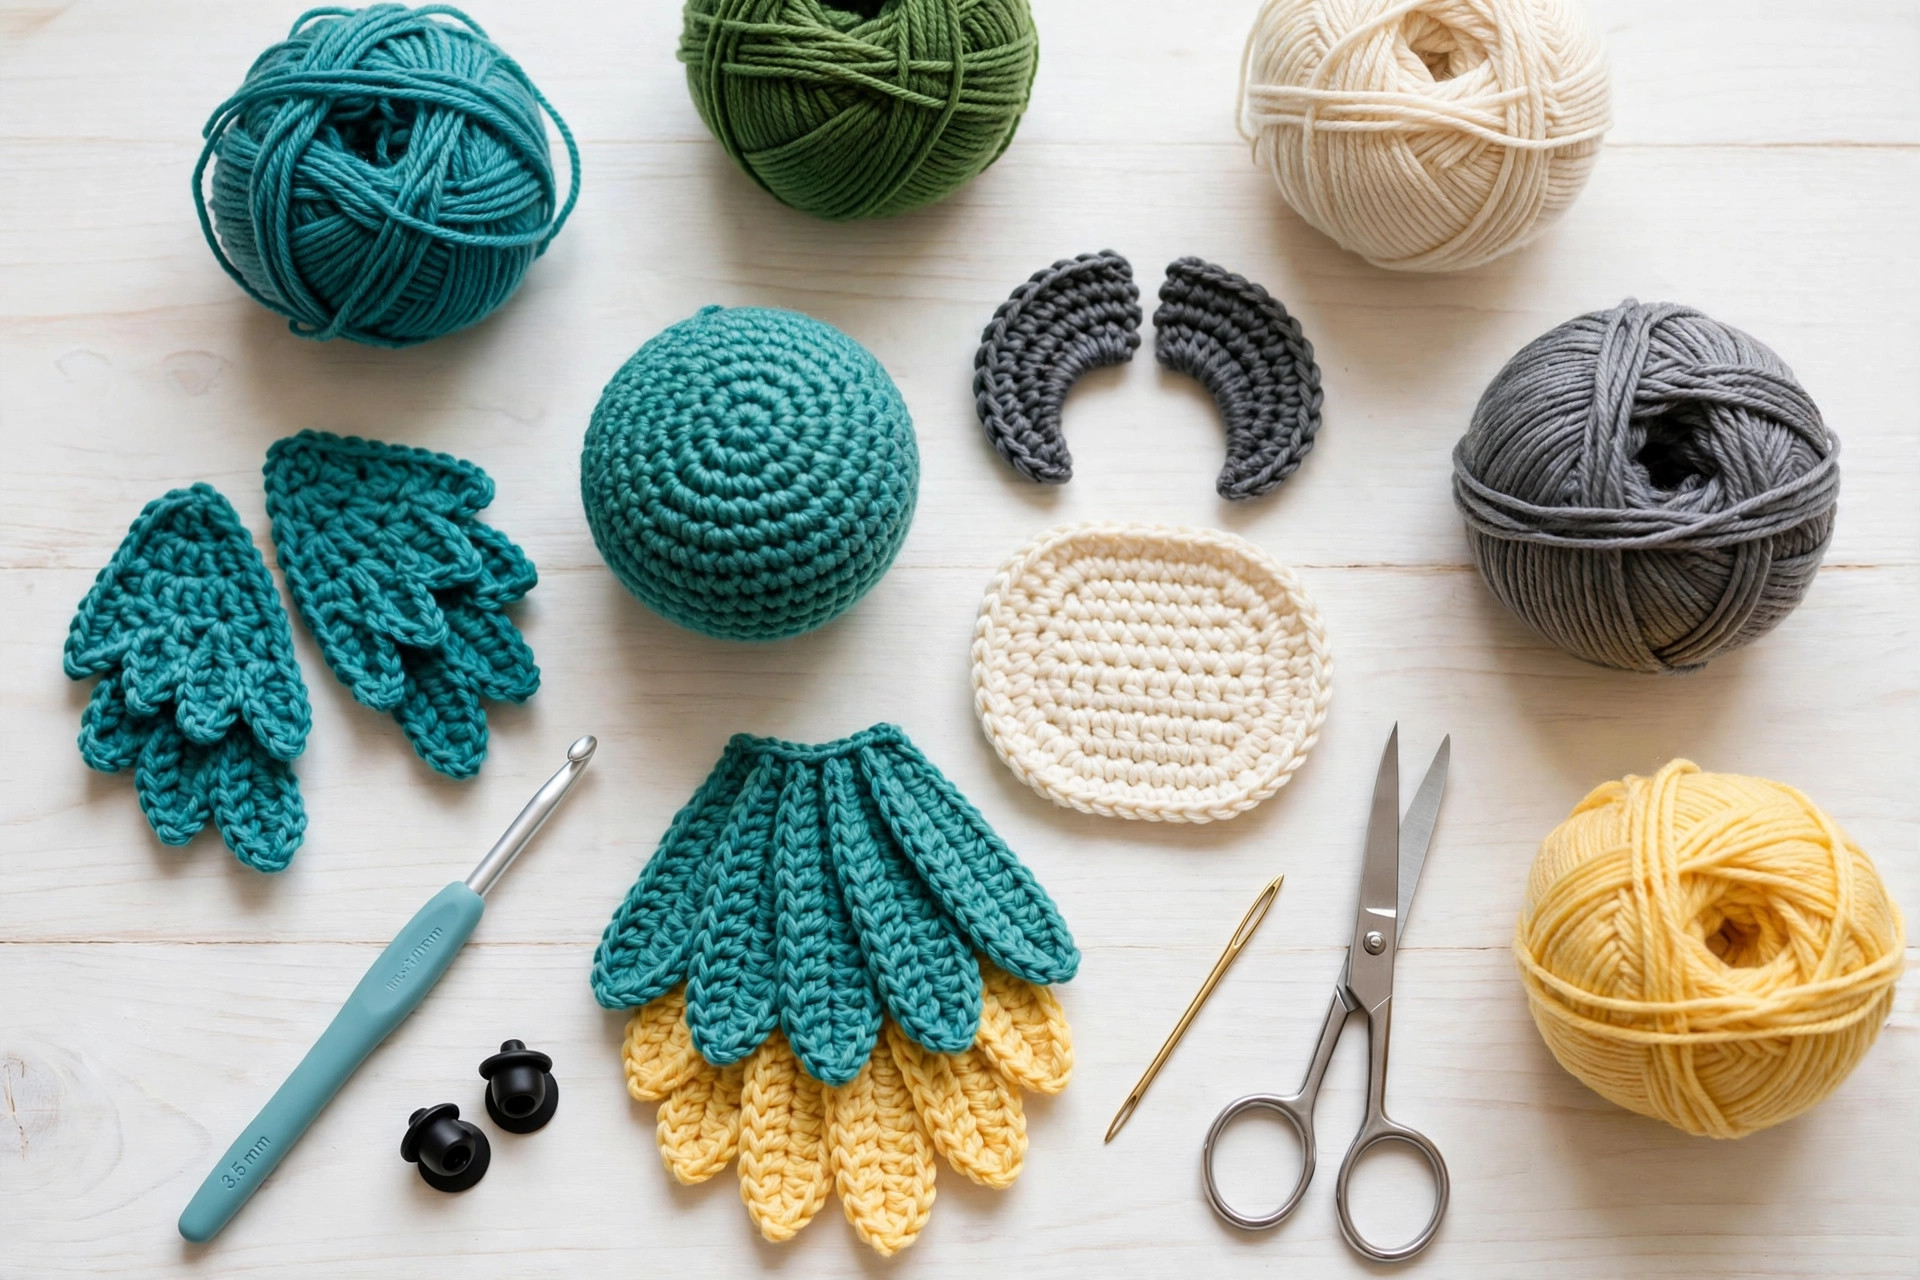
| Supply | What to get |
|---|---|
| Main yarn A | Worsted (#4) acrylic, teal — about 60 g |
| Main yarn B | Worsted (#4), leaf green — about 60 g |
| Belly yarn | Worsted (#4), cream — about 25 g |
| Beak and feet yarn | Worsted (#4), charcoal grey — about 25 g |
| Feather accent yarn | Worsted (#4), golden yellow — about 15 g |
| Crochet hook | 3.5 mm (E-4) |
| Safety eyes | 12 mm black, one pair (or black yarn for embroidered eyes) |
| Stuffing | Polyester fiberfill, a generous handful |
| Notions | Tapestry needle, stitch markers, scissors, sewing pins |
Smooth worsted acrylic is ideal: it holds crisp color-block edges and shows every stitch. Avoid fuzzy or chenille yarns — they blur the beak shaping. A 4.0 mm hook works too; your parrot will just come out a touch bigger.
Size, gauge and skill level
- Finished size: about 25 cm (10 in) from crown to tail tip, 11 cm (4.5 in) wide.
- Gauge: not critical — what matters is fabric tight enough that stuffing doesn't peek through. If you can see daylight between stitches, drop a hook size. Roughly, 4 sc ≈ 2.5 cm (1 in).
- Skill level: confident beginner. Know the magic ring, single crochet, increase, decrease, and how to change color (explained below). The feathers are flat rows — if you can turn work and count rows, you're ready.
First amigurumi? The crochet panda bear teaches the same spiral techniques — many readers make the panda first, then graduate to the parrot.
Color-change refresher: work the last single crochet until two loops remain, then yarn over with the new color and pull through. Carry the resting color loosely up the inside between bands — invisible from outside.
Abbreviations — US terms
| Abbreviation | Meaning |
|---|---|
| MR | magic ring |
| sc | single crochet |
| inc | increase (2 sc in the same stitch) |
| dec | decrease (sc 2 together — invisible decrease recommended) |
| st(s) | stitch(es) |
| ch | chain |
| sl st | slip stitch |
| R | round |
| FO | fasten off |
A note on decreases: the invisible decrease (front loop only of the next two stitches, yarn over, pull through both, yarn over, pull through two) keeps fabric smooth — use it for every "dec".
The pattern (US terms)
Work the round pieces in continuous spirals unless noted. Mark the first stitch of each round. Stitch counts are in parentheses — count them, especially on the head and body.
Head — teal
- R1: MR, 6 sc (6)
- R2: inc in each st (12)
- R3: [sc, inc] × 6 (18)
- R4: [2 sc, inc] × 6 (24)
- R5: [3 sc, inc] × 6 (30)
- R6: [4 sc, inc] × 6 (36)
- R7: [5 sc, inc] × 6 (42)
- R8: [6 sc, inc] × 6 (48)
- R9–R15: sc around (48) — 7 rounds
Place the eyes and face patches now (crochet the face patches first — below). Eyes sit between R12 and R13, 10 stitches apart. Push each safety eye through a patch center, then the head fabric; click the washer on inside and whipstitch around each patch. For embroidered eyes, skip the safety eyes and stitch them on after assembly.
- R16: [6 sc, dec] × 6 (42)
- R17: [5 sc, dec] × 6 (36)
- Start stuffing now, while the opening is wide.
- R18: [4 sc, dec] × 6 (30)
- R19: [3 sc, dec] × 6 (24)
- R20: [2 sc, dec] × 6 (18)
- R21: [sc, dec] × 6 (12)
- R22: dec × 6 (6). FO, close and weave in.
Tip: stuff to tennis-ball firmness — over-stuffing shows fiberfill, under-stuffing gives a lumpy face.
Face patches — cream, make 2
Small ovals worked around a starting chain, worn behind the eyes like a macaw's facial patch.
- Ch 6.
- R1: sc in 2nd ch from hook, 3 sc, 3 sc in last ch; rotate and work down the other side: 3 sc, inc in last ch (12)
- R2: inc, 3 sc, inc in next 3 sts, 3 sc, inc in next 2 sts (18)
- R3: sc around (18)
- FO with a long sewing tail (~30 cm).
Upper beak — charcoal grey
The showpiece: a cone, small at the tip and wider at the base, bent into the hooked curve before sewing.
- R1: MR, 6 sc (6)
- R2: sc around (6)
- R3: [2 sc, inc] × 2 (8)
- R4: sc around (8)
- R5: [3 sc, inc] × 2 (10)
- R6: sc around (10)
- R7: [4 sc, inc] × 2 (12)
- R8: sc around (12)
- R9: [5 sc, inc] × 2 (14)
- R10: sc around (14)
- FO with a long sewing tail (~40 cm). Stuff firmly, packing extra into the base — that's what meets the face.
Creating the curve: bend the tip toward the underside. Run grey yarn through the underside around R5 and up through the tip; pull until it bows into a hook and knot inside to lock it. A subtle arc reads "parrot"; a hard right angle reads "toucan accident."
Lower beak — charcoal grey
- R1: MR, 6 sc (6)
- R2: [sc, inc] × 3 (9)
- R3: sc around (9)
- R4: [2 sc, inc] × 3 (12)
- R5: sc around (12)
- FO with a long sewing tail (~30 cm). Stuff lightly — just a pinch.
Body — green with teal bands, worked in a spiral
Worked from the base up. Change color in the last yarn-over before each band; carry the resting color up the inside.
- R1 (green): MR, 6 sc (6)
- R2: inc in each st (12)
- R3: [sc, inc] × 6 (18)
- R4: [2 sc, inc] × 6 (24)
- R5: [3 sc, inc] × 6 (30)
- R6: [4 sc, inc] × 6 (36)
- R7: [5 sc, inc] × 6 (42)
- R8–R11: sc around (42) — green
- R12–R14: sc around (42) — teal (chest band)
- R15–R18: sc around (42) — green
- R19–R21: sc around (42) — teal (shoulder band)
- R22: [5 sc, dec] × 6 (36)
- R23: [4 sc, dec] × 6 (30)
- Stuff firmly — really pack it; this body carries the head, beak and tail.
- R24: [3 sc, dec] × 6 (24)
- R25: [2 sc, dec] × 6 (18)
- R26: [sc, dec] × 6 (12)
- R27: dec × 6 (6). FO, close and weave in.
Belly panel — cream
A slightly domed oval worked around a starting chain, like the face patches but bigger. It sits on the front like a waistcoat — crisp edge, no stranded colorwork inside.
- Ch 11.
- R1: sc in 2nd ch from hook, 8 sc, 3 sc in last ch; rotate and work down the other side: 8 sc, inc in last ch (22)
- R2: inc, 8 sc, inc in next 3 sts, 8 sc, inc in next 2 sts (28)
- R3: sc, inc, 8 sc, [sc, inc] × 3, 8 sc, [sc, inc] × 2 (34)
- R4: sc around (34)
- FO with a long sewing tail (~50 cm).
Wings — green with teal tips, make 2
Worked in the round, then flattened into teardrops.
- R1 (green): MR, 6 sc (6)
- R2: [sc, inc] × 3 (9)
- R3: sc around (9)
- R4: [2 sc, inc] × 3 (12)
- R5: sc around (12)
- R6: [3 sc, inc] × 3 (15)
- R7: sc around (15) — switch to teal in the last yarn-over
- R8 (teal): [4 sc, inc] × 3 (18)
- R9: sc around (18)
- R10: [4 sc, dec] × 3 (15)
- FO with a long sewing tail (~30 cm). Do not stuff; flatten gently — the teal tip falls at the narrow end.
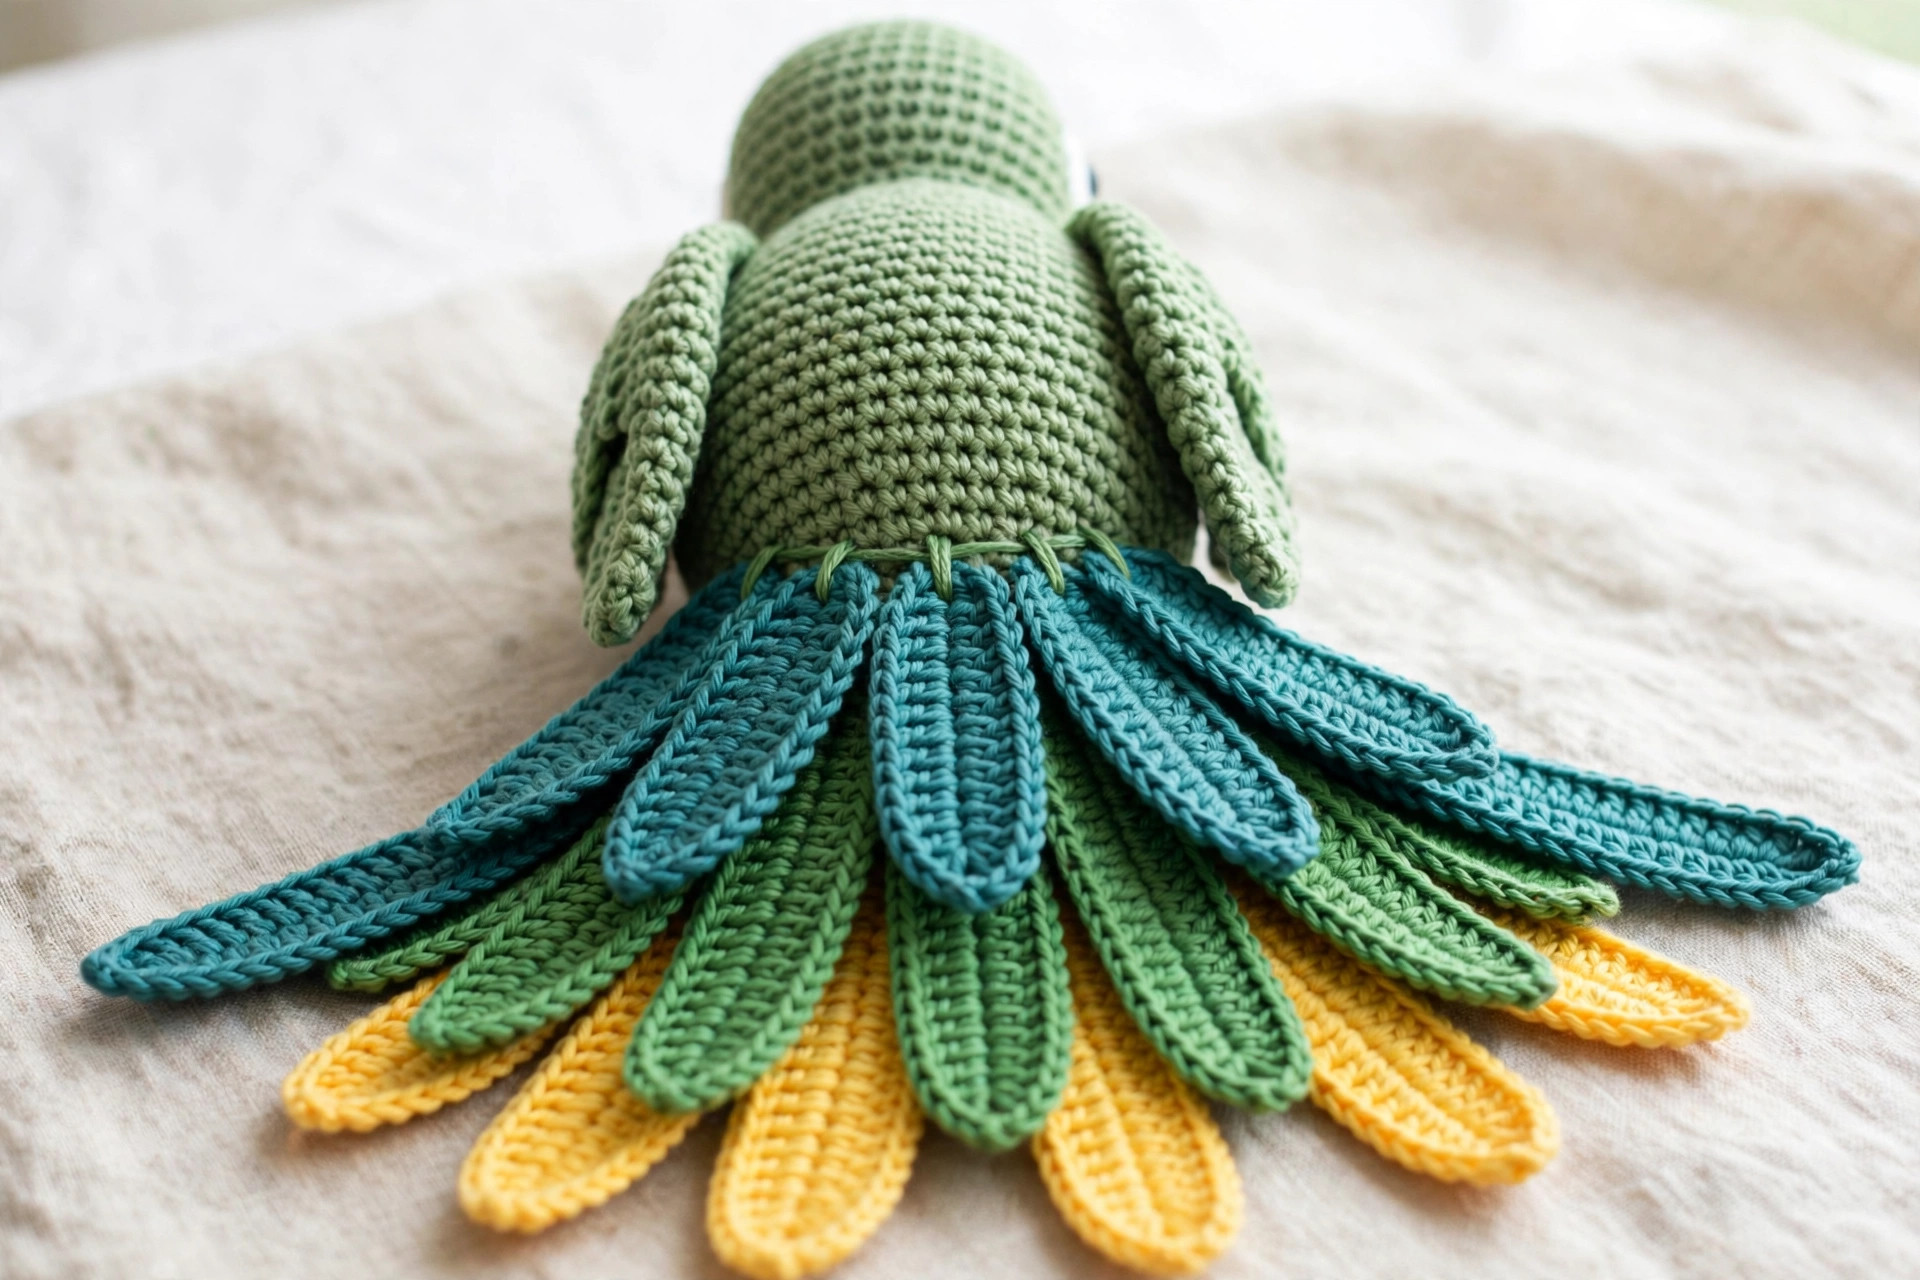
Tail feathers — make 5
Worked flat: ch 1 and turn at the end of every row (the ch doesn't count). Wide end = base, tapered end = tip.
Long feather — teal, make 1:
- Ch 9.
- Row 1: sc in 2nd ch from hook and across (8)
- Rows 2–16: sc across (8) — 15 rows
- Row 17: dec, 4 sc, dec (6)
- Row 18: sc across (6)
- Row 19: dec, 2 sc, dec (4)
- Row 20: dec × 2 (2)
- Row 21: dec (1). FO, weave in the tail.
Medium feathers — green, make 2:
- Ch 9.
- Row 1: sc in 2nd ch from hook and across (8)
- Rows 2–12: sc across (8) — 11 rows
- Row 13: dec, 4 sc, dec (6)
- Row 14: sc across (6)
- Row 15: dec, 2 sc, dec (4)
- Row 16: dec × 2 (2)
- Row 17: dec (1). FO, weave in the tail.
Short feathers — golden yellow, make 2:
- Ch 7.
- Row 1: sc in 2nd ch from hook and across (6)
- Rows 2–8: sc across (6) — 7 rows
- Row 9: dec, 2 sc, dec (4)
- Row 10: dec × 2 (2)
- Row 11: dec (1). FO, weave in the tail.
Feet — charcoal grey, make 2
- R1: MR, 6 sc (6)
- R2: [sc, inc] × 3 (9)
- R3–R4: sc around (9) — 2 rounds
- R5: [sc, dec] × 3 (6)
- FO with a long sewing tail (~25 cm). Tuck in a pinch of stuffing and flatten into an oval foot. Optional: stitch two snug vertical lines over the front edge for toes.
Assembly — the order that actually matters
- Belly panel first. Pin the panel to the front of the body, centered — top edge just under the teal shoulder band (around R20), bottom edge near R6, seam at the back. Whipstitch around it, easing so the edges don't pucker.
- Head to body. Center the head on the body, face forward over the belly panel. Sew around the join with teal yarn, twice, for security. Pack extra stuffing into the neck before closing — a heavy beak on a floppy neck is a sad parrot.
- Upper beak. Position it on the face front, base between the eyes, top edge around R11 of the head. Sew around the base, hooking the tip down and slightly forward.
- Lower beak. Tuck it just beneath the upper one, top edge around R15, and sew it to the face — the upper beak should visibly overlap it.
- Wings. Sew one to each side of the body at roughly R13–R18 height, top edge against the body, teal tips down and slightly back. Whipstitch along the top edge only — wings should hug the body.
- Tail feathers. Press the feathers flat first, then fan them at the back of the body's base: green pair at the bottom, angled outward; the long teal one centered on top; the short yellow pair in the gaps. Sew all bases down firmly, angled slightly downward — the tail is the tripod's back leg, so this join must be strong.
- Feet. Sew the feet under the front of the body's base, toes forward, about 4 cm apart. Set the parrot down: feet and tail fan should form a stable tripod.
- Eyes (embroidered option). If you skipped safety eyes, embroider them onto the face patches now — satin-stitch ovals or French knots in black yarn, about 1 cm tall, each with one tiny white catchlight stitch.
Finishing touches
Fifteen unhurried minutes here is the difference between "homemade" and "handmade."
Press the feathers flat. Curl-prone after handling. Press under a dry cloth with a warm (not hot) iron, or sandwich under a heavy book overnight — acrylic and direct high heat are not friends.
Check the beak curve. In profile, the hook should arc over the lower beak without swallowing it. If it drifted, re-tighten the anchoring stitch inside.
Weave in every end, then tug-test. Run each tail through several stitches inside its piece and snip close. Tug the parrot gently all over: nothing should move but the fabric.
Three cute variations to try next
Once you've made one parrot, you'll want a flock. Same pattern, three personalities:
- Scarlet macaw. Head and body in bright red, cream belly and patches, tail in blue, yellow and red. The Pinterest colorway.
- Mini budgie. Use DK-weight yarn with a 3.0 mm hook — everything shrinks to about 19 cm (7.5 in) and the feathers look especially delicate at this scale. A lovely gift size.
- Sleepy night parrot. For a baby-safe version, embroider the eyes as two curved lines (closed eyes) and sew the wings forward like a hug. Dozing-on-your-shelf cute.
Got the amigurumi bird bug? The free crochet chicken pattern uses the same spiral foundations at a squishier scale; the celestial leaf dragon takes them up to showpiece size.
Troubleshooting tips
- The beak looks like a ball, not a hook. You skipped the bend. Thread grey yarn through the underside and tip and pull it into the curve — firm stuffing holds the bend.
- The color band has an obvious jog. Change color in the final yarn-over of the previous round, not after. A slight jog is normal in spirals — keep it at the back, under the tail.
- Stuffing shows through the stitches. Your tension is too loose or your hook too big — switch to a 3.25 mm hook for the small pieces, or tighten up.
- The parrot tips forward. The tail is the tripod's back leg. Re-sew the feather bases lower with more downward angle, and nudge the feet forward.
- The feathers curl and won't fan. Press them flat under a heavy book overnight. If one still refuses, a round of slip stitches around its edge adds the structure to straighten it.
- The head wobbles on the neck. Almost always an under-stuffed neck. Unpick a few join stitches, pack in more fiberfill, and re-sew with two full passes.
Frequently asked questions
Is this free crochet parrot pattern really free?
Yes — the complete pattern above is free, no email signup required. Sharing the post or saving it on Pinterest is the kindest thank-you.
What skill level is this pattern?
Confident beginner. If you can crochet a magic ring and single crochet in the round, you have almost every skill needed — the only new techniques, color changes and flat feather rows, are explained above.
How long does it take to make?
About 5–6 hours: roughly 3.5–4 hours of crocheting (feathers and head slowest), 45–60 minutes of assembly, and 15 minutes of finishing. A perfect long-weekend project.
Can I sell the finished parrots I make?
Yes! You may sell finished parrots made from this pattern in small batches (craft fairs, Etsy, gifts). Please credit Little Loop Finds as designer with a link back to this page. The pattern text and photos may not be redistributed or sold.
Is this parrot safe for babies and toddlers?
With two changes, yes: embroider the eyes instead of using safety eyes, and sew the beak and tail on extra-securely. Safety eyes are fine for older children but still small parts — use your judgment for under-threes.
More free patterns to try
Keep the hook moving: the flamingo crochet pattern is the ideal companion piece — same tropical energy, longer legs. The highland cow crochet pattern adds a loop-stitch shag challenge, the crochet panda bear is a simpler warm-up, and the free crochet chicken is the squishiest bird in our flock.
The box below contains an Etsy link. If you buy through it, we may earn a small commission at no extra cost to you. Learn more.
No time to make one?
Short on time? Find handmade crochet parrots from independent makers on Etsy.
Browse on Etsy (opens Etsy in a new tab)