Crochet toothless free pattern: black dragon amigurumi
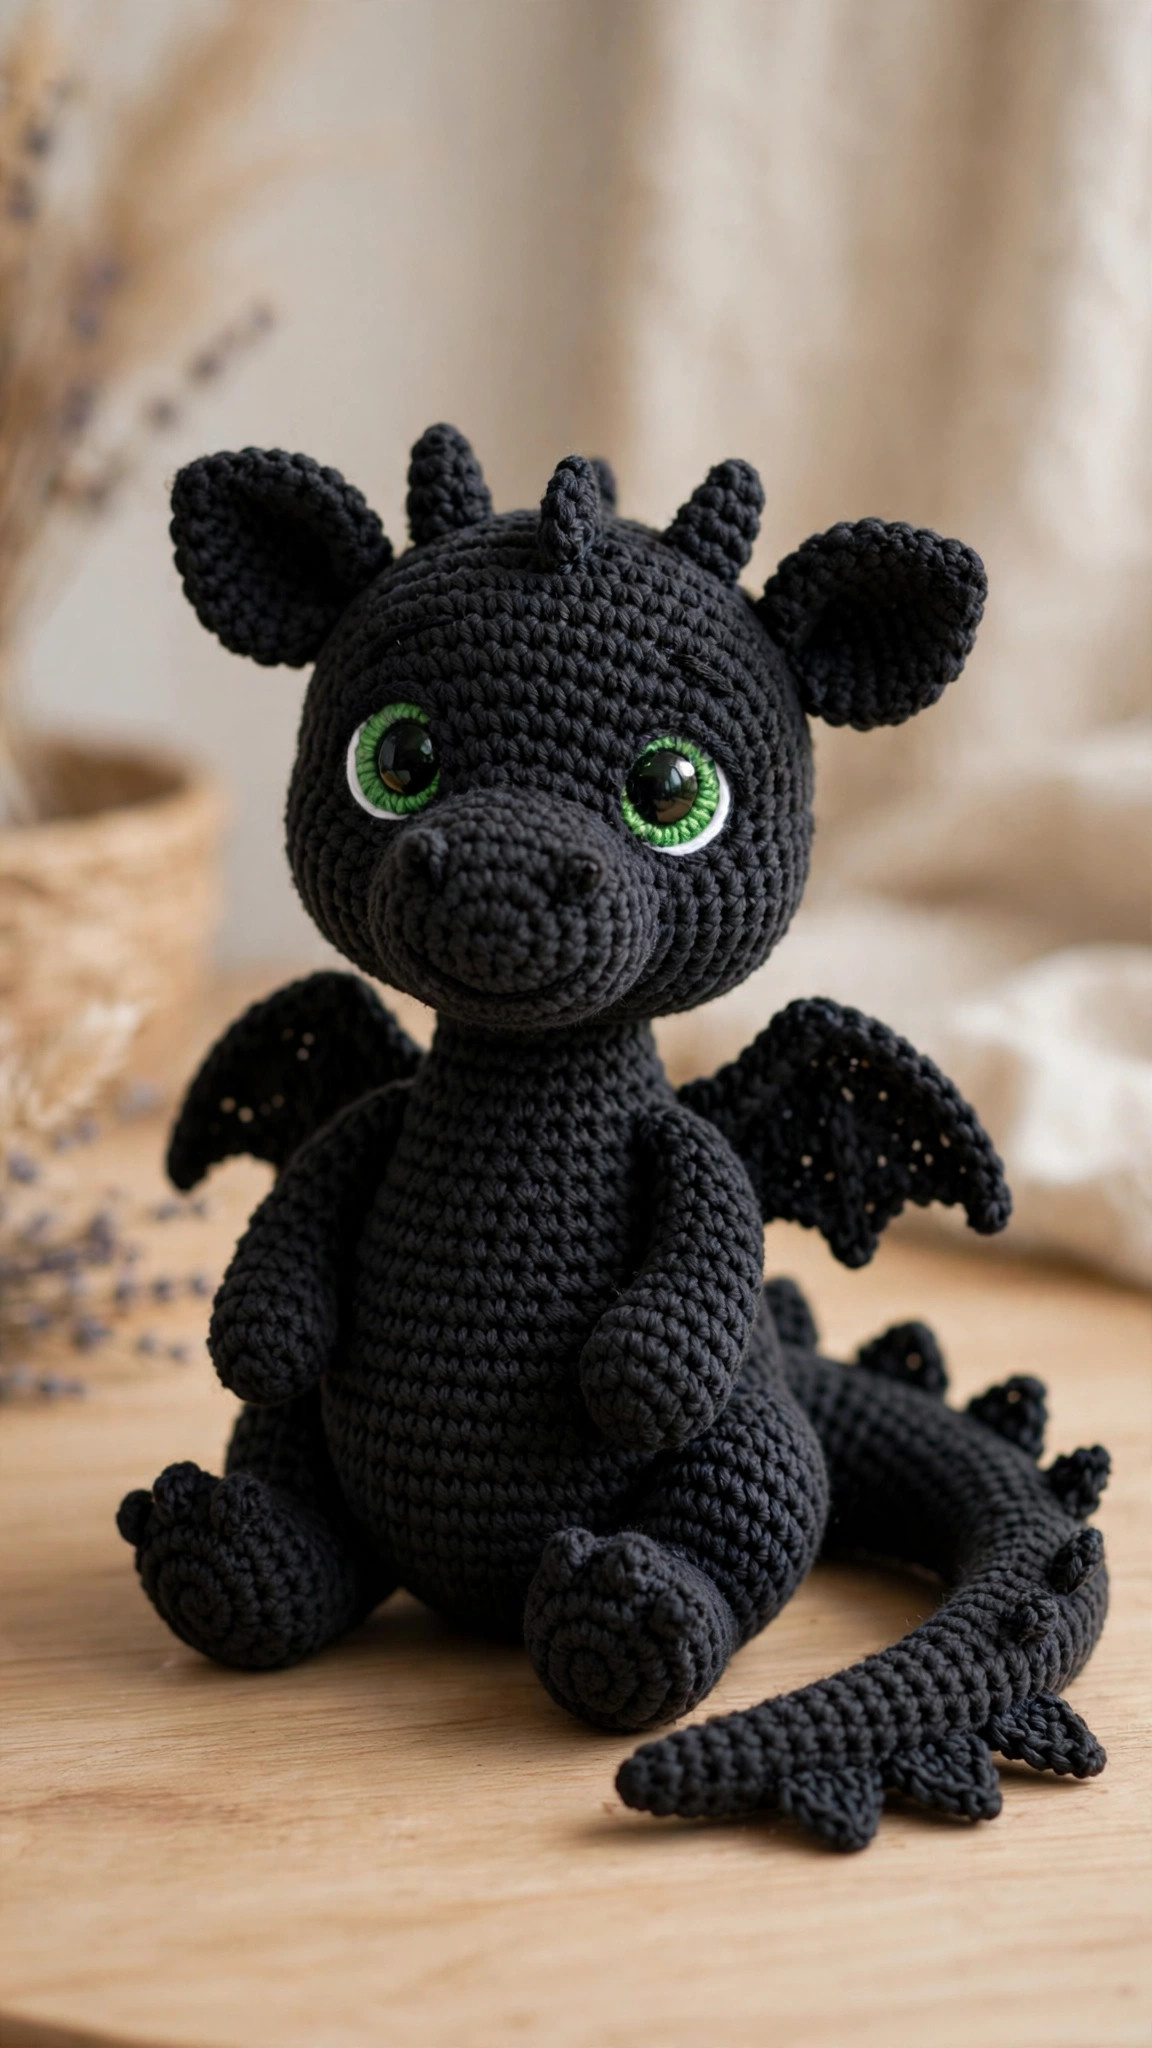
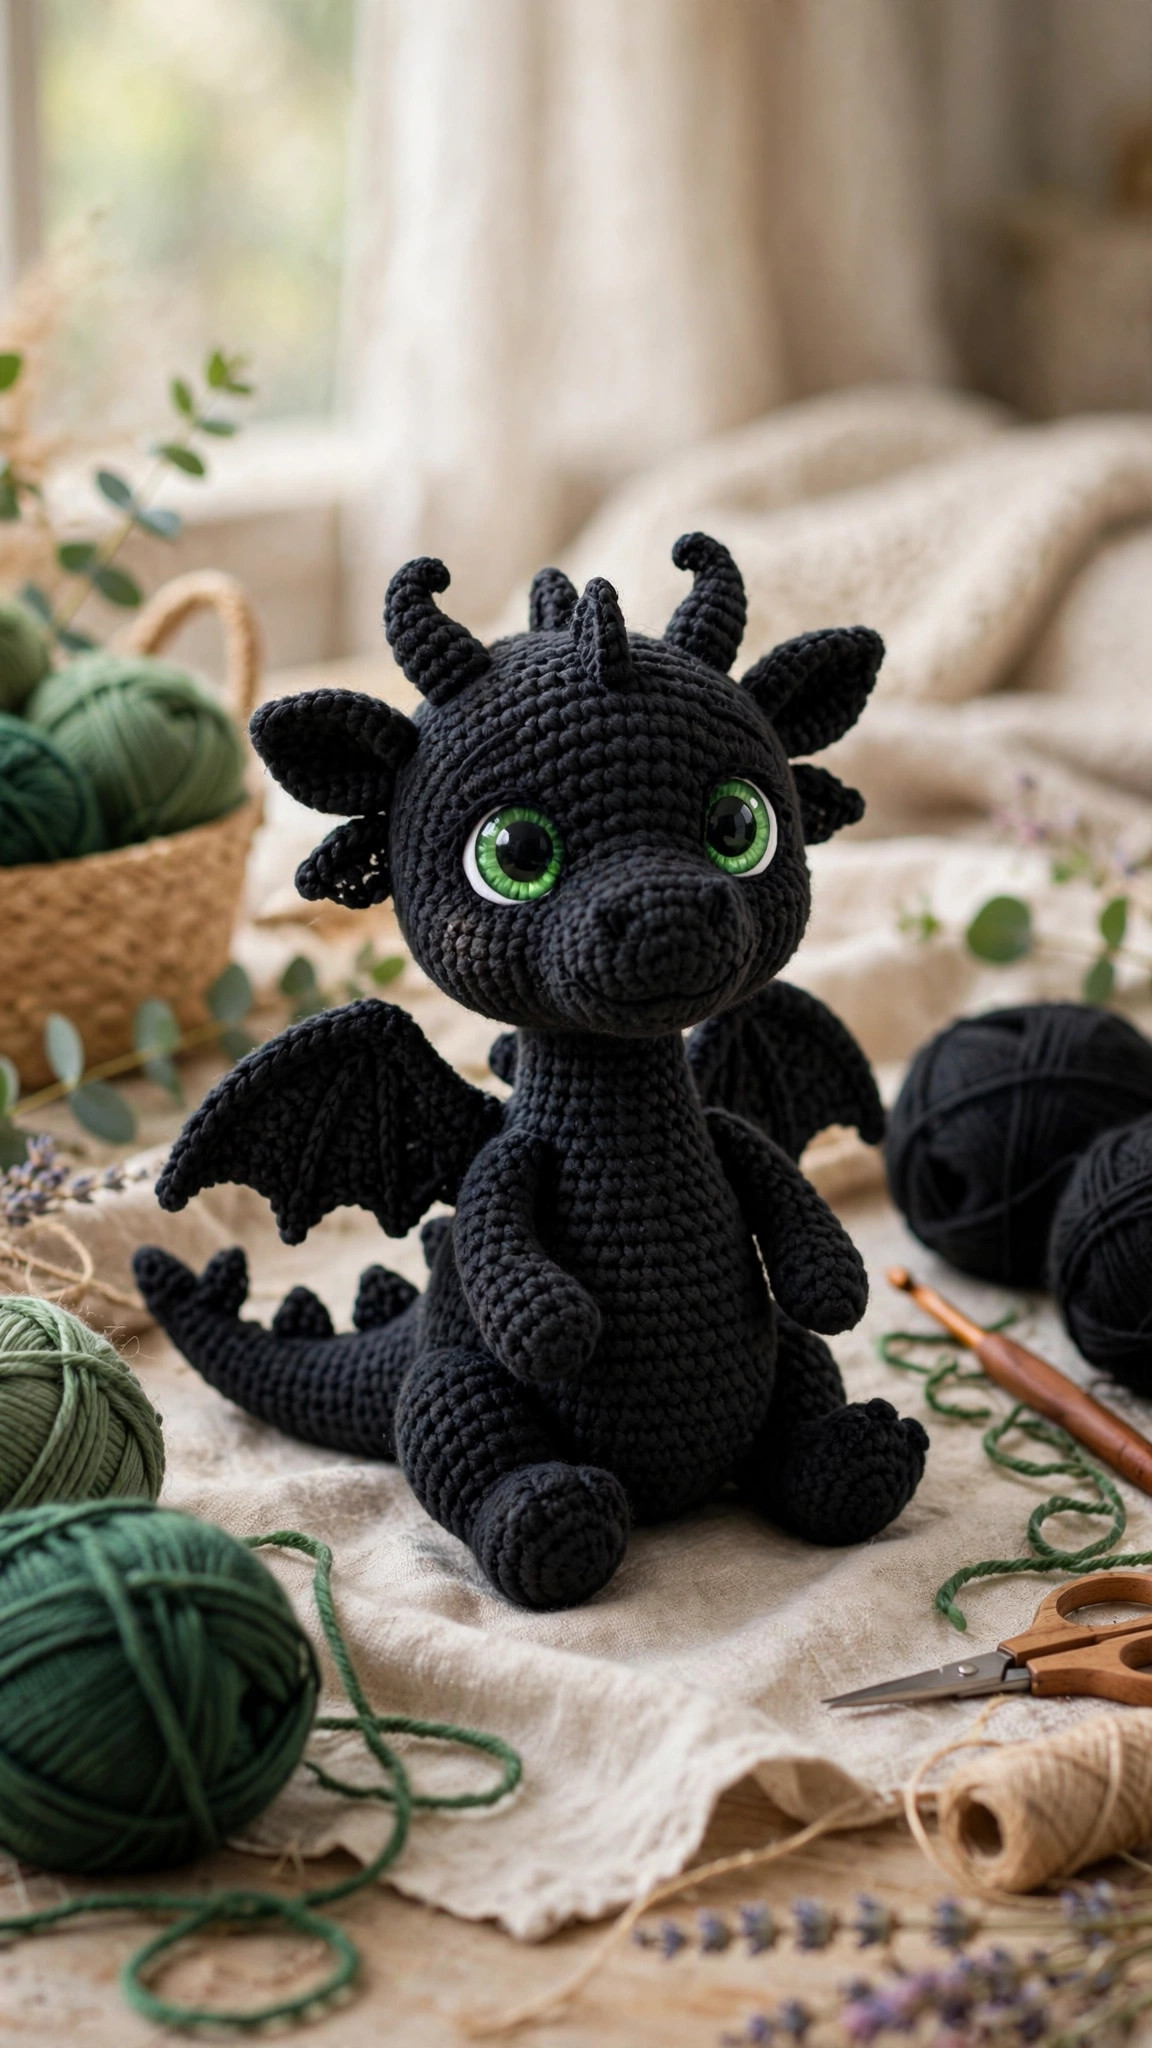
A wide-headed, round-bellied black dragon with huge green eyes, a low snout, soft folded wings and a fin-tipped tail — an original design worked in simple single-crochet spirals from small pieces you sew together over one cozy weekend.

Amigurumi · Crochet
- Finished size
- About 18 cm / 7 in tall
- Making time
- About 5–6 hours
- Hook
- 3.5 mm, worsted-weight yarn
- Pieces
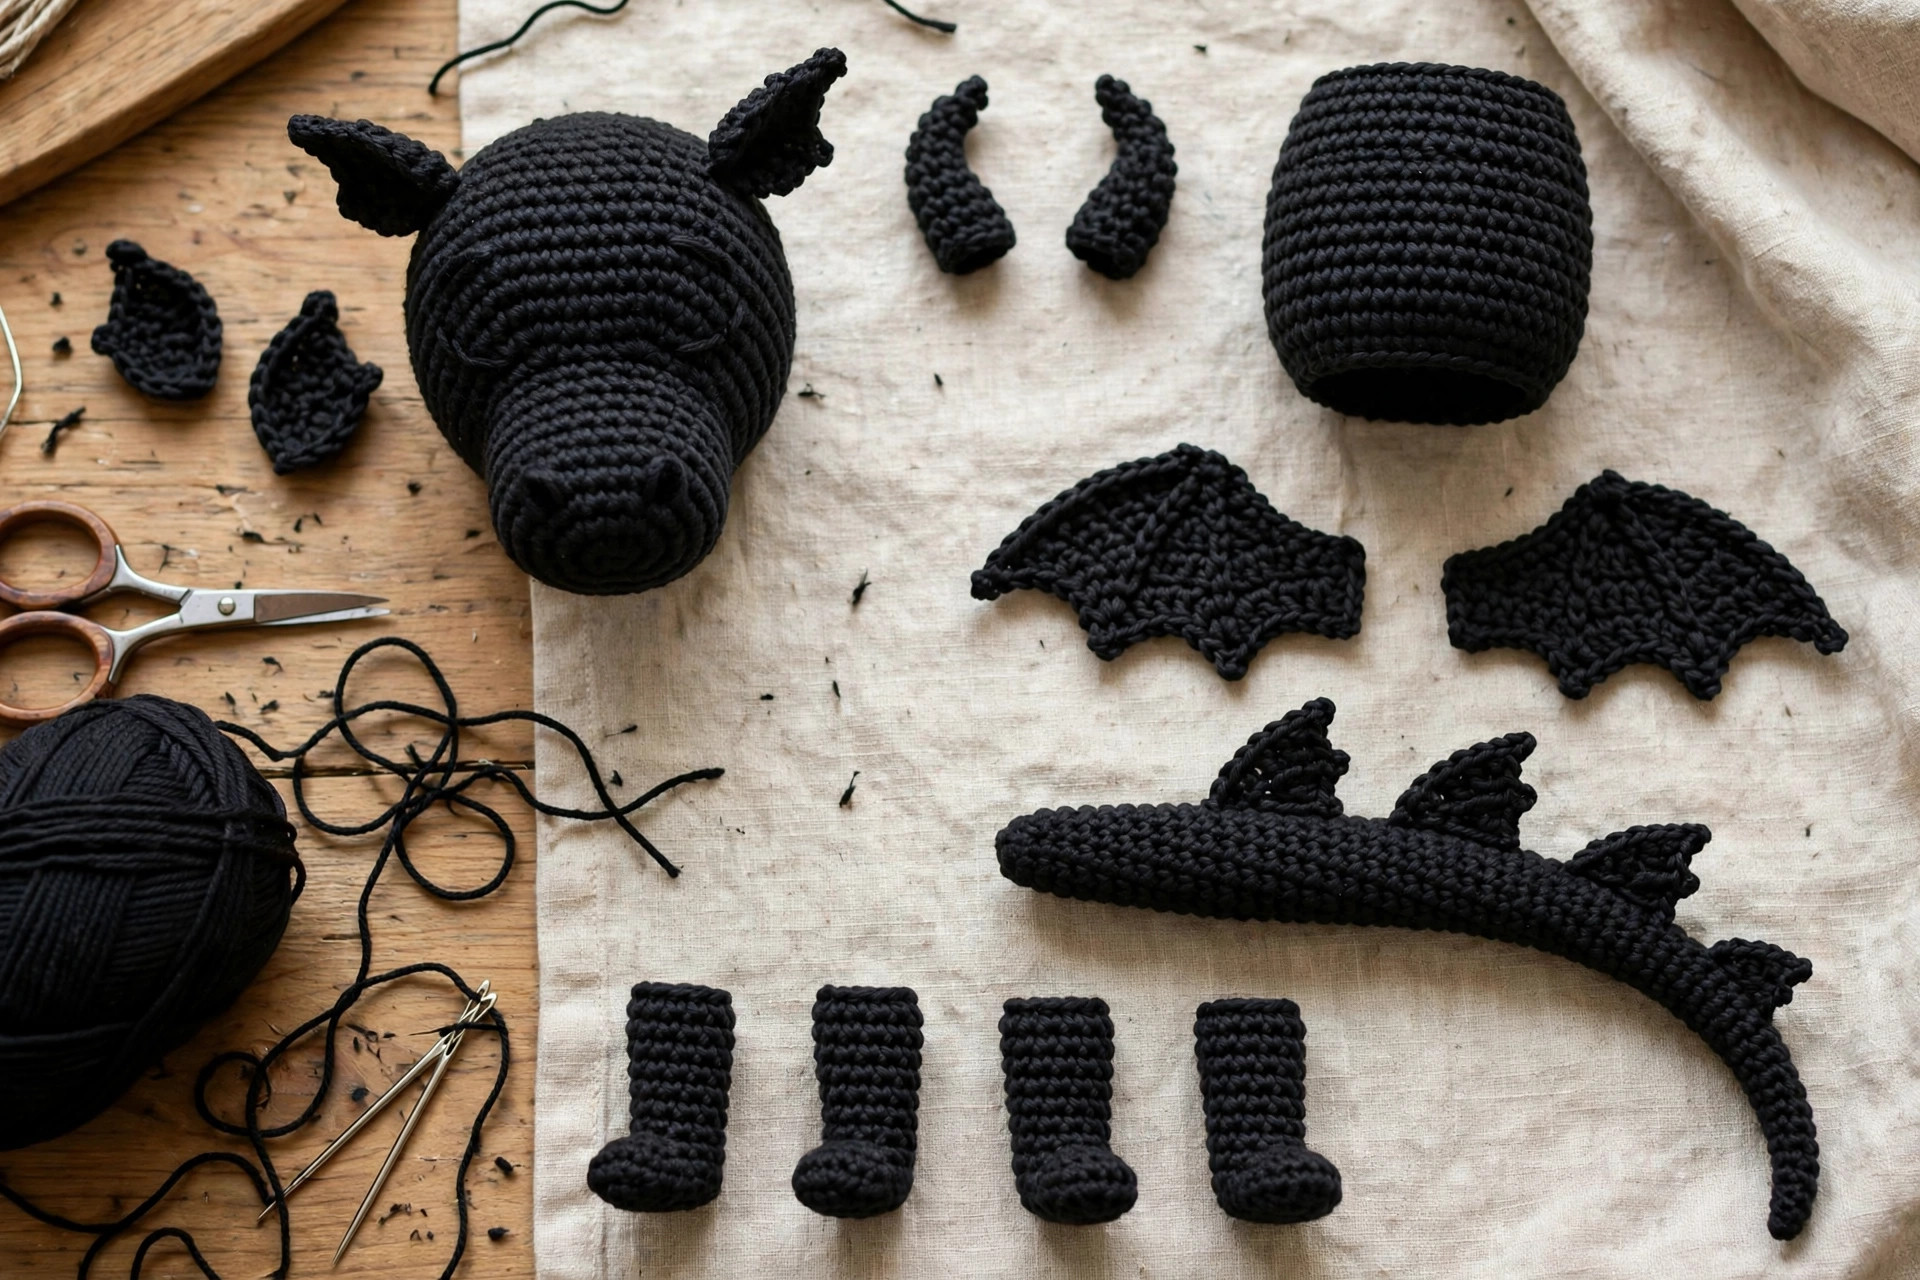
- 17 pieces to assemble
- Skill
- Confident beginner
In this post
Searching for a crochet toothless free pattern usually means one thing: you want a sweet, big-eyed black dragon with little wings, a swishy tail and a face that melts everyone who sees it. This is my own original black dragon amigurumi design, worked out stitch by stitch with my own proportions and stitch math — not an official or licensed pattern, and not copied from anyone else's design. You get a round-bellied, wide-headed little dragon plush with huge green eyes, tiny rounded ears, two small head nubs, soft folded wings and a long tail tipped with two flat fins, all in simple single-crochet spirals.
Why you'll love this black dragon crochet pattern
Most dragon patterns go one of two ways: so simplified the toy reads as a black blob with wings, or so complicated — wired wings, embroidered scales, dozens of spikes — that makers give up halfway. This design takes a calmer path. Every piece is a basic shape: a sphere for the head, an egg for the body, a tapered tube for the tail, and flat shapes for the wings, belly and fins. The character comes from proportion and placement, not difficult stitches.
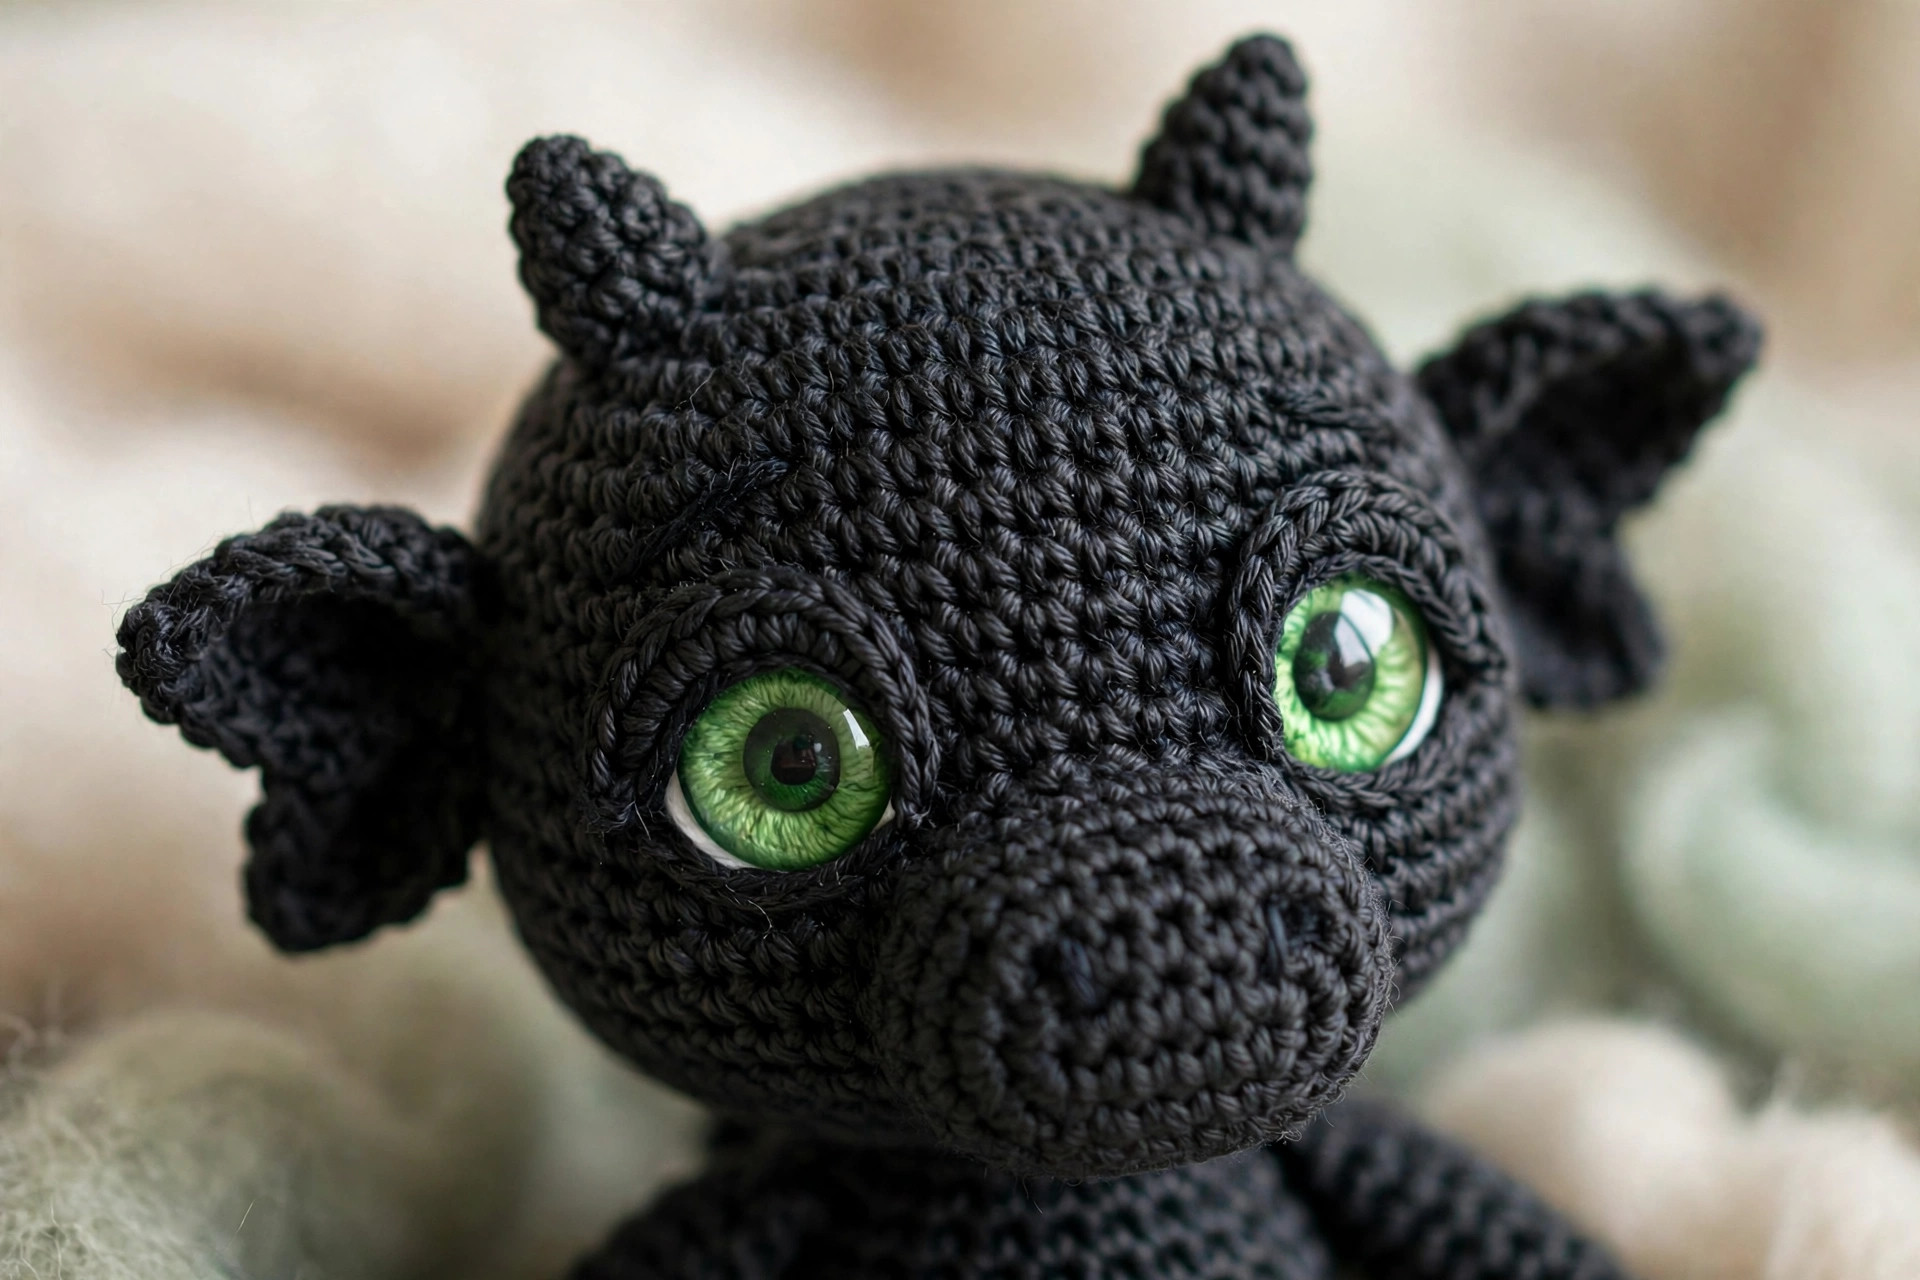
The head is a little wider than tall, and the snout is a separate shallow piece sewn low, pushing the eyes up and apart. The green eyes are set wide — 10 stitches apart — the oldest amigurumi trick for a young, friendly face. The wings are worked flat, so you can check the pair matches first. No wire, no fuss.
Love dragon makes? Our leaf-wing dragon is a bigger green showpiece, while the classic dragon plush is a softer companion make.
Materials you'll need
| Supply | What to get |
|---|---|
| Main yarn | Worsted-weight (#4) acrylic or cotton in black, about 120 g |
| Belly yarn | Worsted-weight light grey or soft sage green, about 20 g |
| Wing yarn | Worsted-weight charcoal or dark grey, about 25 g |
| Crochet hook | 3.5 mm (E-4) |
| Safety eyes | 14 mm green or black, one pair (green iris reads best) |
| Stuffing | Polyester fiberfill, a generous handful |
| Notions | Tapestry needle, stitch markers, scissors, pins |
A quick note on black yarn: black stitches are hard to see, especially in the evening. Work in your best light, with a white towel under your work so stitch tops show in silhouette. Smooth acrylic beats matte cotton here — its slight sheen makes counting far less painful.
Size, gauge and skill level
- Finished size: about 18 cm (7 in) tall sitting, 13 cm (5 in) wide across the wings, tail about 12 cm (4.5 in) long.
- Gauge: not critical — what matters is tight fabric so stuffing does not peek through. If you can see daylight between stitches, drop a hook size. Rough guide: 4 sc ≈ 2.5 cm (1 in).
- Skill level: confident beginner to intermediate. Know the magic ring, single crochet, increase and invisible decrease. Wings and fins are worked flat; everything else is explained round by round.
If this is your first amigurumi, the crochet cat is a simpler warm-up with the same spiral techniques and fewer pieces to sew.
Black-yarn sanity savers: count out loud on increase rounds, move your marker every round, and feel for stitch tops with your fingertip when you cannot see them.
Abbreviations — US terms
| Abbreviation | Meaning |
|---|---|
| MR | magic ring |
| sc | single crochet |
| inc | increase (2 sc in the same stitch) |
| dec | decrease (sc 2 together — invisible decrease recommended) |
| st(s) | stitch(es) |
| ch | chain |
| sl st | slip stitch |
| R | round |
| FO | fasten off |
A note on decreases: use the invisible decrease (front loops only of the next two stitches) everywhere this pattern says "dec" — it keeps the fabric smooth.
The pattern (US terms)
Work in continuous spirals unless marked flat. Mark the first stitch of each round. The stitch count at the end of every round is in parentheses — count, especially on the head and body.
Head — black
The head is deliberately wide. Five even rounds give it that broad, flat-faced look — do not shorten them; the width is the character.
- R1: MR, 6 sc (6)
- R2: inc in each st (12)
- R3: [sc, inc] × 6 (18)
- R4: [2 sc, inc] × 6 (24)
- R5: [3 sc, inc] × 6 (30)
- R6: [4 sc, inc] × 6 (36)
- R7: [5 sc, inc] × 6 (42)
- R8–R12: sc in each st around (42) — 5 rounds even
- R13: [5 sc, dec] × 6 (36)
- R14: [4 sc, dec] × 6 (30)
- Insert safety eyes between R10 and R11, 10 stitches apart, washers clicked firm. Start stuffing now.
- R15: [3 sc, dec] × 6 (24)
- R16: [2 sc, dec] × 6 (18)
- R17: [sc, dec] × 6 (12)
- R18: dec × 6 (6). FO, thread tail through front loops, pull tight, weave in.
Tip: stuff firmly at the cheeks, softer at the crown, so the eyes are not pushed outward.
Snout — black
A shallow, wide piece sewn low on the face. A flat pinch of fiberfill is all it needs.
- R1: MR, 6 sc (6)
- R2: inc in each st (12)
- R3: [sc, inc] × 6 (18)
- R4: [2 sc, inc] × 6 (24)
- R5–R6: sc in each st around (24) — 2 rounds even
- FO, leaving a long tail (about 40 cm / 16 in) for sewing.
Body — black
A simple egg: round base, five even rounds, then a taper to the neck. Smaller than the head on purpose — a big head on a compact body reads young.
- R1: MR, 6 sc (6)
- R2: inc in each st (12)
- R3: [sc, inc] × 6 (18)
- R4: [2 sc, inc] × 6 (24)
- R5: [3 sc, inc] × 6 (30)
- R6–R10: sc in each st around (30) — 5 rounds even
- R11: [3 sc, dec] × 6 (24)
- R12: [2 sc, dec] × 6 (18)
- Stuff firmly, pushing extra fiberfill toward the base so he sits flat.
- R13: [sc, dec] × 6 (12)
- R14: dec × 6 (6). FO, close and weave in as for the head.
Belly patch — light grey or sage, worked flat
A flat oval for the body front. It breaks up all that black and finishes the plush.
- Ch 7.
- Row 1: sc in 2nd ch from hook and next 4 ch, 3 sc in last ch, down the other side: sc in next 4, inc in last st (14)
- Row 2: inc, 4 sc, inc × 3, 4 sc, inc × 2 (20)
- Row 3: sc, inc, 4 sc, [sc, inc] × 3, 4 sc, [sc, inc] × 2 (26)
- Rows 4–8: sc in each st around (26) — work in rounds around the oval, 5 rounds even
- FO, leaving a long tail for sewing. Press flat before sewing; do not stuff.
Wings — charcoal, make 2, worked flat
Each wing is flat, with increases along one edge only — the other edge stays straight and is sewn to the back. Pin-label that straight edge; mirror-image confusion is the number one wing mistake.
- Ch 3.
- Row 1: sc in 2nd ch from hook, sc in last ch (2). Ch 1, turn.
- Row 2: inc, sc (3). Ch 1, turn.
- Row 3: sc, inc, sc (4). Ch 1, turn.
- Row 4: inc, 2 sc, inc (6). Ch 1, turn.
- Row 5: sc in each st across (6). Ch 1, turn.
- Row 6: inc, 4 sc, inc (8). Ch 1, turn.
- Row 7: sc in each st across (8). Ch 1, turn.
- Row 8: inc, 6 sc, inc (10). Ch 1, turn.
- Row 9: sc in each st across (10). Ch 6 for the wing point, sl st back along the chain and across the row edge to finish.
- FO, leaving a long tail for sewing. Flatten under a book for ten minutes if your wing curls.
Identical flat pieces work for both sides — flip one over, shaped edge outward. Check the pair matches before sewing.
Tail — black
A tapered tube widening slowly toward the body. Stuff lightly as you go with the end of your hook — a tail stuffed at the end will be lumpy.
- R1: MR, 4 sc (4)
- R2: sc in each st around (4)
- R3: [sc, inc] × 2 (6)
- R4–R5: sc in each st around (6) — 2 rounds even
- R6: [2 sc, inc] × 2 (8)
- R7–R9: sc in each st around (8) — 3 rounds even
- R10: [3 sc, inc] × 2 (10)
- R11–R13: sc in each st around (10) — 3 rounds even
- R14: [4 sc, inc] × 2 (12)
- R15: sc in each st around (12)
- FO, leaving a long tail for sewing. Stuff lightly, keeping the tip soft so it can curl.
Tail fins — charcoal, make 2, worked flat
Little flat fins for either side of the tail tip. Keep them small — wider than the tail, they look like paddles.
- Ch 5.
- Row 1: sc in 2nd ch from hook and in each ch across (4). Ch 1, turn.
- Row 2: inc, 2 sc, inc (6). Ch 1, turn.
- Row 3: sc in each st across (6). Ch 1, turn.
- Row 4: dec, 2 sc, dec (4)
- FO, leaving a long tail for sewing. Do not stuff.
Ears — black, make 2
Small flattened rounds. Folding the base when sewing gives that relaxed flop.
- R1: MR, 6 sc (6)
- R2: [sc, inc] × 3 (9)
- R3: [2 sc, inc] × 3 (12)
- R4–R5: sc in each st around (12) — 2 rounds even
- R6: [2 sc, dec] × 3 (9)
- FO, leaving a long tail. Do not stuff — flatten each ear gently.
Head nubs — black, make 2
Two tiny bumps between the ears. The quickest pieces in the pattern — without them the crown looks bare.
- R1: MR, 4 sc (4)
- R2: [sc, inc] × 2 (6)
- R3: sc in each st around (6)
- FO, leaving a long tail. Add the tiniest pinch of stuffing, or none at all.
Legs — black, make 4
All four legs are identical: short, wide and stubby. The back pair does the sitting.
- R1: MR, 6 sc (6)
- R2: inc in each st (12)
- R3–R5: sc in each st around (12) — 3 rounds even
- R6: [sc, dec] × 4 (8)
- FO, leaving a long tail. Stuff the back legs firmly and the front legs lightly.
Assembly — the order that actually matters
- Snout first. Pin the snout low on the head, centered between and below the eyes, its top edge around R12. Sew with whipstitches, tucking a flat pinch of fiberfill behind it as you close.
- Nostrils and mouth. With dark grey yarn, embroider two tiny dots on the snout, 4 stitches apart, and one short curved line below them.
- Eye highlights. Embroider one tiny white stitch at the upper edge of each eye — thirty seconds, and the difference between flat eyes and living eyes.
- Ears and nubs. Fold each ear base slightly; sew ears to the top sides of the head around R5–R6, angled outward. Sew the nubs between them on the crown, 3 stitches apart.
- Head to body. Center the head on the body, sew around the join, then go around again. Pack extra stuffing into the neck before closing — a big head needs a solid neck.
- Belly patch. Pin centered on the body front, top just below the neck join. Sew flat around the edge.
- Legs. Sew the firmly stuffed back legs to the base, pointing forward — he sits on these. Sew front legs to the sides around R8–R9, angled slightly forward. He should sit upright alone.
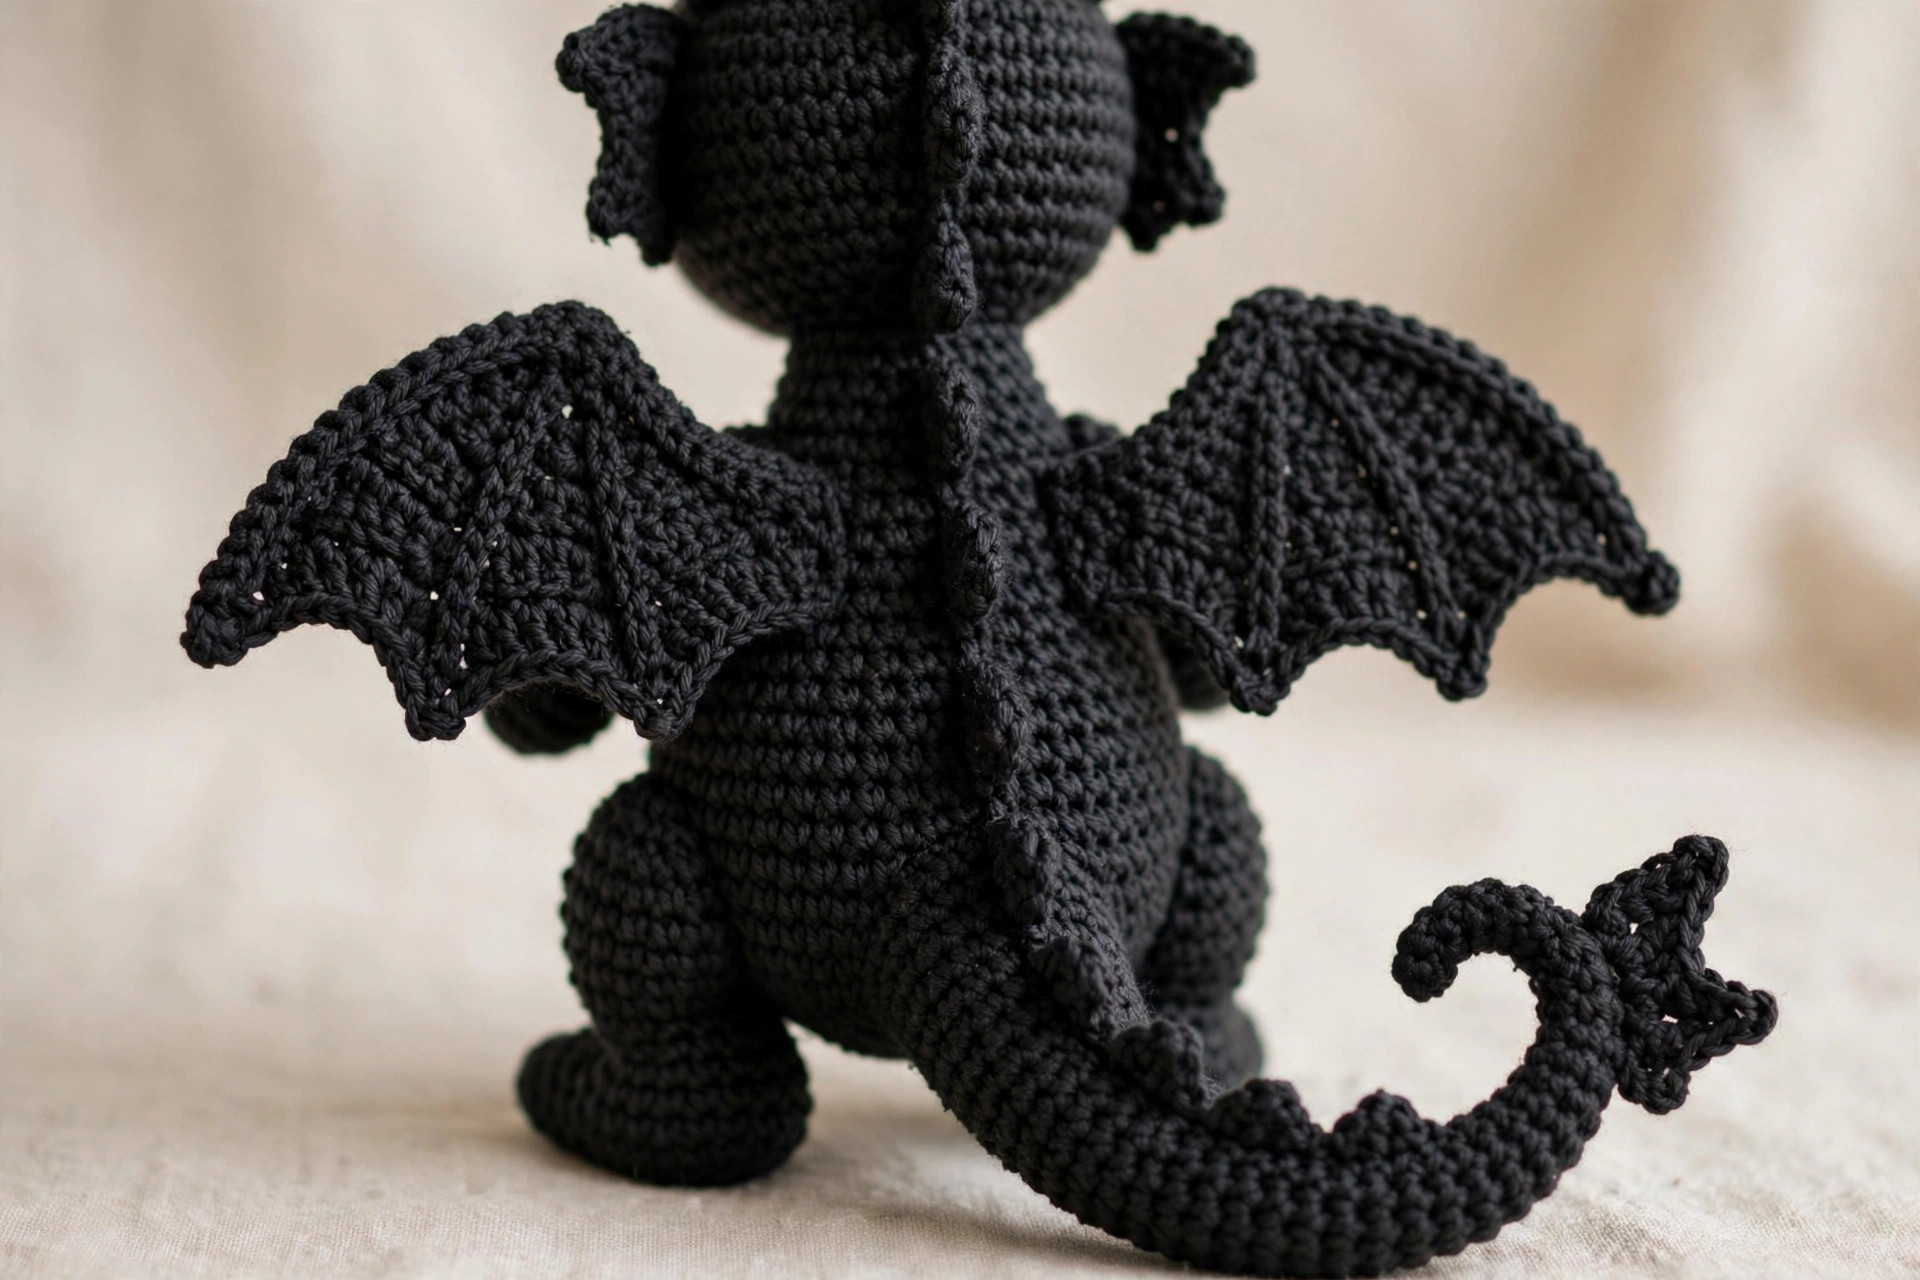
- Wings. Pin to the back, straight edges against the body, tops around R5. Sew along the straight base edge only, twice — leaving the rest free lets a wing lift.
- Tail and fins. Sew the wide tail end to the lower back, centered. Curl the tail to one side, holding the curl with two discreet stitches if you like. Sew one fin to each side of the tip, fanned slightly apart.
Finishing touches
Take fifteen minutes here. Finishing separates a character from a silhouette.
Check him in daylight. Black yarn hides sins indoors and reveals them at a window. Look for neck gaps, uneven wings, or a drifting fin.
Set the wing angle. Wing droops? Add two stitches at the top corner of its base. Sticks out too far? Add them at the bottom corner. The base is a hinge.
Pose the tail. Curled around his side he looks calm; flicked behind him, ready to pounce. Hold the pose with two discreet stitches.
Three sweet variations to try next
Same stitch math, three personalities:
- Night-sky dragon. Body black, belly patch in deep purple or midnight blue, with three tiny silver stars embroidered on it. Photographs beautifully against pale backgrounds.
- Moss dragon. Swap black for deep forest green, belly for cream, keep the green eyes — a gentle woodland dragon. Ears in a slightly lighter green give a soft, tonal look.
- Big snuggly dragon. Chunky chenille yarn, 5.5 mm hook, every stitch count as written. He grows to a squishy 30 cm or so — big enough to hug. Embroider the eyes for a small child.
Troubleshooting tips
- You cannot see your stitches. Work in daylight, put something white under your hands, count out loud, and feel for stitch tops. Work black pieces in the morning and the grey belly patch in the evening if that helps.
- You can see stuffing through the stitches. Tension too loose or hook too big. Switch to a 3.25 mm hook, or tighten up — on black fabric, gaps show as pale specks.
- The head wobbles. An under-stuffed neck under an oversized head. Unpick a few join stitches, pack in more fiberfill, and re-sew with two full passes.
- The wings sit at different heights. Measure, do not eyeball. Count rounds down from the neck join on both sides and pin both wings at the same round before sewing either.
- He tips backward. Push more stuffing toward the front base of the body, move the back legs a few millimeters forward, and check he is on a flat surface before unpicking anything.
- The tail fins look like paddles. Too big, or sewn in line with the tail. Fan them slightly apart at the tip, and do not add an extra even row — that row makes them paddle-sized.
- The snout looks crooked. Pin it from the front, eyes as your guide: centered between them and noticeably below. If already sewn crooked, unpick fully — a re-pinned snout takes five minutes and fixes the face.
Frequently asked questions
Is this crochet toothless pattern really free?
Yes — the complete pattern above is free, no signup, nothing held back. Sharing it or saving it on Pinterest is the kindest thank-you. It is an original Little Loop Finds design, not an official or licensed pattern.
What skill level is this pattern?
Confident beginner to intermediate. If you can magic ring and single crochet in the round, you have nearly every skill needed. The new things are a few flat pieces and a longer assembly — pin everything first.
How long does it take to make?
About 5–6 hours: 3.5–4 hours crocheting, an hour of assembly, and 15 minutes finishing. Two evenings and a lazy morning, comfortably.
Can I sell the finished dragons I make?
Yes! Sell finished dragons in small batches at craft fairs or on Etsy. Please credit Little Loop Finds with a link back to this page. The pattern text and photos may not be redistributed or sold.
Can I use a different yarn weight?
Absolutely. Use your label's hook size minus 0.5 mm so fabric stays tight, keep every stitch count, and he simply comes out bigger or smaller. Chunky chenille with a 5.5 mm hook makes the big snuggly version above.
Is this dragon safe for babies and toddlers?
With two changes, yes: embroider the eyes instead of safety eyes (green satin-stitch ovals with a black center keep the look), and sew wings, fins and ears on with two full passes. Safety eyes are small parts — use your judgment for under-threes.
Why does my dragon not look fierce at all?
Because he was never meant to. Wide head, low snout, wide-set eyes and short legs are deliberate, gentle choices. For a fiercer sibling, narrow the eye spacing to 8 stitches, skip the belly patch, and angle the wings higher.
More free patterns to try
If this dragon was fun, keep the hook moving. The teddy bear worked in one piece is the ideal next amigurumi if sewing was your least favorite part. The woodland nursery mobile turns small plushies like this one into nursery decor — imagine a flight of tiny dragons above a crib.
The box below contains an Etsy link. If you buy through it, we may earn a small commission at no extra cost to you. Learn more.
No time to make one?
Short on time? Find handmade crochet black dragons from independent makers on Etsy.
Browse on Etsy (opens Etsy in a new tab)