Crab crochet pattern free: cheery amigurumi crab
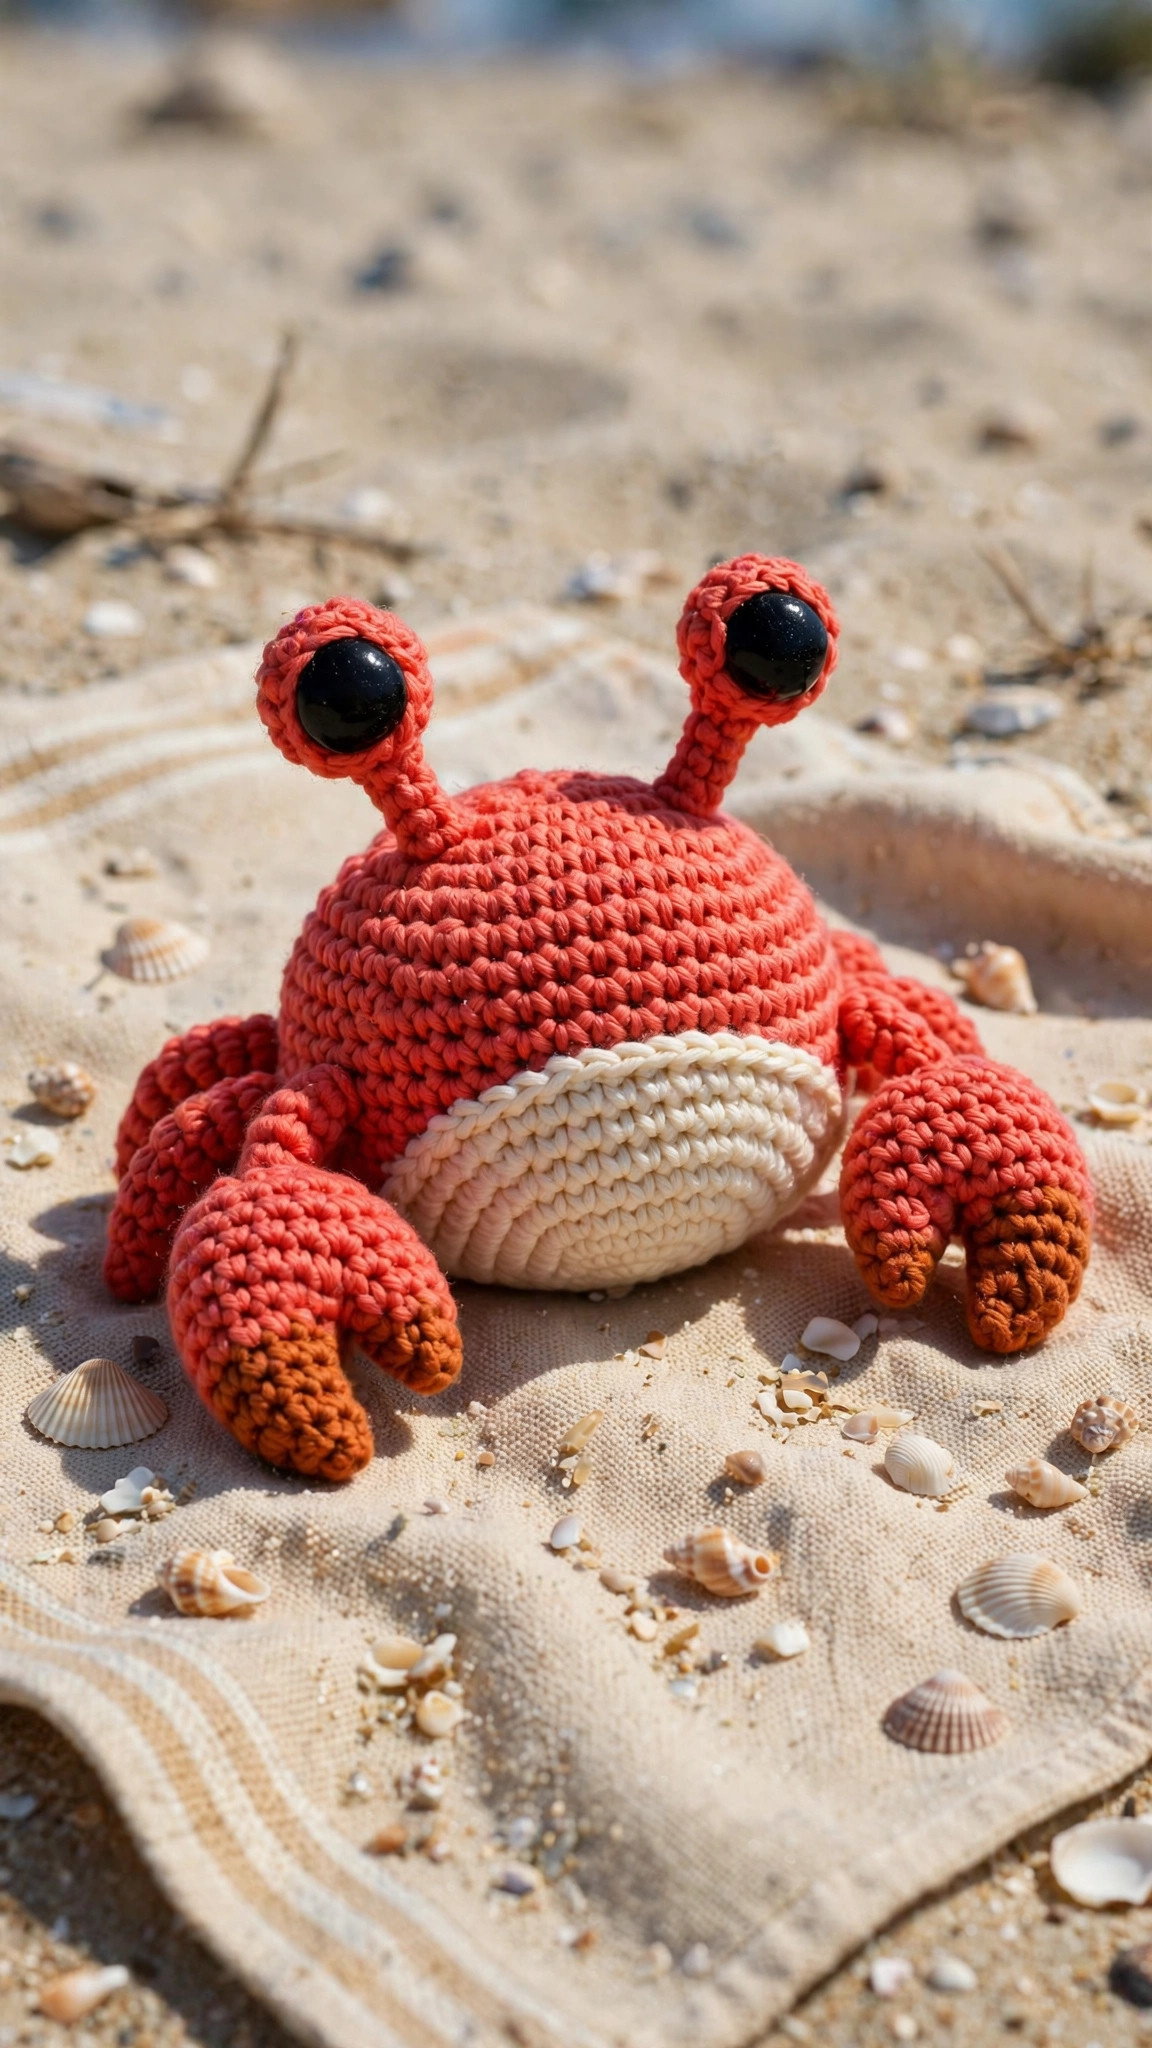
A cheery amigurumi crab with a cream belly, black eyes on stalks and two big waving claws, worked in simple single crochet rounds in a relaxing weekend project.

Amigurumi · Crochet
- Finished size
- 8 in wide with claws (medium)
- Making time
- About 4–5 hours
- Hook
- 3.5 mm, worsted-weight yarn
- Pieces
- Body, eyes, claws, legs
- Skill
- Beginner
In this post
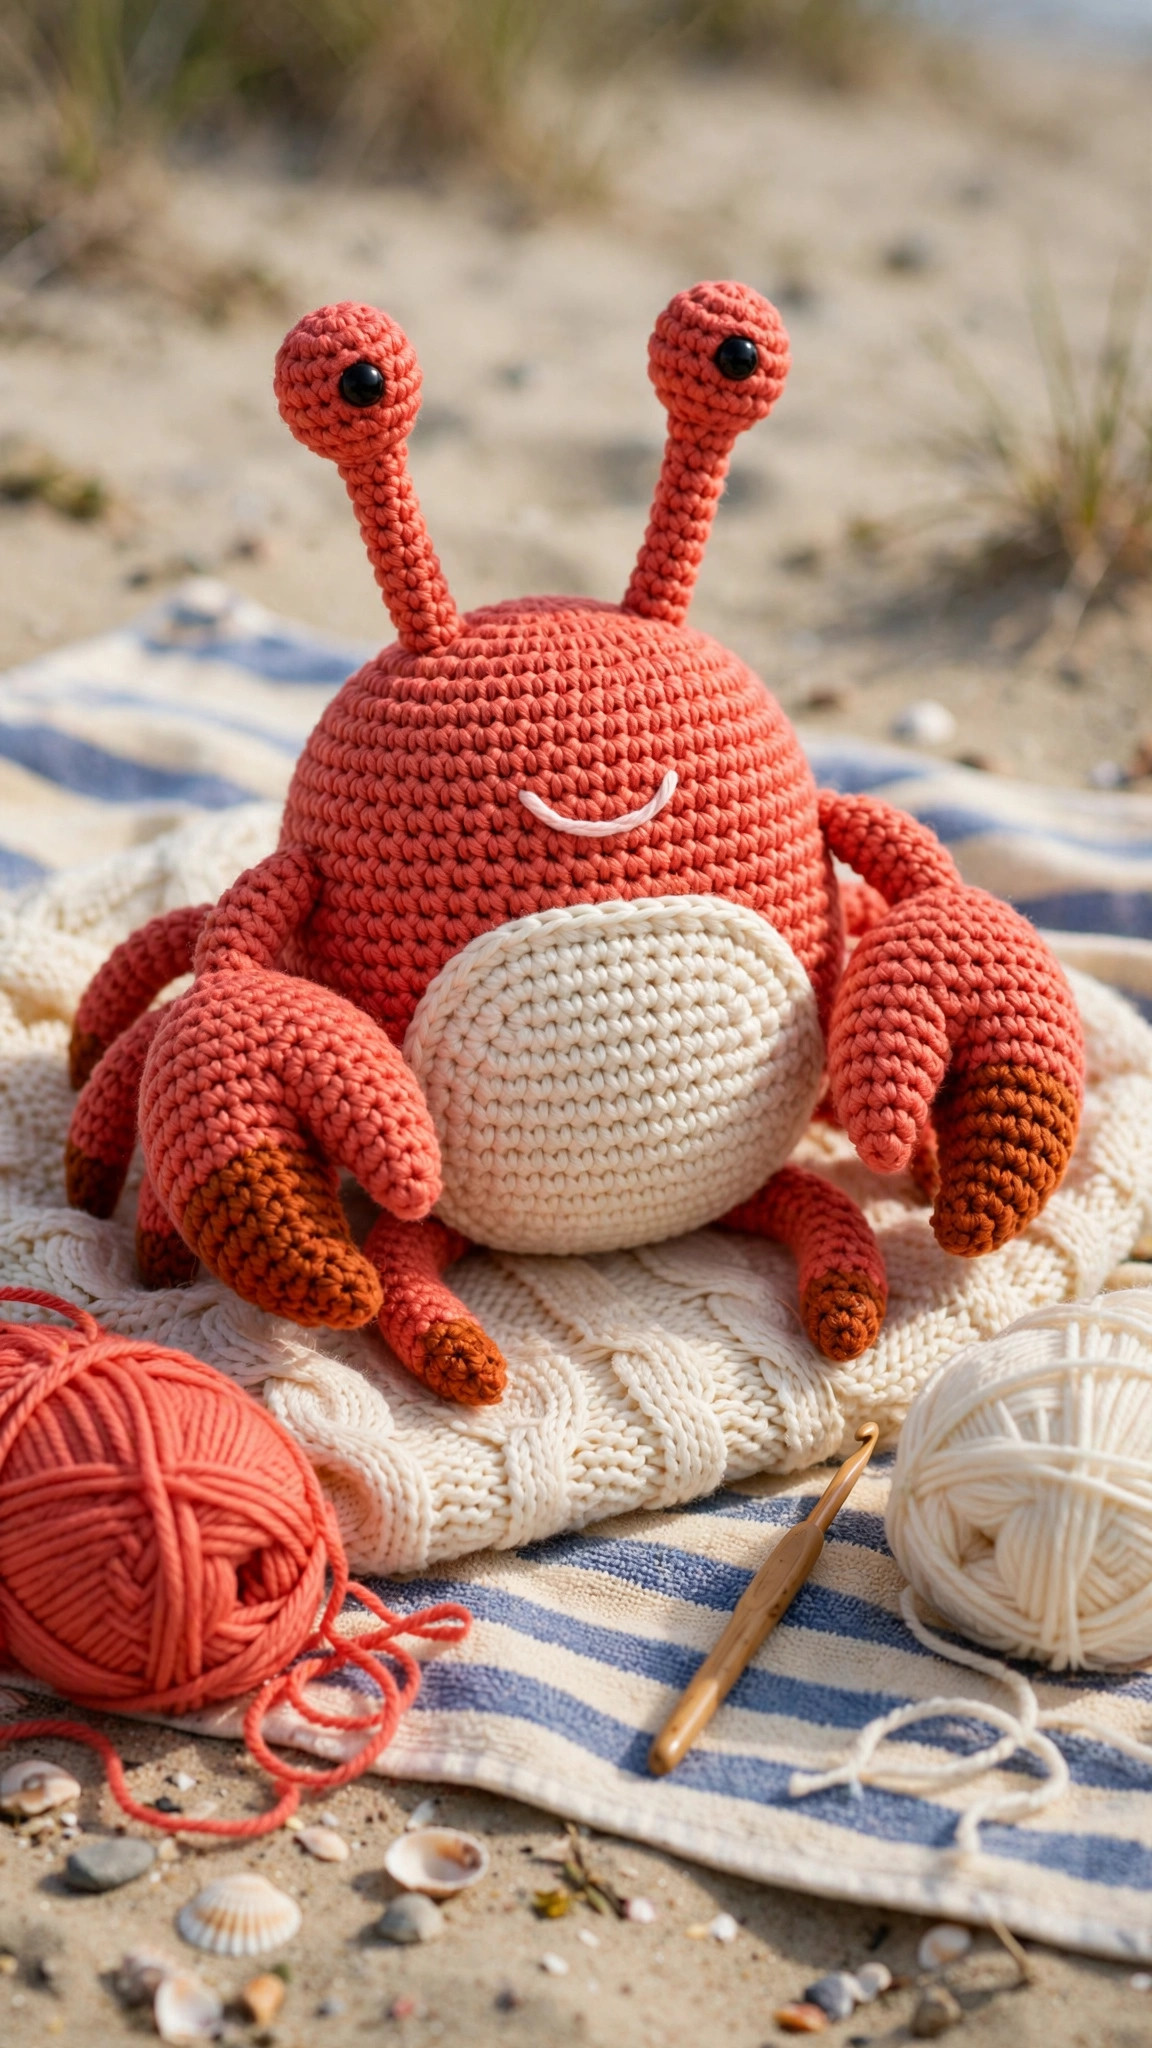
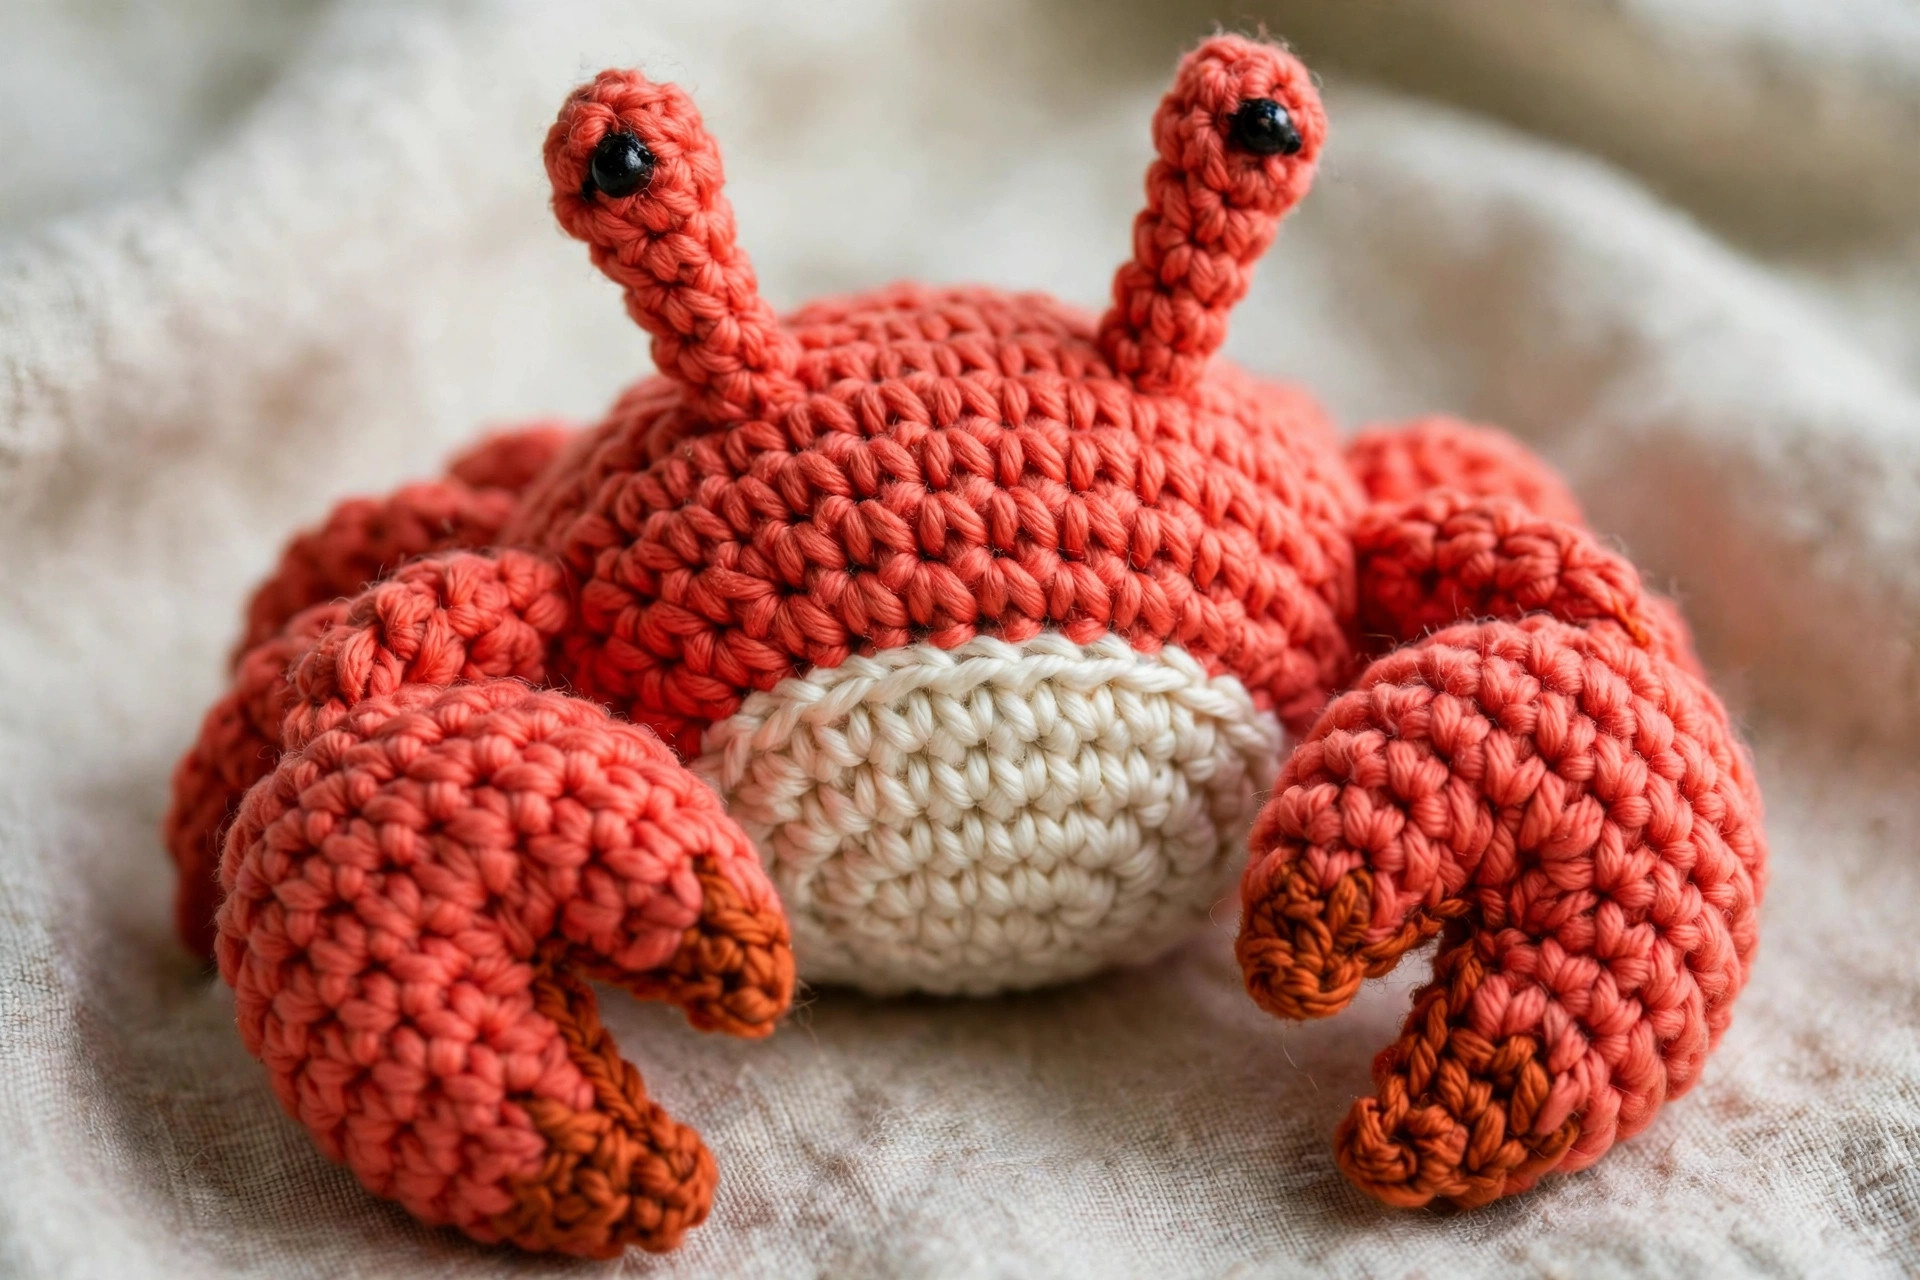
If you have been looking for a crab crochet pattern that is free, friendly, and actually looks like a crab, this cheery amigurumi crab is the one. He is worked in coral red yarn with a cream belly, big black eyes on stalks, and two chunky claws that wave hello. The whole crab is built from simple amigurumi shapes, mostly flattened spheres and short tubes, so if you can single crochet in the round and work a basic increase and decrease, you can make him. He sits flat on his legs, which makes him perfect for a beach-themed nursery shelf, a summer baby shower gift, or a bath-time buddy for a toddler who loves the seaside.
Why you'll love this crab crochet pattern
Most amigurumi crab patterns fall into one of two traps: they are either so flat that the crab looks like a coaster with eyes, or so round that the claws stick out at strange angles and the whole thing rolls off the shelf. This pattern dodges both. The body is a wide, flattened oval that sits stably, the eyes sit on short stalks that hold their shape, and the claws are chunky pincers that point forward like a real crab waving.
The colourwork is simple: the cream belly is a flat oval sewn on at the end, so there is no fiddly colour changing mid-round. The coral red body photographs beautifully against sand and shells, and the black bead eyes give the crab a cheerful expression.
He is also a stash buster: the body uses less than one full ball of coral yarn. If you love sea creatures, our crochet octopus plush is the natural next project, and the free crochet duck pattern is a quick one-evening make.
Materials you'll need
| Supply | What to get |
|---|---|
| Main color (A) | Worsted-weight (#4) yarn in coral red, about 150 yds / 137 m (1 ball) for medium |
| Cream (B) | Worsted-weight (#4) yarn in cream, about 40 yds / 37 m |
| Dark orange (C) | Worsted-weight (#4) yarn in dark orange, about 30 yds / 27 m |
| Black (D) | Worsted-weight (#4) yarn in black, about 10 yds / 9 m |
| Crochet hook | 3.5 mm (E-4) |
| Safety eyes | Two 10 mm black safety eyes with washers |
| Stuffing | Polyester fiberfill, about 3 oz / 85 g |
| Tapestry needle | For sewing pieces together and weaving in ends |
| Notions | Stitch markers, scissors, pins, black embroidery thread |
A smooth acrylic or acrylic-blend worsted is the best pick here: it holds the stuffing shape and survives the washing machine on a gentle cycle. Avoid fluffy or eyelash yarn for your first crab: it hides your stitches and makes counting rounds much harder.
Yarn amounts by size (approximate): Small — A: 100 yds, B: 30 yds, C: 20 yds, D: 8 yds. Medium — A: 150 yds, B: 40 yds, C: 30 yds, D: 10 yds. Large — A: 220 yds, B: 55 yds, C: 40 yds, D: 12 yds.
A note on safety eyes: safety eyes are not safe for babies under three, who can chew them loose. If this crab is for a baby, embroider the eyes instead with black yarn or a French knot.
Size, gauge and skill level
The crab is worked in continuous rounds unless a row is stated. Use a stitch marker in the first stitch of every round and move it up as you go.
| Size | Finished width (with claws) | Body width | Hook |
|---|---|---|---|
| Small | 6 in / 15 cm | 4 in / 10 cm | 3.0 mm |
| Medium | 8 in / 20 cm | 5.5 in / 14 cm | 3.5 mm |
| Large | 10 in / 25 cm | 7 in / 18 cm | 4.0 mm |
- Finished size (medium): about 8 in (20 cm) wide including the claws, 5.5 in (14 cm) wide at the body, and 3.5 in (9 cm) tall including the eye stalks. He sits flat on his legs and does not roll.
- Gauge: 18 sc and 20 rounds = 4 in (10 cm) with a 3.5 mm hook, worked in the round. Gauge matters less for amigurumi than for garments, but your stitches should be tight enough that the stuffing does not show through. If you can see white fiberfill peeking between stitches, drop down half a hook size.
- Skill level: advanced beginner. You should know how to chain, single crochet, increase, and decrease, and how to work a magic ring. The claws use a little shaping, all explained round by round.
If this is your first amigurumi, read the whole pattern once before you start. Counting is the whole secret: match the number in brackets at the end of each round.
Abbreviations — US terms
| Abbreviation | Meaning |
|---|---|
| ch | chain |
| sc | single crochet |
| hdc | half-double crochet |
| dc | double crochet |
| inc | increase: 2 sc in the same stitch |
| dec | invisible decrease: sc 2 stitches together through front loops only |
| sl st | slip stitch |
| st(s) | stitch(es) |
| MR | magic ring |
| RS | right side |
| FO | fasten off |
| [ ] | total stitch count at the end of the round |
A note on invisible decreases: work them through the front loops only of the next two stitches. They lie much flatter than a standard sc2tog and keep the crab's shaping smooth instead of puckered.
The pattern (US terms)
Work all pieces in continuous rounds unless a row is stated. Stuff pieces firmly as you go, a little at a time, so the stuffing stays even and the shapes stay smooth.
Body
The body is a wide, flattened oval: it is worked like a sphere but with fewer rounds, so it stays low and wide. With color A and your hook, start with a magic ring.
- Round 1: 6 sc in MR. [6]
- Round 2: inc in each st around. [12]
- Round 3: (sc, inc) 6 times. [18]
- Round 4: (2 sc, inc) 6 times. [24]
- Round 5: (3 sc, inc) 6 times. [30]
- Round 6: (4 sc, inc) 6 times. [36]
- Round 7: (5 sc, inc) 6 times. [42]
- Round 8: (6 sc, inc) 6 times. [48]
- Rounds 9–13: sc in each st around. [48]
- Round 14: (6 sc, dec) 6 times. [42]
- Round 15: (5 sc, dec) 6 times. [36]
- Round 16: (4 sc, dec) 6 times. [30]
Begin stuffing the body now, pushing the stuffing out toward the sides so the body stays wide and flat rather than round.
- Round 17: (3 sc, dec) 6 times. [24]
- Round 18: (2 sc, dec) 6 times. [18]
- Round 19: (sc, dec) 6 times. [12]
- Round 20: dec 6 times. [6]
Fasten off, leaving a long tail. Thread the tail through the front loops of the final 6 stitches, pull closed, and weave in the end. Set the body aside.
For the small size, stop the increases at Round 7 ([42]) and work Rounds 9–11 straight, then decrease in the same rhythm to close at Round 17. For the large size, add one more increase round, (7 sc, inc) 6 times [54], work two extra straight rounds, then decrease in the same rhythm to close at Round 23.
Belly patch
With color B, work a flat oval in rows. This is the cream patch on the underside of the body.
- Row 1: ch 11. Sc in 2nd ch from hook and in each ch across. [10]
- Row 2: ch 1, turn, inc, 8 sc, inc. [12]
- Row 3: ch 1, turn, inc, 10 sc, inc. [14]
- Rows 4–6: ch 1, turn, sc in each st across. [14]
- Row 7: ch 1, turn, dec, 10 sc, dec. [12]
- Row 8: ch 1, turn, dec, 8 sc, dec. [10]
Fasten off, leaving a long tail. Pin the patch to the front lower half of the body and sew it on. Do not stuff it: it lies flat.
Eye stalks and eyes — make 2
Each eye sits on a short stalk in color A, with a black safety eye at the top. Work the stalk first.
- Round 1: 5 sc in MR. [5]
- Rounds 2–5: sc in each st around. [5]
Fasten off, leaving a long tail. Insert a 10 mm safety eye through the top of the stalk, about 1 round down from the top edge, and click the washer on inside. Sew the stalks to the top of the body, about 6 stitches apart, tilted very slightly outward. If one leans, add a tiny pinch of stuffing at its base.
Claws — make 2
Each claw has a chunky pincer in coral red (A) with a dark orange (C) tip, plus a short arm that joins it to the body. Work the pincer first.
Pincer: with color A, start with a magic ring.
- Round 1: 6 sc in MR. [6]
- Round 2: (sc, inc) 3 times. [9]
- Round 3: (2 sc, inc) 3 times. [12]
- Rounds 4–6: sc in each st around. [12]
- Round 7: (2 sc, dec) 3 times. [9]
- Round 8: (sc, dec) 3 times. [6]
Fasten off, leaving a long tail. Stuff the pincer firmly: it should be a plump teardrop, wider at the base.
Pincer tip: with color C, work a small cone that caps the pincer and looks like the claw's darker tip.
- Round 1: 4 sc in MR. [4]
- Round 2: (sc, inc) 2 times. [6]
- Round 3: sc in each st around. [6]
Fasten off, leaving a tail. Sew the tip onto the narrow end of the pincer, then pinch it slightly flat so it looks like a claw.
Arm: with color A, work a short tube.
- Round 1: 5 sc in MR. [5]
- Rounds 2–5: sc in each st around. [5]
Fasten off, leaving a tail. Sew the arm to the side of the body, about halfway up, pointing forward. Sew the pincer to the end of the arm, angled so the claw tip points up and forward. The two claws should mirror each other.
Tip: if a claw droops, run a short length of craft wire or a pipe cleaner up the inside of the arm before sewing it on.
Legs — make 6
Crabs have six walking legs, three on each side, plus the two claw arms. With color A:
- Round 1: 4 sc in MR. [4]
- Rounds 2–5: sc in each st around. [4]
Fasten off, leaving a long tail. Do not stuff the legs: the yarn alone holds the shape. Sew three legs to each side of the body, spaced evenly along the lower half, angled downward so their tips touch the table.
Smile
Embroider the smile last, after the belly patch is sewn on. With black thread (D), work a gentle upward curve across the cream belly patch, about 4 stitches wide, centred under the eyes. Add two tiny vertical lines at the ends for a cheerful grin.
Finishing touches
Sew the pieces on in this order: belly patch first, then eye stalks, then claws, then legs, then the smile. Pin each piece before you sew it and look at the crab from arm's length.
Check the sit. Set the crab on a flat table: he should sit flat on his legs without rolling or tipping forward onto his claws. If he tips, the claws are sewn too low.
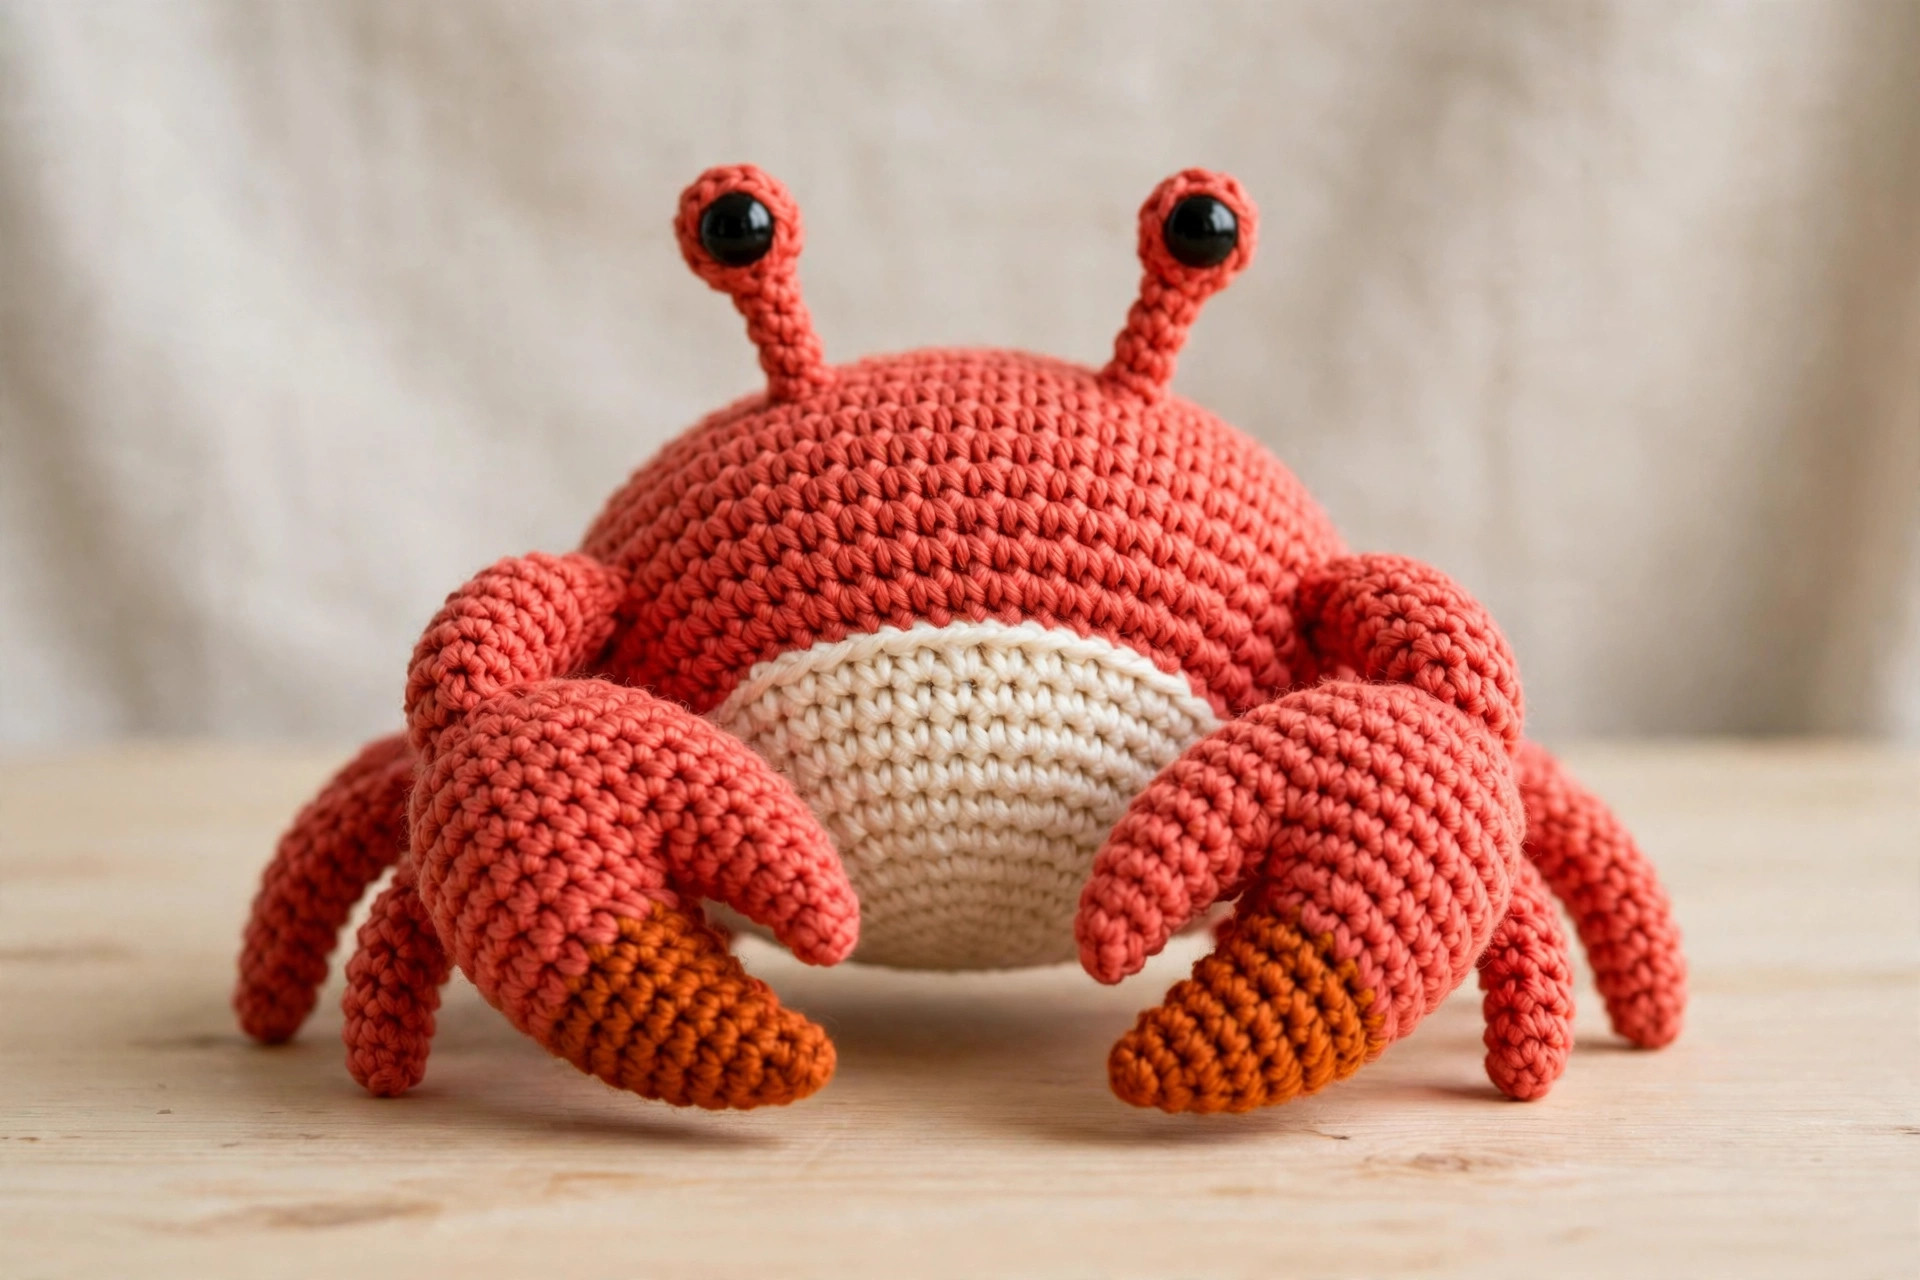
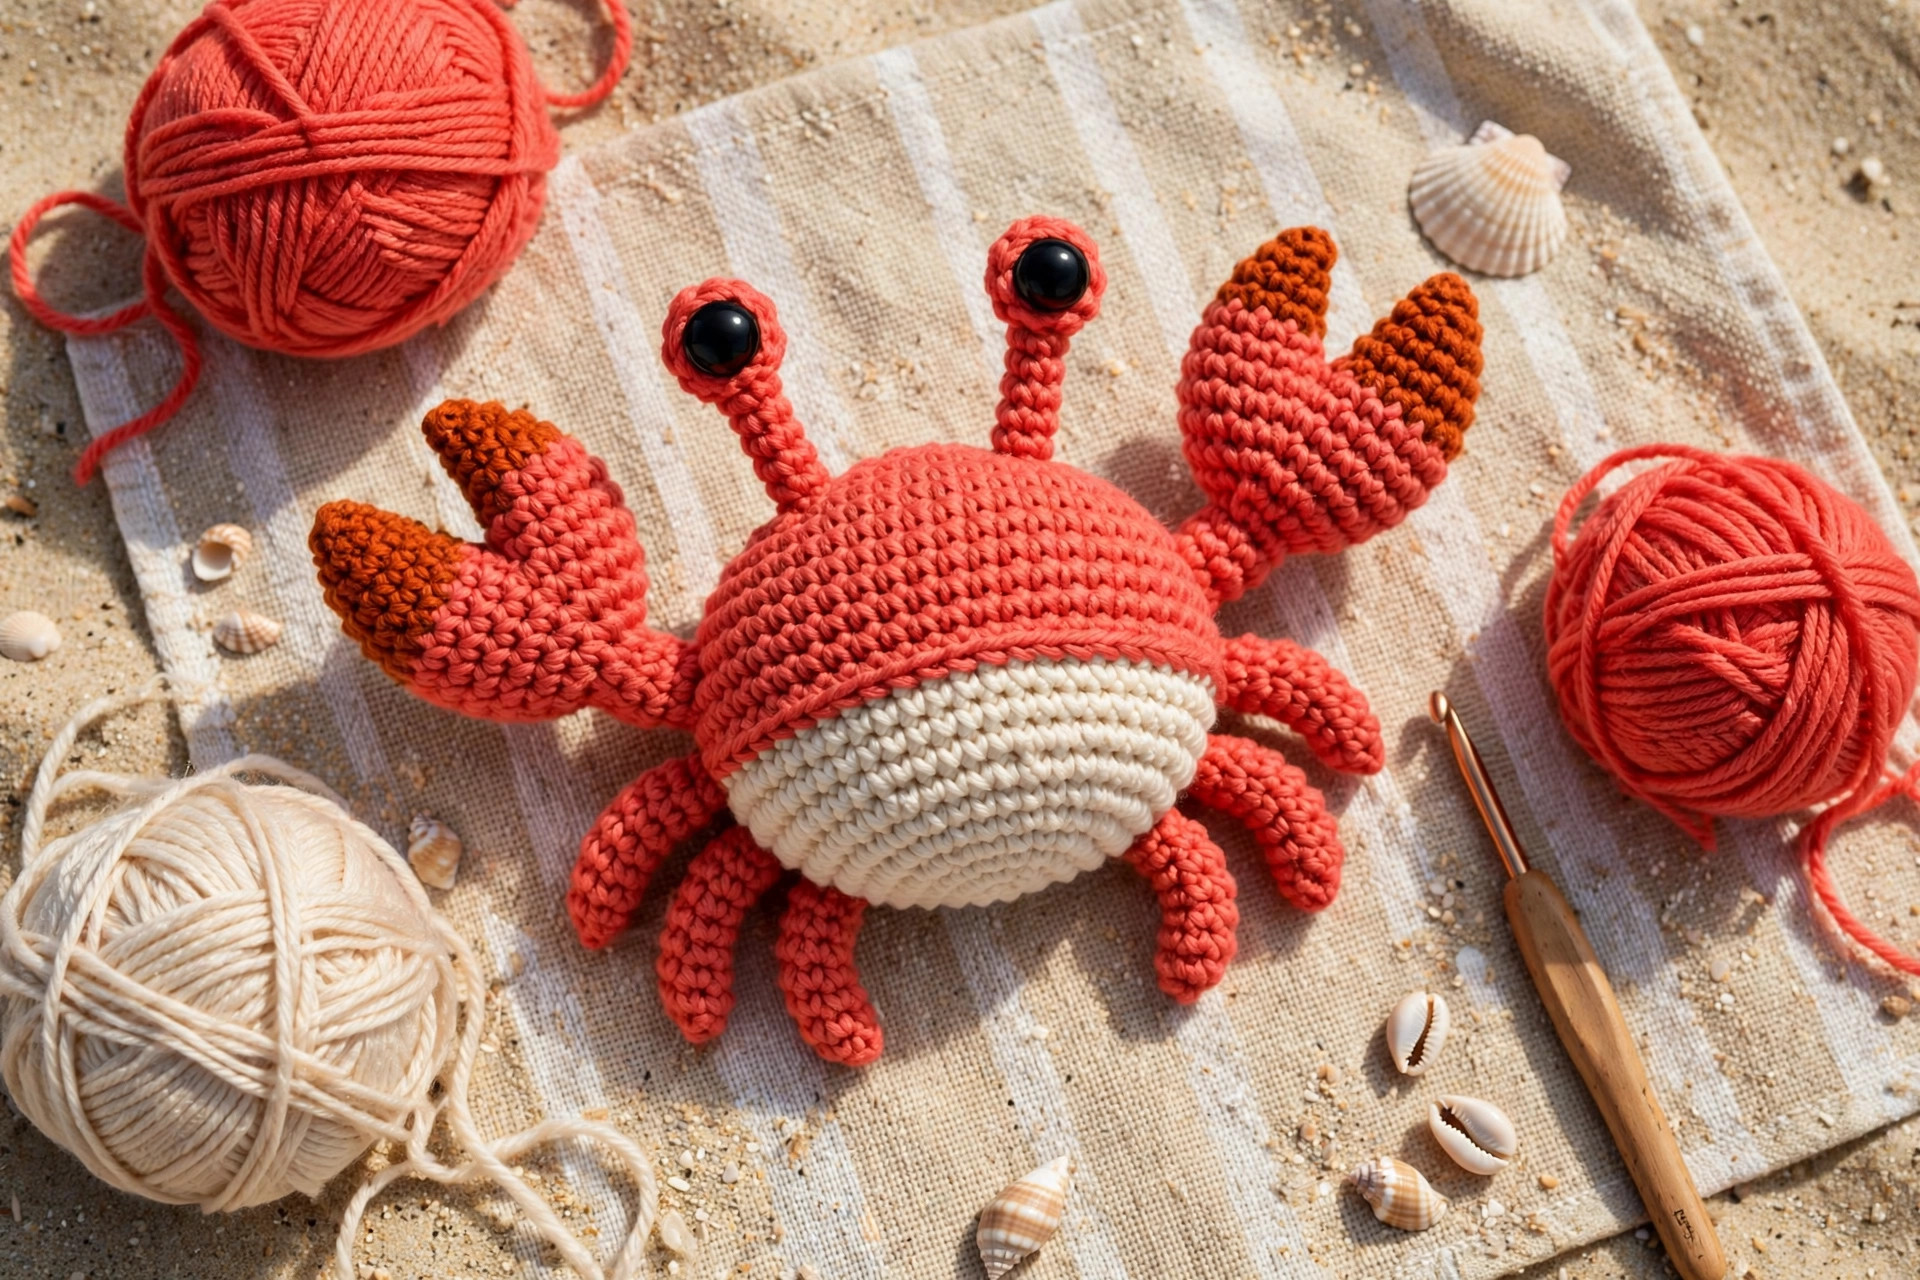
Steam the stalks. Hold a steam iron an inch above the eye stalks (never press it down) and gently straighten them while they are warm. Let them cool in position and they will stand up straight.
Weave in every end. Work each tail into the stuffing for at least 2 in, changing direction once so it cannot wriggle out.
Three cute variations to try next
Once you have made one crab, the same body shape makes a whole beach. Same construction, three personalities:
- Hermit crab. Make the body as written, then crochet a tiny striped shell: a small cone in cream and coral stripes sewn onto the back. He looks perfect next to our crochet octopus plush.
- Baby crab. Make the small size, use embroidered eyes, and sew the claws on very firmly. A baby crab with embroidered eyes is the safest version for a toddler's bath toy. Pair it with our free crochet duck pattern for a bath-time set.
- Tropical orange crab. Work the whole crab in sunny orange instead of coral red, with a yellow belly patch. If you love the tropical look, the flamingo crochet pattern in pink makes a perfect beach companion.
And if this crab gave you the amigurumi bug, the crochet hammerhead shark pattern is the next step up, or keep it gentle with the free crochet bunny pattern, a quick one-evening make.
Troubleshooting tips
- Your crab rolls off the shelf. Flatten the base with your palm and make the legs a round longer so their tips reach the table.
- The stuffing shows through the stitches. Your hook is too big for your yarn, or you are stuffing too hard. Drop down half a hook size.
- The eye stalks lean or flop. The stalk is too long or too loosely stuffed. Shorten the stalk by one round, or add a pipe cleaner inside the stalk before sewing it on.
- The claws point in different directions. You sewed them on without pinning first. Always pin both claws, step back, and check they mirror each other before you sew.
- The belly patch puckers. You pulled the whip stitches too tight. Sew with a relaxed tension and pin the patch flat first.
- The smile looks crooked. Mark the ends of the smile with pins before you embroider it, and count the stitches between them. A smile that is one stitch off centre is easy to spot at arm's length.
Frequently asked questions
Is this crab crochet pattern really free?
Yes, the complete pattern above is free, no email signup, no PDF purchase required.
What skill level is this crab pattern?
Advanced beginner. If you can single crochet in the round, work increases and decreases, and sew pieces together, you have every skill this pattern needs. The claws are the fiddliest part and they are explained round by round.
How long does it take to make?
About 4–5 hours for the medium size: roughly 2 hours for the body and belly, 1 hour for the eyes, claws, and legs, and 1 hour for assembly and the smile.
How much yarn do I need?
For the medium crab, about 150 yds of coral red, 40 yds of cream, 30 yds of dark orange, and 10 yds of black in worsted-weight yarn.
Is this crab safe for a baby?
Yes, with two changes: embroider the eyes instead of using safety eyes, and sew the claws and legs on very firmly with no loose ends.
Can I sell the finished crabs I make?
Yes! You may sell finished crabs made from this pattern in small batches. Please credit Little Loop Finds as the pattern designer with a link back to this page.
Can I make the crab bigger?
Yes. Use the large size and a 4.0 mm hook, or hold two strands of worsted together with a 5.5 mm hook for a giant crab about 13 in wide.
More free patterns to try
If this crab was fun, keep the hook moving. The crochet octopus plush is the crab's ocean cousin, the crochet hammerhead shark pattern is the next step up in sea creatures, the flamingo crochet pattern makes a perfect beach companion, and the free crochet duck pattern is a quick one-evening make.