Quilted Christmas poinsettia wreath sewing pattern
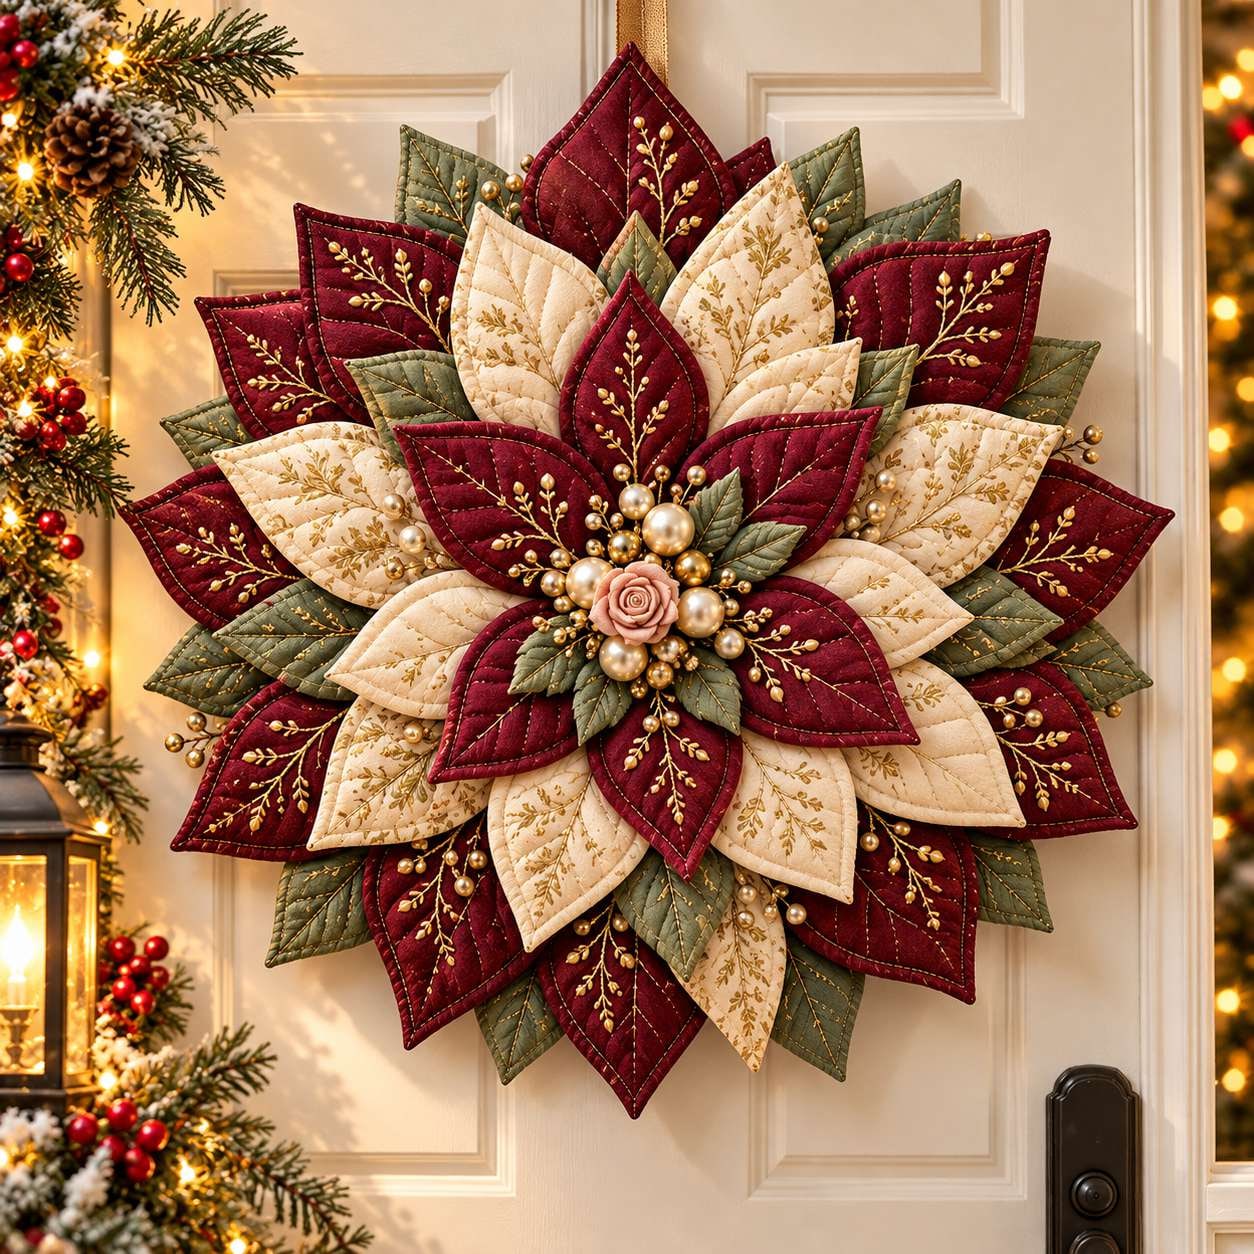
One large blooming poinsettia sewn petal by petal — quilted burgundy and champagne petals, quiet sage leaves and a blush rosette ringed with pearl and gold beads. Rich and handmade rather than bright and plastic.

Christmas · Sewing
- Finished size
- 46 cm / 18 in wide
- Making time
- About 4–6 hours
- Seam allowance
- 0.7 cm / ¼ in, included
- Pieces
- 30 petals + 8 sage leaves
- Skill
- Confident beginner
In this post
- Pattern at a Glance
- Why This Wreath Looks Premium
- Before You Begin
- Materials + Exact Quantities
- Pattern Pieces + Cut Quantities
- Print + Prepare the Templates
- Cut, Pair + Label Every Piece
- Sewing the Petals
- Assembling the Wreath
- The Luxury Centre + Finishing the Back
- Troubleshooting + Quick Fixes
- Final Quality Checklist
- Care, Display Ideas + Licence
- Frequently Asked Questions
If you love Christmas decor that feels rich and handmade rather than bright and plastic, this wreath is made for you. Instead of a standard red plastic or glitter-covered wreath, you build one large blooming poinsettia from fabric — petal by petal — so every point is softly padded, neatly topstitched and quilted with gentle vein lines. Up close it looks like careful quilting. From a distance it reads as one elegant, full flower.
The palette is what gives it a premium feel. Deep burgundy petals are mixed with warm champagne ivory, while muted sage leaves slip quietly between the layers. A small blush fabric rosette sits in the centre surrounded by pearl-like and antique-gold beads. There is no large novelty bow, no tinsel and no harsh glitter. The result is calm, luxurious and very giftable — perfect for a front door, a living-room wall, a seasonal market table or a thoughtful handmade Christmas gift.
This is a confident beginner sewing pattern. If you can cut accurately, sew a 0.7 cm (1/4 in) seam, turn a small shape, press carefully and topstitch 2–3 mm from an edge, you can make it. The making time is about 4–6 hours depending on how much quilting detail you add and how much hand finishing you prefer.
Make one complete wreath first before you think about batch production. Batting thickness and fabric weight change petal fullness and the final diameter more than you might expect. Finish your first wreath, hang it, then use it as your reference sample for cousins, colourways or market stock.
Pattern at a Glance
| Detail | Measurement |
|---|---|
| Finished size | Approx. 46 cm / 18 in wide |
| Construction | 4 radial layers of padded petals |
| Flower petals | 30 total — 12 outer, 10 middle, 8 inner |
| Sage leaves | 8, tucked between layers |
| Seam allowance | 0.7 cm / 1/4 in, included |
| Skill level | Confident beginner |
| Making time | Approx. 4–6 hours |
| Support base | 24 cm / 9.45 in covered circle |
| Centre | 4 cm blush rosette + 12–18 mixed beads |
| Best use | Front door, wall, seasonal display, gift |
Colour palette: Deep Burgundy · Champagne Ivory · Muted Sage · Antique Gold · Blush
Why This Wreath Looks Premium
Most poinsettia wreaths rely on bright red to do all the work. This design does the opposite. It uses shape, layering and quiet luxury details to create richness.
Four-layer radial construction. Twelve large outer petals form the outer silhouette. Ten shorter middle petals sit in the gaps and add fullness. Eight inner petals frame the centre. Eight sage leaves are tucked in last as restrained filler. Each tier is rotated slightly so the points of one layer sit between the points of the layer below. That offset is what makes the finished flower look full and natural rather than stacked or flat.
Quilted vein detail. Every petal gets one centre vein and two or three gentle curved side veins. The quilting is deliberately simple — no dense free-motion, no heavy stitching that flattens the padding. It suggests the shape of a real poinsettia petal without looking busy. If you want a subtle luxury touch, work the veins in a muted antique-gold thread while keeping the edge topstitching in matching thread.
Luxury centre. Instead of a large bow or plastic berries, the centre is a small blush rosette about 4 cm across, ringed with 12–18 pearl-like and antique-gold beads mixed from about 6 mm to 16 mm. The cluster stays compact so it polishes the flower without hiding the inner petals.
Clean, finished back. A firm covered support circle hides all the assembly stitching, and a reinforced fabric hanging loop is secured with a boxed-X stitch at true 12 o’clock. The wreath looks neat from behind, hangs straight on a standard door hook, and feels safe to gift or sell.
Visual goal to keep in mind. From across the room the wreath should read as one blooming poinsettia. Up close, neat topstitching, plump but not bulky petals, balanced quilting and a tidy centre provide the handmade detail that supports a premium presentation.
Before You Begin
Read the whole pattern through once before you cut. The petal sewing is repetitive and relaxing once you are organised, but the layers must go down in order and the bases must be positioned accurately to keep the wreath circular.
Start-here checklist:
- Print the template pages at 100% / Actual Size and check both calibration squares before cutting fabric.
- Press all fabrics first. Fuse interfacing to a scrap and test your iron setting.
- Make one complete petal first, quilt it and check the fullness. Adjust batting or seam trimming before you batch-sew all 38 units.
- Keep one layer at a time on the table. Label outer, middle, inner and sage stacks so they never mix.
- Decide your colour order before assembly. The suggested distribution keeps burgundy dominant with ivory lightening every layer, but a mostly-ivory wreath with burgundy accents also works beautifully.
- Use a press cloth when you press quilted petals. Heavy steam and long pressure will crush the loft you worked to create.
Key terms in this pattern:
| Term | Meaning |
|---|---|
| RST | Right sides together |
| SA | Seam allowance |
| Standard SA | 0.7 cm / 1/4 in, included in templates |
| Topstitch | 2–3 mm from the finished edge |
| Batting piece | One low-loft piece per petal unit |
Recommended working order: print and check → cut and pair → sew petal units → trim and turn → topstitch and quilt → build support circle → outer layer → middle and inner layers → sage leaves → centre → back and loop → hang test.
Materials + Exact Quantities
Choose quilting cotton, linen-look cotton or a similar stable woven fabric. Avoid very stretchy, slippery or heavily textured fabrics for your first wreath — the points will turn more cleanly and the layers will sit flatter in a stable weave. Low-loft fusible batting gives dimension without making the wreath too thick for a door that needs to close over a hook.
| Material | Suggested quantity |
|---|---|
| Burgundy fabric | 0.75 m / 0.8 yd |
| Champagne ivory fabric | 0.60 m / 0.65 yd |
| Muted sage fabric | 0.40 m / 0.45 yd |
| Low-loft fusible batting | 1.0 m / 1.1 yd, 90 cm wide |
| Firm woven interfacing | 0.35 m / 0.4 yd |
| Backing fabric | 35 x 35 cm / 14 x 14 in |
| Hanging-loop fabric | 5 x 24 cm / 2 x 9.5 in |
| Pearl + gold beads | 12–18 mixed, 6–16 mm |
| Blush rosette | 1, approx. 4 cm / 1.6 in |
| Matching thread | Burgundy, ivory, sage + optional gold |
| Hand needle + strong thread | For layering and assembly |
You will also need your usual sewing tools: fabric scissors or a rotary cutter, pins or clips, a blunt turning tool (a wooden point turner is ideal), an erasable fabric marker, a ruler or tape measure, and a sewing machine that lets you shorten stitch length for tight points. A hand-sewing needle with a larger eye helps when stitching beads through the centre cover and support base.
Fabric-saving note: These quantities include a comfortable allowance for cutting 38 padded units (30 flower petals plus 8 sage leaves). If you cut the largest outer petals first and nest middle and inner petals into the remaining spaces, sage leaves and the small centre cover circle can usually come from scraps.
Pattern Pieces + Cut Quantities
The wreath is built from repeated identical templates. Every finished petal uses two matching fabric pieces with one low-loft batting piece sandwiched against the front. That keeps each petal dimensional but light enough for a standard door hook. Tracing each master piece onto reusable template plastic or card is worth the few minutes it takes if you plan to make more than one wreath.
| Piece | Finished / template size | Cut |
|---|---|---|
| Outer petal | 18 x 8.5 cm / 7.1 x 3.35 in | 24 fabric + 12 batting |
| Middle petal | 15 x 7.2 cm / 5.9 x 2.8 in | 20 fabric + 10 batting |
| Inner petal | 12 x 6 cm / 4.7 x 2.35 in | 16 fabric + 8 batting |
| Sage leaf | 14 x 6.5 cm / 5.5 x 2.55 in | 16 fabric + 8 batting |
| Support circle | 24 cm / 9.45 in diameter | 2 fabric + 1 firm interfacing |
| Centre cover circle | 10 cm / 3.95 in diameter | 1 fabric + 1 interfacing |
| Hanging strip | 5 x 24 cm / 2 x 9.5 in | 1 fabric |
| Seam allowance | 0.7 cm / 1/4 in | Included in templates |
Suggested colour distribution
This distribution keeps the flower reading as a deep, rich poinsettia with ivory acting as light rather than competition:
- Outer petals (12): 8 burgundy + 4 champagne ivory
- Middle petals (10): 6 burgundy + 4 champagne ivory
- Inner petals (8): 5 burgundy + 3 champagne ivory
- Leaves (8): all muted sage
- Centre: blush rosette + mixed pearl and antique-gold beads
You can shift the balance for a different mood — all-ivory petals with a burgundy centre layer for a winter-white look, or sage moved into the inner layer for a softer botanical feel — but keep one colour clearly dominant. Even colour splits tend to look spotty once the layers are offset.
Print + Prepare the Templates
Template accuracy matters because 12 outer petals must meet evenly around a circle. A template that prints even 5% small will change both petal size and final diameter.
Printer settings:
- Print template pages at 100% / Actual Size. Turn off Fit to Page, Shrink, Scale to Fit and any borderless enlargement.
- Measure both calibration squares on the printed page: one should be exactly 5 x 5 cm and the other 2 x 2 in. If either is off, adjust printer scaling and reprint before cutting fabric.
- The printable petal outlines already include the 0.7 cm / 1/4 in seam allowance. Cut on the outer printed line.
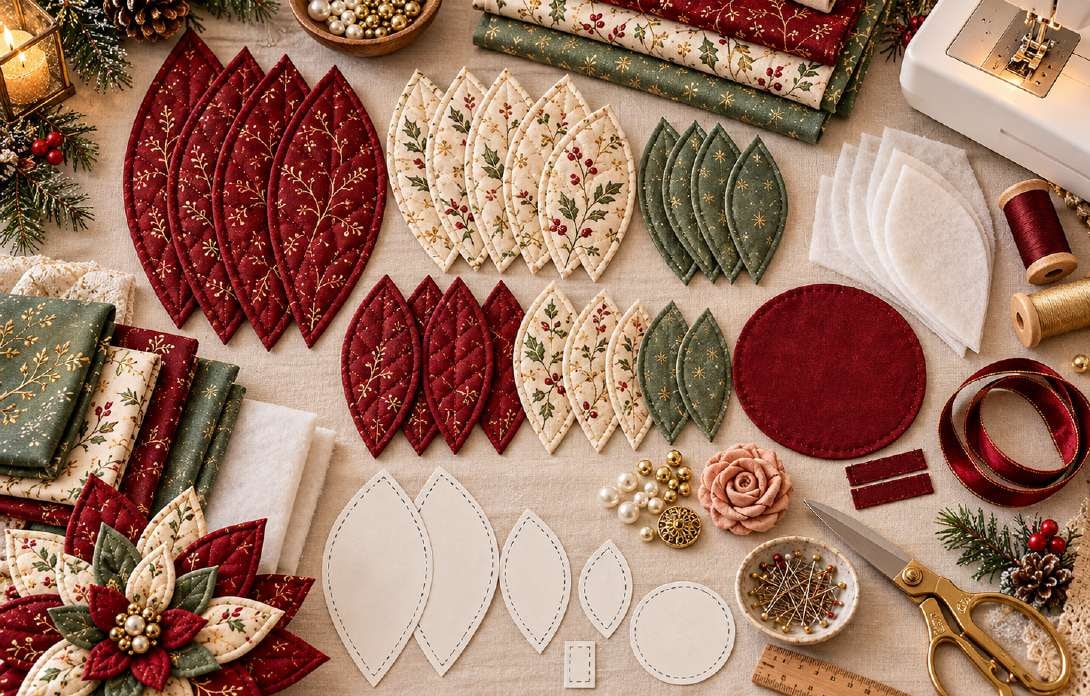
For directional prints, keep the point of every petal oriented toward the top of the fabric print before cutting. It reads as a small detail on a single petal, but on a 46 cm wreath the points draw the eye and even print direction makes them look intentional.
Trace for reuse
If you plan to make multiples — for family gifts, a craft-fair table or a small Etsy run — trace each master piece onto template plastic or thin card after your test print checks out. Mark the template name, the cut quantities and the grain direction on each piece. It slows the first cutting session by a few minutes and speeds up every one after.
Cut, Pair + Label Every Piece
Cutting is the most organisational part of this project. Thirty-eight padded units plus circles can become confusing very quickly if they land in one mixed pile.
Recommended order:
- Cut all fabric pieces first and keep each size in a labelled stack: Outer / Middle / Inner / Sage.
- Cut batting. If your batting is bulky, cut it slightly inside the cutting line; if it is a true low-loft, cut full template size.
- Pair matching front and back petal pieces immediately so prints and colours stay coordinated. Pin each pair with its batting piece so a unit is ready to sew.
- Mark the top point and centre base of each petal lightly on the wrong side. A tiny dot at the base helps you align bases on the support circle later.
- Keep the burgundy and ivory counts per layer as planned. Count again before sewing — sewing 14 outer petals because two extra were cut is only helpful if you have planned where they will go.
Set the support circle pieces, centre cover and hanging strip aside in a separate small stack. They are sewn at different stages and are easy to lose under petal piles.
Sewing the Petals
This is the heart of the project. You will repeat the same three stages — sew, turn, quilt — for all 30 flower petals and 8 sage leaves. Work layer by layer in batches. The repetition is genuinely calming once the first petal checks out, and watching labelled stacks grow is very satisfying.
Step 1 — Sew Each Petal Unit
For one petal, place the two fabric pieces right sides together. Lay one batting piece against the wrong side of the petal that will become the front. Pin through all layers so nothing shifts as you approach the point.
Stitch around the curved sides and pointed tip with a 0.7 cm (1/4 in) seam allowance. Leave a 4–5 cm (1.6–2 in) opening at the curved base — this is your turning opening and it will be hidden under the next layer once the wreath is assembled. Backstitch at the start and end of the opening so it does not pull open when you turn.
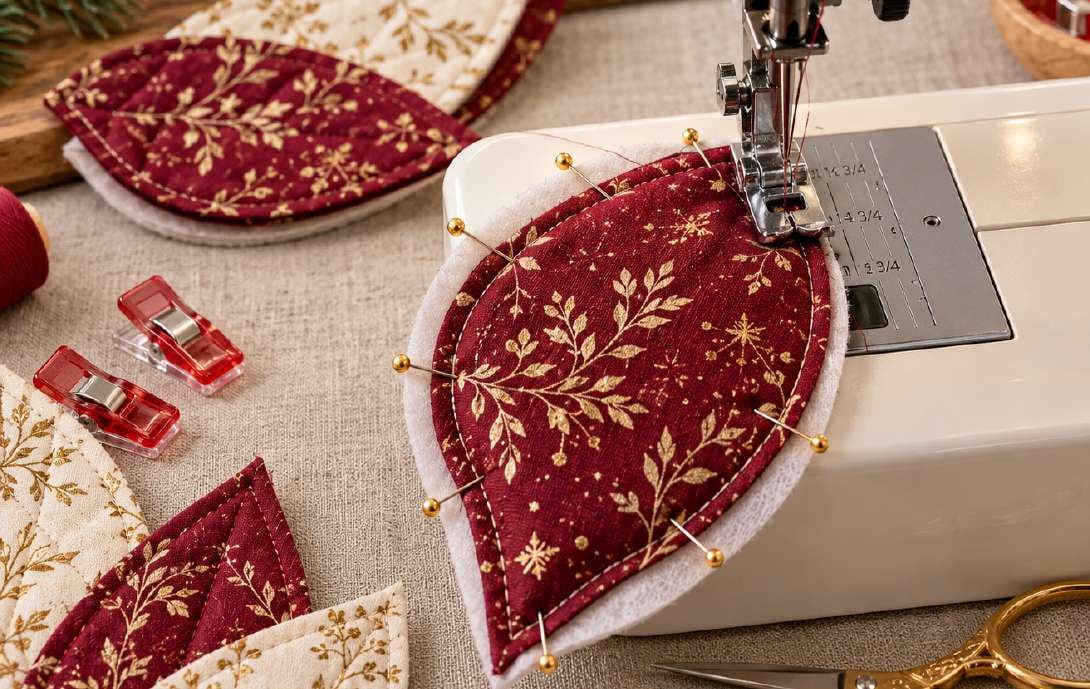
Maker tip: Shorten your stitch length slightly as you approach the point. Take one or two tiny stitches across the very tip rather than pivoting on a single needle hole. A tip sewn with a tiny flat across the point turns to a cleaner, less bulky point than a sharp needle pivot.
Check before you move on: The base opening is still unstitched and all three layers are caught evenly in the seam with no batting peeking out at the edges.
Repeat for all padded units: 12 outer, 10 middle and 8 inner flower petals (30 total), plus 8 sage leaves — 38 units in all. Working one size at a time reduces mix-ups.
Step 2 — Trim, Turn + Shape the Points
Trim the seam allowance at the pointed tip to reduce bulk. Clip small notches along the tightest curves only if the fabric needs help sitting smoothly — most quilting cottons turn without aggressive clipping.
Turn the petal right side out through the base opening. Use a blunt wooden turning tool to push the point out gently from inside. Never force the point with scissors or a sharp metal tool. A slightly rounded, intact point always looks better than a pierced one with batting poking through.
Press each petal flat with the batting centred. Check that the batting has not folded into a lump at the tip or along one edge — ease it flat with your fingers before pressing if it has.
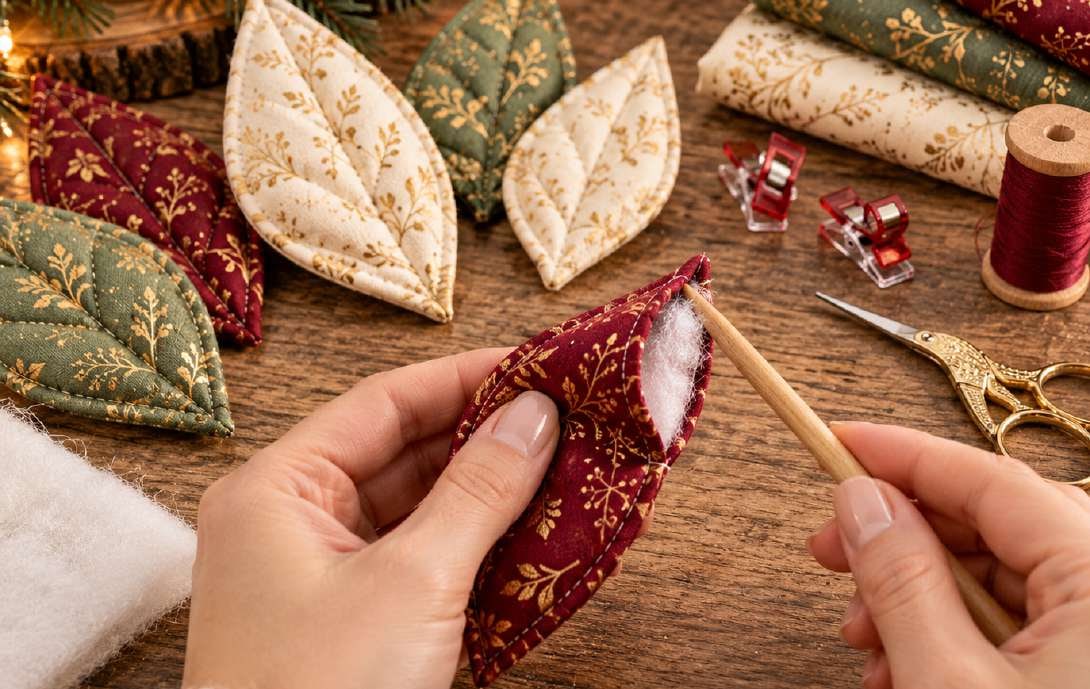
Base opening: Turn the raw edges of the base opening inward by about 0.7 cm (1/4 in) and press. You do not need to close it by hand — topstitching in the next step will close it, and the base will be hidden under the layer above.
Check: The point is crisp, the edges are smooth and the petal lies flat without twisting.
Step 3 — Topstitch + Quilt the Veins
Topstitch 2–3 mm from the finished edge around the entire petal, closing the pressed base opening as you sew. Keep the petal flat under the foot and guide it gently — padded curves like to creep.
Now quilt the veins. Work one centre vein from base toward the tip, stopping about 1.5 cm (5/8 in) before the point. Add 2–3 gentle curved side veins on each side, spacing them so the left and right sides feel visually balanced. The veins do not need rulers or marked perfection — they are meant to suggest a petal surface, not to draw a diagram.
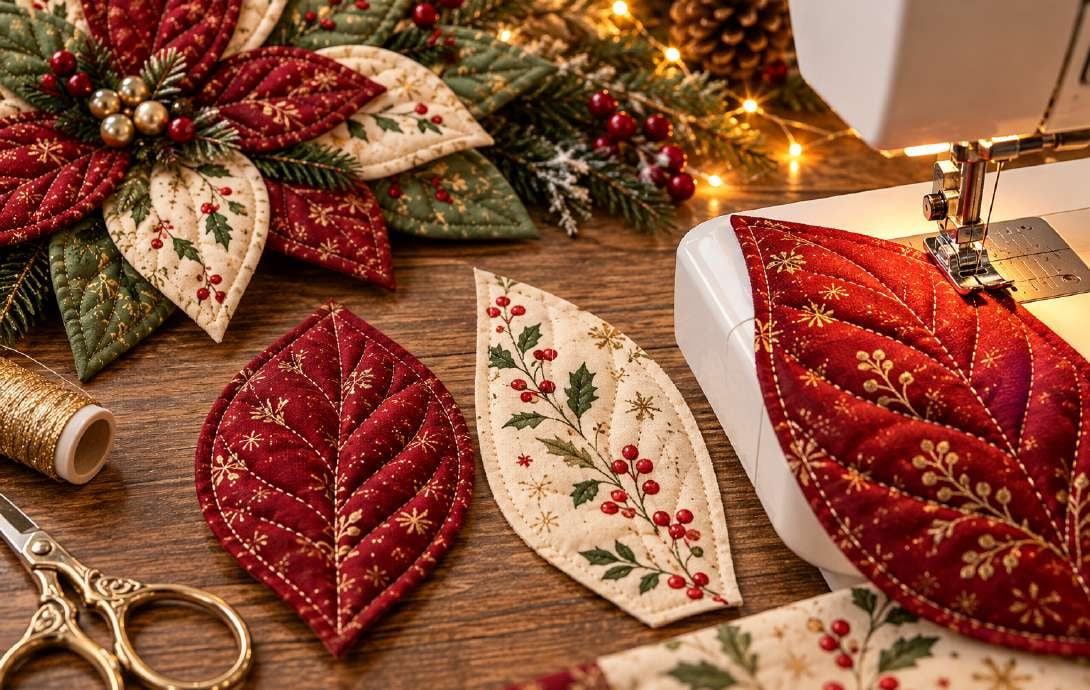
Luxury option: Use a subtle antique-gold thread for the vein lines only. Keep the edge topstitching in matching burgundy, ivory or sage thread so the overall look stays refined rather than sparkly.
Check: The quilting enhances the petal without flattening it. If a petal looks crushed, reduce quilting density on the next one or shorten your pressing time.
Press: Press finished petals from the back using a press cloth. Avoid heavy steam or prolonged pressure — you want to set the edges, not crush the loft.
Quilt all petals and leaves the same way. Stack each finished layer separately and do a final count before assembly: 12 outer, 10 middle, 8 inner, 8 sage. Any extra petals are useful spares if a point did not turn well.
Assembling the Wreath
Assembly happens entirely on the support circle. Once the centre cover goes on, bases are very difficult to reposition, so the golden rule of this half of the project is: pin and look before you stitch. Step back from the table often. A wreath is judged from two metres away, not from sewing distance.
Step 4 — Build the Hidden Support Base
The support circle is the wreath’s skeleton. A firm, accurately marked base keeps the finished piece circular and prevents layered petals from drifting to one side during assembly.
- Fuse the firm interfacing to the wrong side of one 24 cm support-circle piece.
- Place the two circle pieces right sides together and sew around the edge, leaving a 7 cm opening.
- Turn right side out, push the curve out smoothly, and press.
- Topstitch the circle closed 3 mm from the edge, closing the opening as you go.
- Mark the centre. Divide the edge into 12 equal positions like a clock face — 12, 1, 2, 3 and so on around the circle. These marks guide the outer layer.
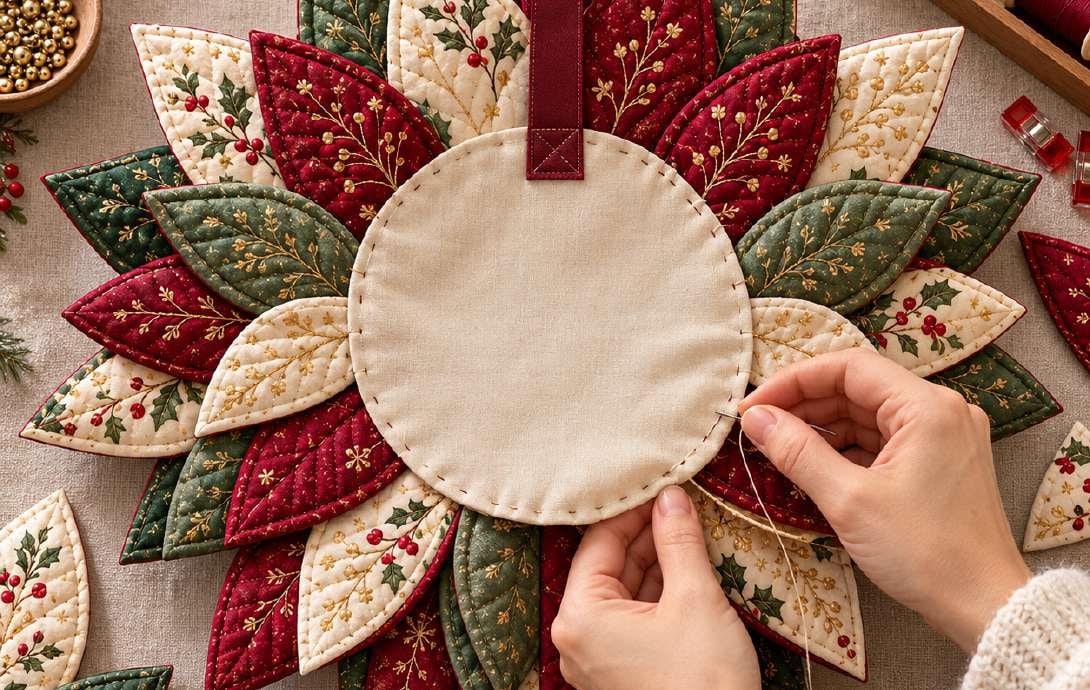
Work on a flat table for assembly. Mark 12 o’clock clearly — the hanging loop is centred there at the end, and everything aligns more easily if 12 o’clock never moves.
Step 5 — Arrange the Outer Petal Layer
Dry-fit first, always. Errors in the outer layer cannot be hidden by inner layers.
- Place one outer petal at each of the 12 clock marks.
- Position each petal base about 3.5 cm (1.4 in) inside the support-circle edge.
- Alternate burgundy and champagne ivory according to your planned colour sequence — with the suggested distribution, ivory petals land roughly every third position.
- Pin every petal before sewing any of them.
Step back and look at the whole wreath on the table. Adjust spacing until the points form a clean, even circle with no large gaps and no crowded overlaps. Check that all 12 points reach approximately the same outer radius. Small shifts of 2–3 mm at the base make a large difference at the tip.
Secure: Stitch each petal base to the support circle with a short line of machine stitching or several strong hand stitches. Keep stitches in the base area that will be hidden beneath the middle layer.
Check: The silhouette reads as a circle, colour alternation looks even and the spine of each petal points toward the centre mark.
Step 6 — Add the Middle + Inner Layers
The rotation between layers is what creates fullness. If the points of one layer sit directly behind the points of the layer below, the wreath reads flat and spiky. If they sit in the gaps, it reads as a blooming flower.
Middle layer (10 petals): Place one middle petal over each gap between outer petals. Move each base inward about 2–2.5 cm (3/4–1 in) from the outer-layer bases. Pin the full ring, step back and check the circle, then secure each base the same way as the outer layer.
Inner layer (8 petals): Place eight inner petals closer to the centre, again offsetting the points so they sit between the middle-layer points. The inner layer should overlap the middle-layer bases and visually frame the centre cluster rather than cover the wreath completely. Leave a central area roughly 10–11 cm across for the centre cover and embellishment.
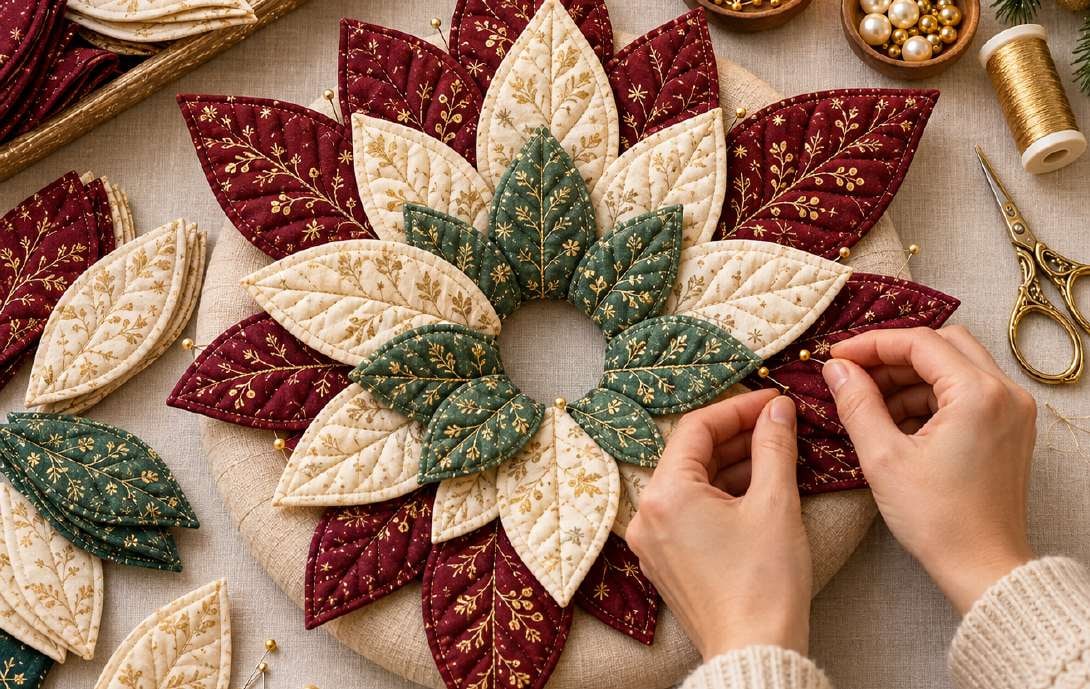
Symmetry check before permanent stitching: Measure from the centre to four opposite petal tips — 12 and 6 o’clock, then 3 and 9 o’clock. The distances should be close. It is much easier to slide a pinned layer now than to unpick a secured one later.
Step 7 — Tuck in the Sage Leaves
Use the 8 sage leaves as restrained filler, not as a second wreath.
Slide each leaf base beneath the middle or inner petals so only about two-thirds of the leaf remains visible. Space them around the wreath instead of clustering them in one area — the eye should notice green as a quiet support for the burgundy and ivory, not as a competing ring. Secure each leaf with a few hand stitches through its hidden base.
Keep it elegant: If the centre starts to look busy, remove two leaves rather than adding more. Beginners almost always add too many leaves on the first sample. Burgundy and ivory must remain the dominant colours at a two-metre viewing distance.
Optional accent: Tiny berry sprigs may be inserted at three or four points only. Choose small-scale elements, cover all wire ends completely and keep them away from the very edge if the wreath will hang on a door that swings.
Check: Sage is visible, balanced and calm. The flower still reads burgundy-and-ivory first.
The Luxury Centre + Finishing the Back
Step 8 — Build the Pearl + Gold Centre
The centre is the wreath’s jewellery. It is small on purpose, and its job is to polish the flower, not to hide the inner petals.
- Fuse interfacing to the 10 cm centre cover circle if you have not already done so.
- Place the centre cover over the inner petal bases and hand-stitch it down securely around the edge with strong thread. This covers all exposed bases and gives you a firm foundation for embellishment.
- Position the 4 cm blush rosette exactly in the centre. Pin it and check from above that it is centred against the inner petal ring.
- Arrange 12–18 pearl-like and antique-gold beads around the rosette, mixing sizes from approximately 6–16 mm. Aim for a compact, balanced cluster — larger beads slightly toward the centre, smaller beads filling gaps.
- Sew each bead securely through the centre cover and into the support base underneath. Knot securely between beads or every two beads.
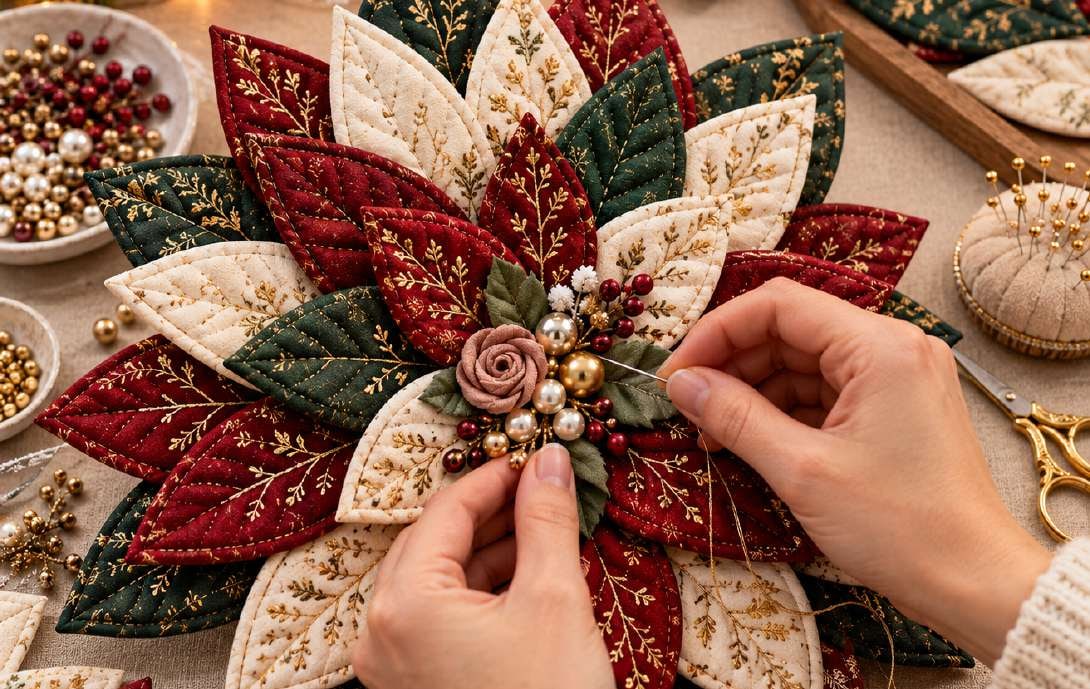
Design rule: Keep the cluster compact. If beads spread wider than about 7 cm, the centre starts competing with the inner petals. A smaller, denser cluster reads as more premium.
Safety: Use strong thread and knots between beads. Avoid glue-only attachment for heavier beads on a hanging wreath — doors move, temperatures change, and a glued bead on a front door is a bead on the doorstep by January.
Check: The rosette is centred, bead sizes feel balanced, and no loose thread tails remain visible.
Step 9 — Finish the Back + Hanging Loop
A wreath that looks finished from behind is a wreath you can gift, sell and hang with confidence. The back of this design is deliberately plain and neat.
- Make the strap: fold the 5 x 24 cm hanging strip lengthwise, press the raw edges inward, and topstitch both long edges to form a clean narrow strap.
- Form a loop. Centre it at 12 o’clock on the back, directly above the 12 o’clock placement mark.
- Overlap at least 4 cm (1.6 in) of each strap end onto the support base.
- Secure with a boxed-X stitch — a small rectangle with a diagonal cross inside it — through the strap ends and the support circle. This stitch tolerates door movement much better than a single straight line.
- If you prefer a fully covered back, hand-stitch the backing/cover circle over the centre of the back to hide remaining assembly stitches. The original design keeps the covered support circle itself as the finished back, so this is optional.
Load test: Before gifting or photographing, hang the wreath for at least 10 minutes on its final hook and confirm the loop does not pull away from the base and the flower front faces forward without twisting.
Check: The wreath hangs straight, the back looks tidy, and no raw edges or wire ends are exposed.
Door-hook note: Keep the loop short enough that the wreath does not drop too low on a standard over-door hook. A loop that finishes 7–9 cm above the wreath top usually sits at eye-pleasing height on a standard door.
Troubleshooting + Quick Fixes
Most first-wreath issues are placement issues, not sewing issues. Catch them before the centre cover goes on and they take seconds to fix.
| Problem | Likely cause | Fix |
|---|---|---|
| Wreath looks oval | Petal bases drifted | Reposition before centre cover |
| Petal points floppy | Batting too soft | Add interfacing in point |
| Wreath too bulky | Batting too thick | Use low-loft, reduce overlap |
| Layers look flat | Tiers aligned directly | Offset points between layers |
| Centre looks crowded | Too many beads/fillers | Remove some, show inner petals |
| Wreath tilts | Loop off-centre | Move loop to true 12 o’clock |
A note on oval wreaths: The most common cause is pinning one side of the table more tightly than the other over a long pinning session. If the diameter measures more than 1.5 cm different between the 12–6 and 3–9 axes, unpin one quarter of the outer layer, ease the bases back toward the clock marks, and re-pin.
A note on floppy tips: Very soft or high-loft batting can make long outer points droop after a week of hanging. On future petals, slip a narrow strip of the firm woven interfacing inside the point area before sewing. For a finished petal, a tiny hand stitch through the tip and base on the back can coax it back into line.
Final Quality Checklist
Run through this list before you photograph, gift or list your wreath:
- Outer silhouette is circular and balanced at arm’s length.
- All petal points are smooth, intact and evenly padded.
- Quilting lines are even and all thread tails are trimmed.
- Sage leaves remain secondary to burgundy and ivory petals.
- Centre rosette is centred; beads are secure and compact.
- Back cover is neat; hanging loop is reinforced with a boxed-X.
- Wreath has passed a 10-minute hanging test and faces forward.
Hang it, step back to doorway distance, and look once more. That is the distance your guests, customers and gift recipients will judge it from — and it is also the distance where four offset layers, quiet sage and that small bead centre really earn their keep.
Care, Display Ideas + Licence
Care: Spot clean only with a barely damp cloth. Store flat or in a wide wreath box, points protected, away from crushing and damp. Keep away from open flame and high heat. Fabric wreaths on doors behind storm doors can get surprisingly warm in direct sun; a shaded or covered porch will keep burgundy rich for many more seasons.
Where it works beautifully:
- A front door with a simple brass or matte-black hook and no competing bow.
- Above a mantel, centred over greenery with candles kept well clear of the fabric.
- On a living-room or hallway wall as the single holiday focal piece.
- As a handmade wedding-winter, housewarming or hostess gift with a handwritten care note.
Licence: Personal use and small-scale handmade selling of finished wreaths are allowed. Redistribution or resale of the digital pattern files is not allowed. If you sell finished wreaths, crediting the pattern in your listing description is appreciated and helps buyers understand the design’s handmade construction.
Frequently Asked Questions
Can I make the wreath smaller for an apartment door or candle ring? The templates are designed for a 46 cm wreath. For a smaller result, print templates at 80–85% and confirm the calibration squares shrink proportionally before cutting. Reduce bead size in the centre as well, or the cluster will dominate the smaller flower.
Can I use velvet or satin for a more formal version? Yes, with care. Velvet makes luxurious winter petals but is thicker at the point and shows every pressing mark. Cut batting slightly inside the seam line, turn points very gently and press from the back with a needle board or a thick towel underneath. Satin tends to fray; finish seam allowances and handle points minimally while turning.
What if I do not have a blush rosette? A small covered button in burgundy or ivory, a cluster of beads without a rosette, or a tiny fabric yo-yo in a muted floral all work as centre substitutions. Keep the centre 3–5 cm across and compact. A large ready-made bow changes the entire character of the piece toward novelty, which this design deliberately avoids.
Is this wreath suitable for outdoor use? It is a fabric wreath designed for a covered door, porch or indoor wall. It is not waterproof. If your door is fully exposed to rain or strong direct sun, hang it for occasions and bring it in afterwards, or choose indoor display.
How do I batch-make efficiently? Complete one wreath fully, then batch in stages: print or trace reusable templates, cut all units for 3–4 wreaths in one session, sew one size at a time, quilt in batches while listening to something good, and assemble one wreath at a time so bases stay accurate. Most makers find the second wreath noticeably faster and the third genuinely rhythmic.
One finished wreath is all it takes to understand why this palette works. Sew the first petal, quilt its veins, and watch a simple stack of burgundy and ivory fabric turn into something that looks considered and expensive. Finish the ring, keep the centre small, hang it at 12 o’clock — and enjoy the quietest, most elegant poinsettia on the street.
The box below contains an Etsy link. If you buy through it, we may earn a small commission at no extra cost to you. Learn more.
No time to make one?
Find handmade quilted fabric poinsettia wreaths from independent makers on Etsy.
Browse on Etsy (opens Etsy in a new tab)