Celestial fabric angel ornament sewing pattern
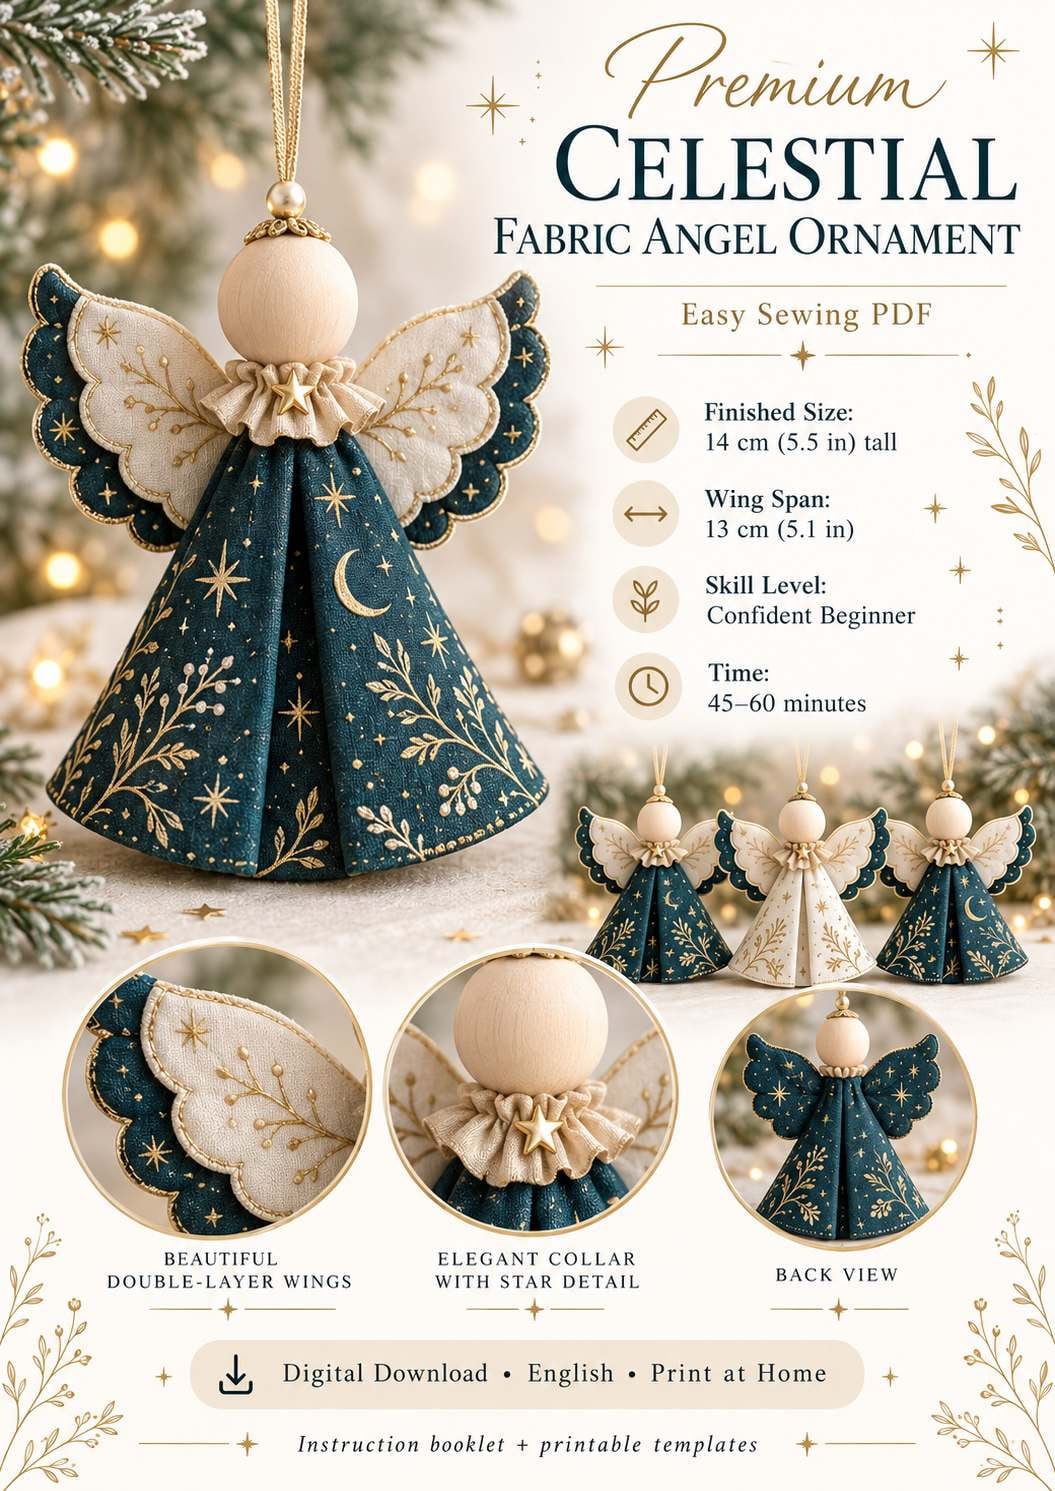
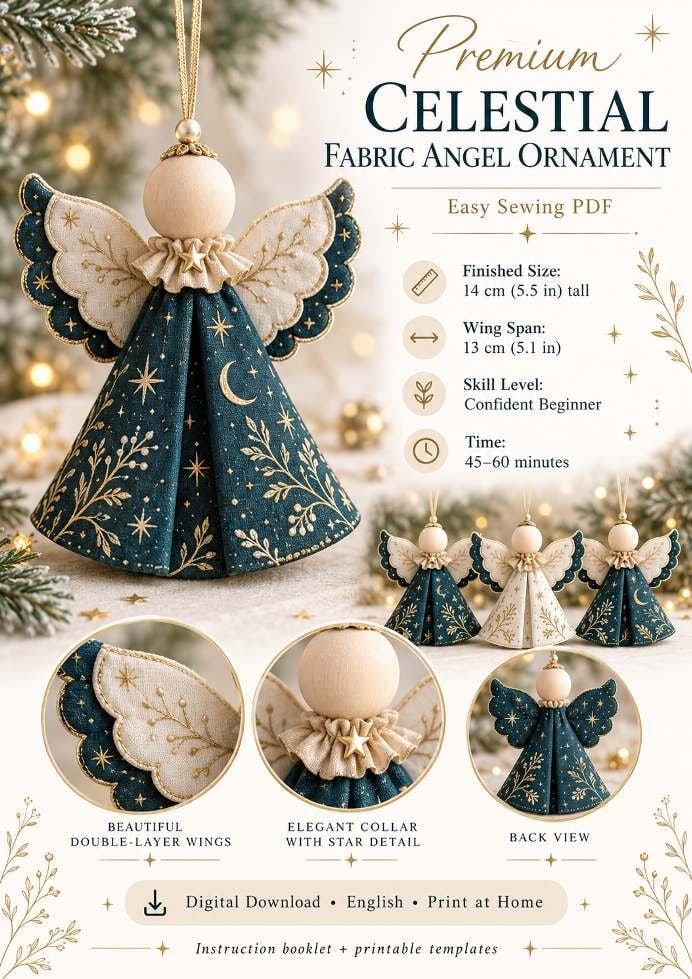
A softly flared bell body in deep teal celestial print, double-layer scalloped wings in teal and pearl ivory, a gathered champagne collar with a gold star, and a faceless wooden bead head. No face painting, no stuffing, no complicated shaping.

Christmas · Sewing
- Finished height
- 14 cm / 5.5 in, excluding the loop
- Wing span
- 13 cm / 5.1 in
- Seam allowance
- 6 mm / ¼ in, included
- Making time
- 45–60 minutes after cutting
- Skill
- Confident beginner
- Stuffing
- None required
In this post
If you love handmade Christmas decor that feels elegant rather than novelty, this little angel is made for you. The celestial print — stars, moons and delicate gold botanicals on deep teal — gives her a calm, premium feel that works from early December right through winter, and at 14 cm tall she sits happily on a tree branch, a gift topper, a garland or a nursery mobile.
If you can sew a 6 mm seam, clip a curve, turn a small shape and topstitch 2–3 mm from an edge, you can make her. She is batch-friendly too, once you have made your first practice angel from scrap cotton.
Before you begin
- Read the complete instructions before cutting
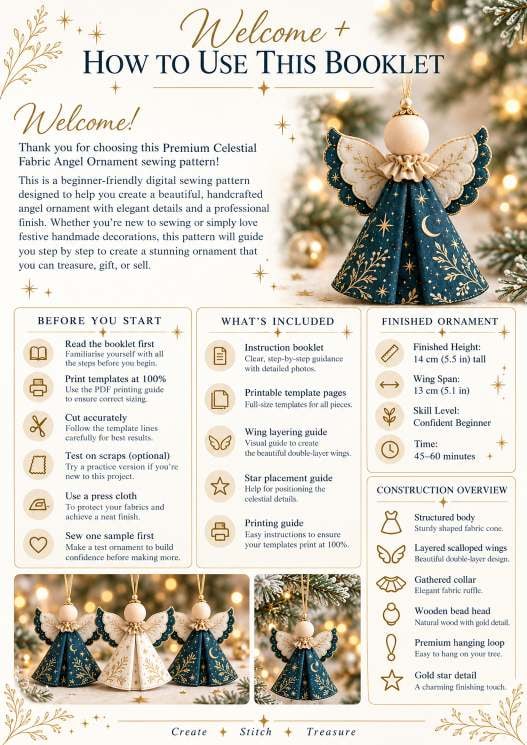
- Print the templates at 100% / Actual Size — turn off Fit, Shrink and Scale to Fit
- Measure both calibration squares before cutting fabric
- Press fabrics first and test fusible interfacing on a scrap
- Use a Universal 80/12 needle, matching thread and a press cloth
- Make one practice ornament from scrap cotton before producing a batch
Key terms: RST right sides together · WST wrong sides together · SA seam allowance · standard SA 6 mm / ¼ in, already included · topstitch 2–3 mm from the finished edge.
Recommended order: print → cut and fuse → body → outer wings → inner wings → layer wings → collar → loop and bead → attach wings → close top → star → final press and check.
Materials & tools
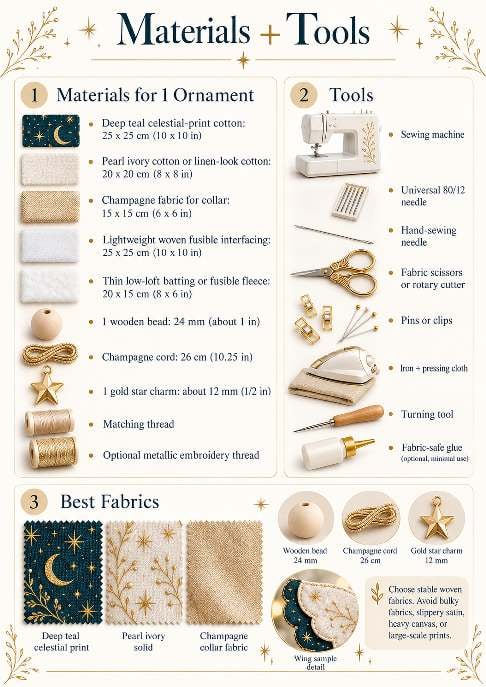
| Material | Size / quantity |
|---|---|
| Deep teal celestial-print cotton | 25 × 25 cm / 10 × 10 in |
| Pearl ivory cotton or linen-look | 20 × 20 cm / 8 × 8 in |
| Champagne collar fabric | 15 × 15 cm / 6 × 6 in |
| Lightweight woven fusible interfacing | 25 × 25 cm / 10 × 10 in |
| Thin low-loft batting / fusible fleece | 20 × 15 cm / 8 × 6 in |
| Smooth wooden bead | 1 × 24 mm / about 1 in |
| Champagne cord | 26 cm / 10.25 in |
| Gold star charm | 1 × about 12 mm / ½ in |
| Sewing thread | Matching; metallic optional |
Tools: sewing machine with a Universal 80/12 needle, hand-sewing needle, scissors or rotary cutter, pins or clips, ruler and removable fabric marker, iron and press cloth, a blunt turning tool, and fabric-safe glue for a tiny secondary tack only.
Fabric choice: use stable lightweight woven cotton, cotton poplin or linen-look cotton, in small-scale prints. Avoid heavy canvas, bulky fleece, slippery satin and oversized motifs — they distort small scallops and make the tiny wing curves bulky.
Printing & templates
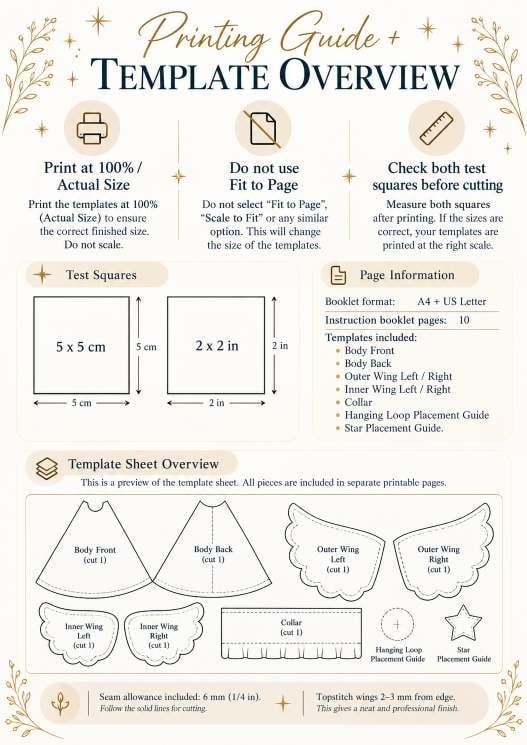
Open the PDF in a standard reader and select 100% / Actual Size. Do not select Fit to Page, Shrink, Scale to Fit or borderless enlargement. Print the calibration page first and measure the 5 × 5 cm square and the 2 × 2 in square with a rigid ruler. If either is wrong, stop and correct the printer scaling before cutting — a few millimetres of error changes the wing fit and the finished height.
The template set: Body Front and Body Back · Outer Wing Left + Right · Inner Wing Left + Right · Collar strip · hanging loop placement guide · star placement guide. Seam allowance is already included, and dashed lines mark the grainline.
Cutting guide
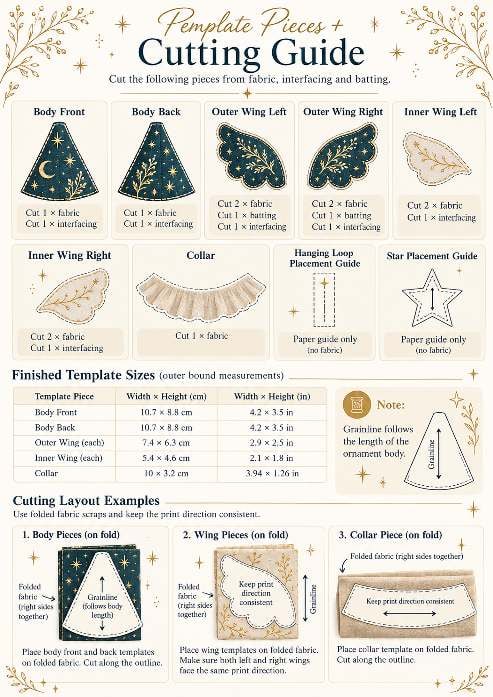
| Piece | Cut |
|---|---|
| Body Front | 1 fabric + 1 interfacing |
| Body Back | 1 fabric + 1 interfacing |
| Outer Wing Left | 2 teal fabric + 1 interfacing + 1 batting |
| Outer Wing Right | 2 teal fabric + 1 interfacing + 1 batting |
| Inner Wing Left | 2 ivory fabric + 1 interfacing |
| Inner Wing Right | 2 ivory fabric + 1 interfacing |
| Collar | 1 champagne, 10 × 3.2 cm |
Cutting rules: keep the body grainline parallel to the lengthwise grain; mirror left and right wings; keep directional motifs upright and consistent; fuse interfacing to one fabric layer only for each finished wing; and mark centre top, wing root, turning gap and Body Front centre before sewing.
Outer bound sizes: body 10.7 × 8.8 cm, outer wing 7.4 × 6.3 cm, inner wing 5.4 × 4.6 cm. The collar is a simple strip, 10 × 3.2 cm (3.94 × 1.26 in).
Roadmap & control values
| Control | Value |
|---|---|
| Main seam allowance | 6 mm / ¼ in |
| Wing topstitch | 2–3 mm from edge |
| Body pleat | About 8 mm total intake |
| Visible collar height | About 1–1.2 cm / ⅜–½ in |
| Outer wing turning gap | About 2.5–3 cm at the root |
| Inner wing gap | About 2–2.5 cm at the root |
| Topstitch length | 2.8–3.0 mm |
Keep these values beside your machine and use them throughout. If an illustrative image looks different, the written control values and the printable templates take priority.
The sewing steps
-
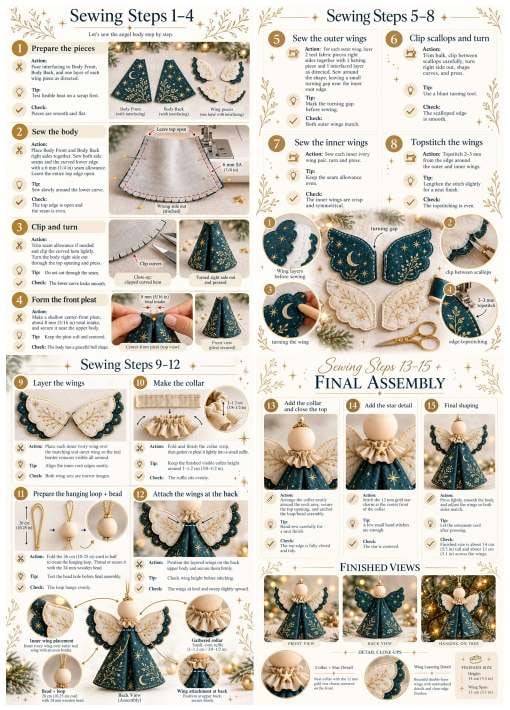
Step 1: Prepare, sew and shape the body (steps 1–4)
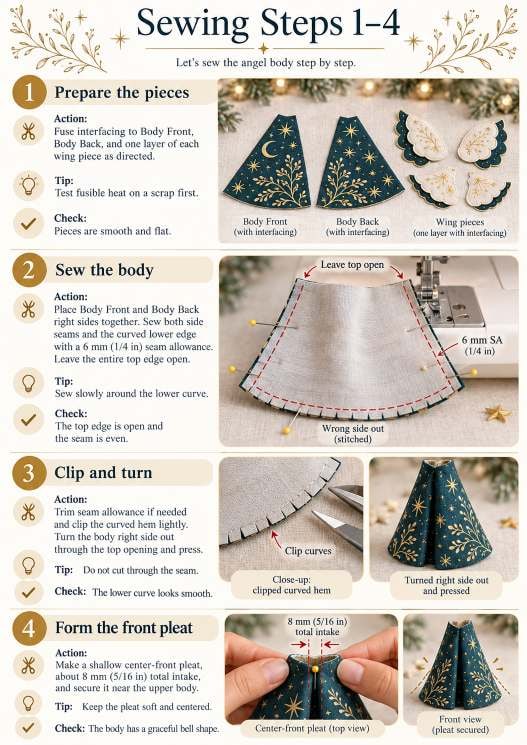
Prepare and fuse. Fuse lightweight interfacing to the wrong side of Body Front, Body Back and the designated wing layers using the manufacturer's heat setting. Press, do not slide the iron, and let the pieces cool flat. Check: no bubbles, shrinkage or warped edges.
Sew the body. Place Body Front and Body Back right sides together, aligning the side edges and curved hem. Sew both sides and the whole lower curve at 6 mm, leaving the entire top edge open, and backstitch at both top corners. Sew slowly around the lower curve for an even bell shape.
Clip, turn and press. Trim bulky areas only if needed, clip the lower curved seam at regular intervals stopping just before the stitch line, then turn through the top. Smooth the curve with a blunt turning tool and press with a cloth. Check: the lower edge is smooth, with no points or puckers.
Form the front pleat. Mark the centre front and form a shallow vertical pleat with about 8 mm total intake. Secure it only near the upper body — about the top 10–15 mm — so the lower body can flare softly, then press lightly.
-
Step 2: Sew the double-layer wings (steps 5–8)
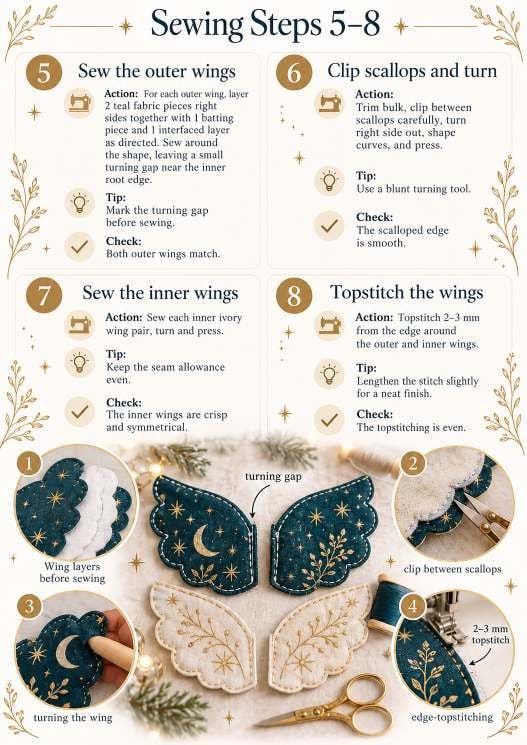
Outer wing sandwich. For each outer wing, place 2 teal pieces right sides together — one already carrying interfacing — and add 1 thin low-loft batting layer against the wrong side of one fabric layer. Pin carefully and sew around at 6 mm, leaving a 2.5–3 cm turning gap on the straight root edge. Mark the gap before sewing so you do not close it by accident.
Clip scallops and turn. Trim the seam bulk and clip deep into every inward valley between scallops without cutting the stitches, adding small V-notches to bulky outward curves if needed. Turn through the root gap, shape each scallop with a blunt tool — not scissors or a sharp point — and press gently through a cloth.
Inner wings. Sew each ivory pair right sides together at 6 mm, leaving a 2–2.5 cm root gap. No batting is used. Clip the curves, turn, shape and press. Check: left and right mirror each other and the seam allowance stays even all the way around.
Topstitch and close gaps. Turn the gap allowances inward and topstitch every wing 2–3 mm from the finished edge at a 2.8–3.0 mm stitch length. The topstitch closes the gap — keep the line smooth around every scallop.
-
Step 3: Layer, collar, loop and attach (steps 9–12)
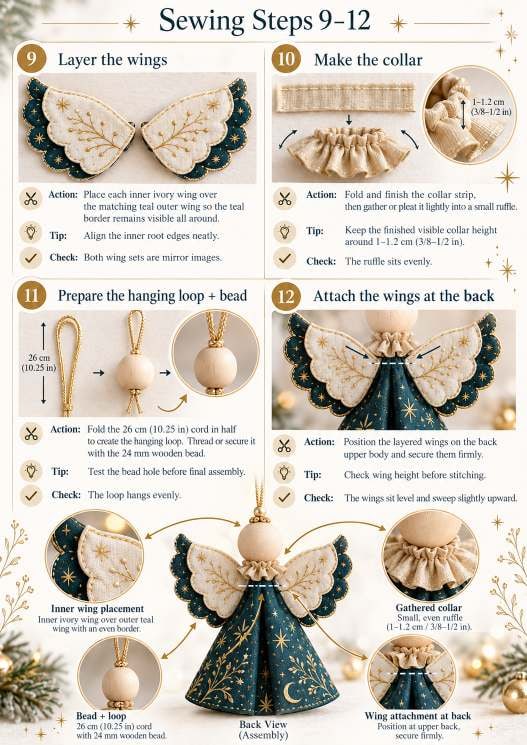
Layer inner over outer wings. Centre each ivory inner wing on its matching teal outer wing, leaving an even teal scalloped border visible all around. Align the root edges and tack the two layers together only at the root, where the stitches will later be hidden.
Make the gathered collar. Neaten or turn under the short ends of the 10 × 3.2 cm champagne strip, finish the long edges to suit your fabric, then sew a long gathering stitch near one long edge. Pull gradually until the collar fits around the body top, aiming for 1–1.2 cm of visible ruffle height, and distribute the gathers evenly.
Prepare loop and bead. Cut 26 cm of cord and fold it exactly in half. Test it through the hole of the 24 mm bead, thread the loop through, and keep both cut ends equal below the bead. Use a compact hidden knot if the hole permits, or bind and stitch the ends together securely.
Attach the wings. Place both finished wing units on the upper Body Back, root edges meeting near the vertical centre and tips sweeping slightly upward. Check symmetry from the front and back, then stitch the roots firmly with reinforced machine stitches or dense hand stitches. Never rely on glue for the wing attachment.
-
Step 4: Close the top, add the star and press (steps 13–15)
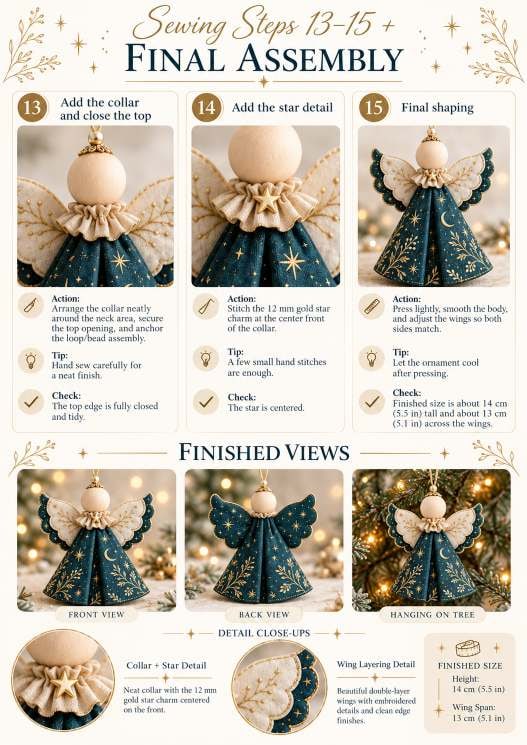
Secure the cord and close the body top. Insert the two equal cord ends between Body Front and Body Back at the centre top, fold the raw top edges inward about 6 mm, and hand-stitch the opening closed with small strong stitches, catching the cord ends securely inside. Tug the loop gently to confirm it cannot pull out.
Attach the collar. Wrap the gathered collar evenly around the closed top, under the bead, and join the ends at the back with hidden stitches. Add several tiny anchoring stitches from the collar into the body top so the ruffle cannot rotate, keeping the gathers balanced on both sides of the front pleat.
Add the star. Position the 12 mm gold star at the exact centre front of the collar and stitch through the charm loop with strong matching or metallic thread, knotting on the hidden side. A tiny glue dot may be used only as secondary stabilisation. The star should sit centred, not pulled tight.
Final shape and hanging test. Press the body lightly through a cloth, avoiding direct heat on the bead, charm and cord. Re-shape the pleat and wings, then hang the ornament for several minutes: it should hang vertically with the bead centred, the collar level and the wings at matching height. If the angel twists, re-open the top stitching and equalise the two cord ends before re-closing.
Target size: 14 cm / 5.5 in tall excluding the loop, 13 cm / 5.1 in across the wings.
Variations
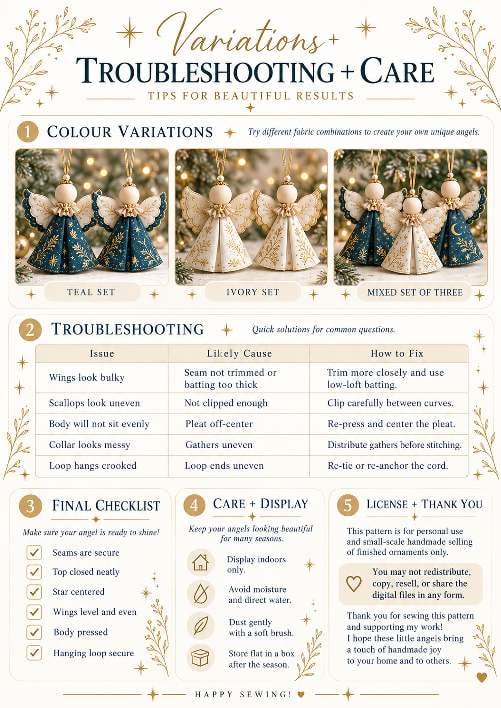
- Teal set: keep the deep teal celestial body and outer wings with pearl ivory inners for the classic look.
- Ivory set: swap to an ivory or cream celestial print for the body and use a soft gold or champagne outer wing for a lighter, vintage feel.
- Mixed set of three: make one teal, one ivory and one reversed — teal inners over ivory outers — and hang them as a trio. The shared gold star and champagne collar tie the set together.
Keep the print scale small on every variation; large motifs disappear into the seams and distort the scallops. If you change the collar fabric, keep it lightweight so the gathers stay soft at 1–1.2 cm visible height.
Troubleshooting
| Issue | Likely cause | How to fix |
|---|---|---|
| Wings look bulky | Seam not trimmed or batting too thick | Trim allowances closely, use thinner low-loft batting |
| Scallops look uneven | Not clipped enough | Clip carefully deeper into the valleys, reshape and press |
| Body leans or will not sit evenly | Pleat off-centre | Re-press and centre the front pleat, check the side seams match |
| Collar gathers look uneven | Gathers unevenly distributed | Loosen the collar join, redistribute the gathers, re-stitch |
| Loop hangs crooked | Cord ends unequal | Re-open the top, equalise the ends, re-anchor evenly |
| Inner wing shifts | Root tacking too light | Add 2–3 hidden root stitches |
| Star tilts | Stitches off the charm loop | Reposition the stitches at the loop and re-centre |
Most fixes are simple re-pressing, re-clipping or redistributing rather than re-sewing. Always use a press cloth, avoid direct heat on the bead, charm and cord, and let the ornament cool fully so the pleat and scallops hold their shape.
Care, display & final checklist
Display indoors, away from moisture, direct water, candles and open flame. Dust with a clean soft brush and do not machine wash. Store flat in a dry box with tissue between the wings after the season so the scallops and collar keep their shape for next year. At 14 cm tall she is light enough for most tree tips, shelf hooks and gift bows, and works just as well tied to a wrapped present or set at a table place.
- Body seams secure
- Top closed neatly
- Cord secure — the loop does not pull out
- Bead centred
- Collar even, gathers balanced
- Star centred at the front
- Wings level, roots firmly stitched
- No loose threads
- Final press complete
- Hanging test passed — hangs straight without twisting
The box below contains an Etsy link. If you buy through it, we may earn a small commission at no extra cost to you. Learn more.
No time to sew one?
Find handmade fabric angel ornaments from independent makers on Etsy.
Browse on Etsy (opens Etsy in a new tab)